
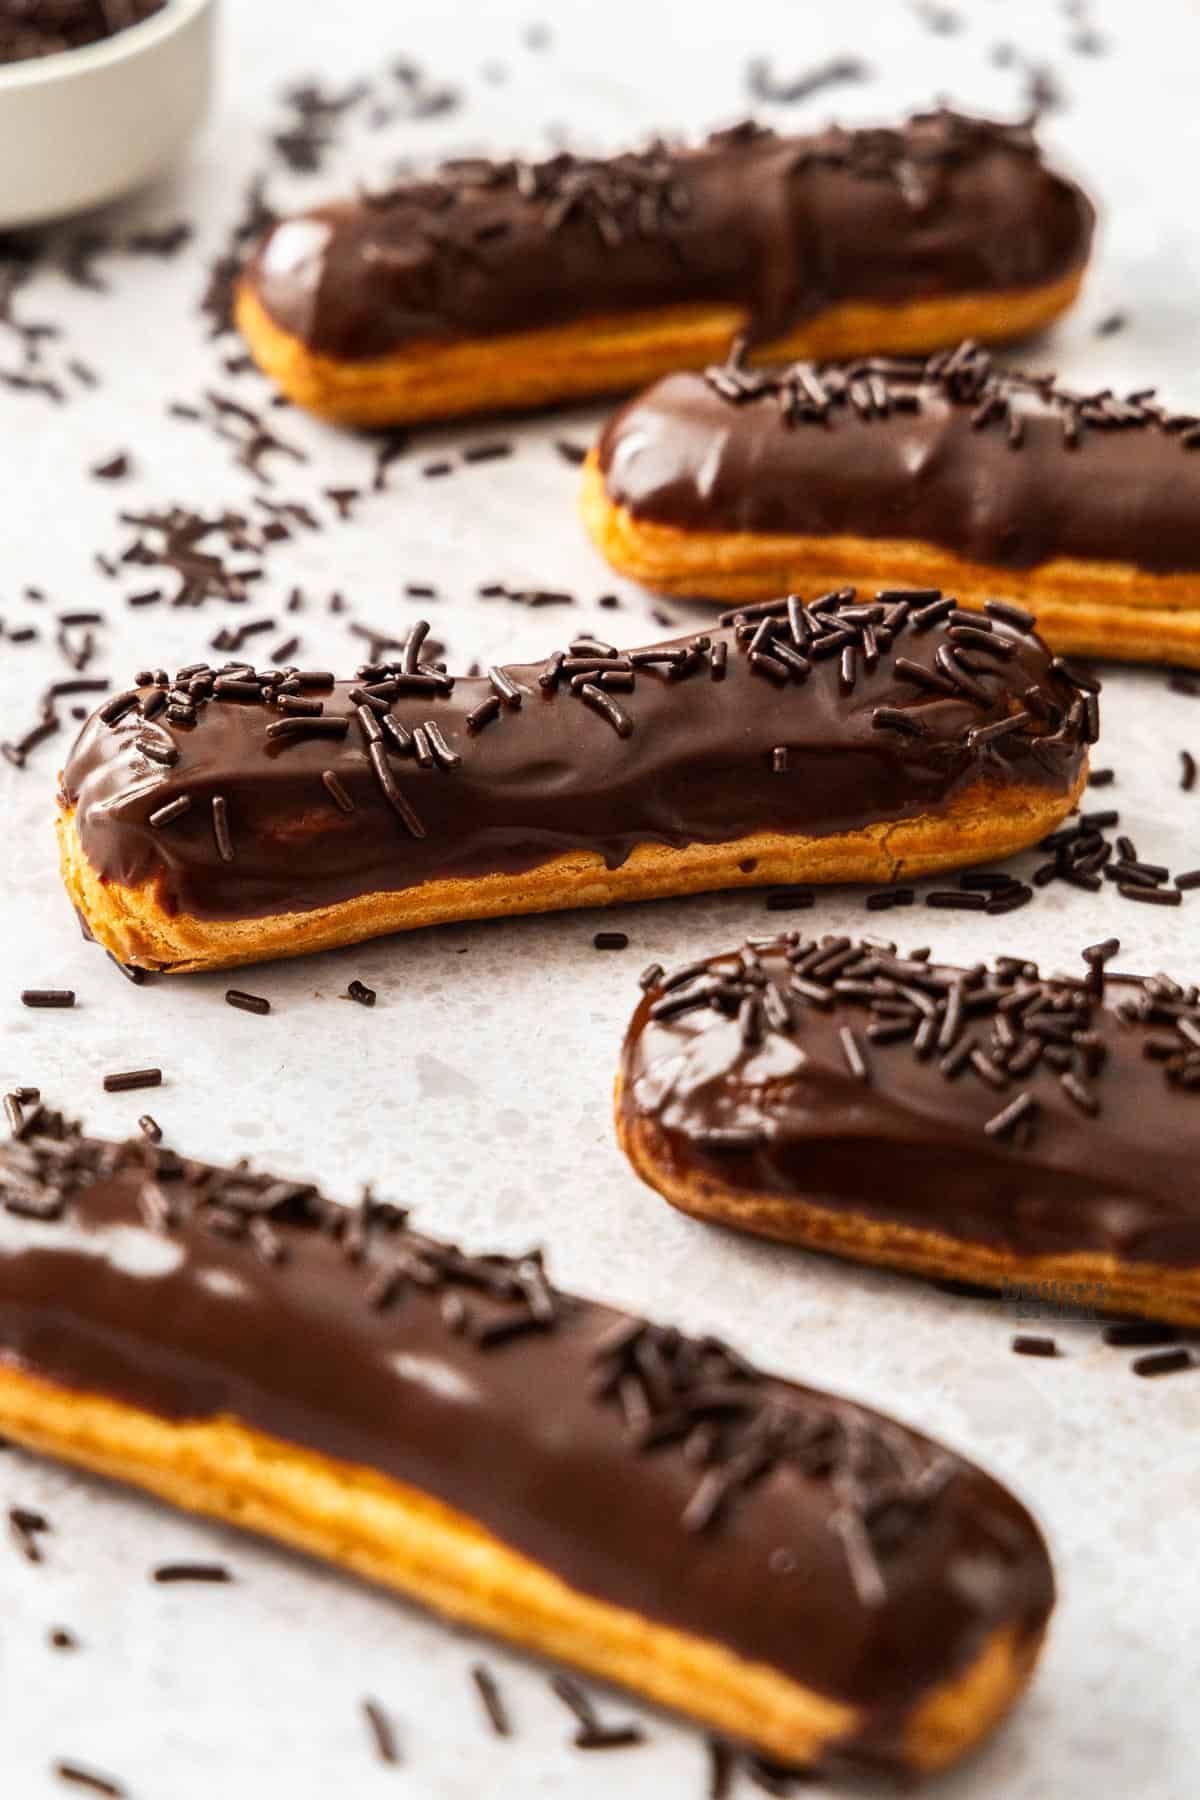
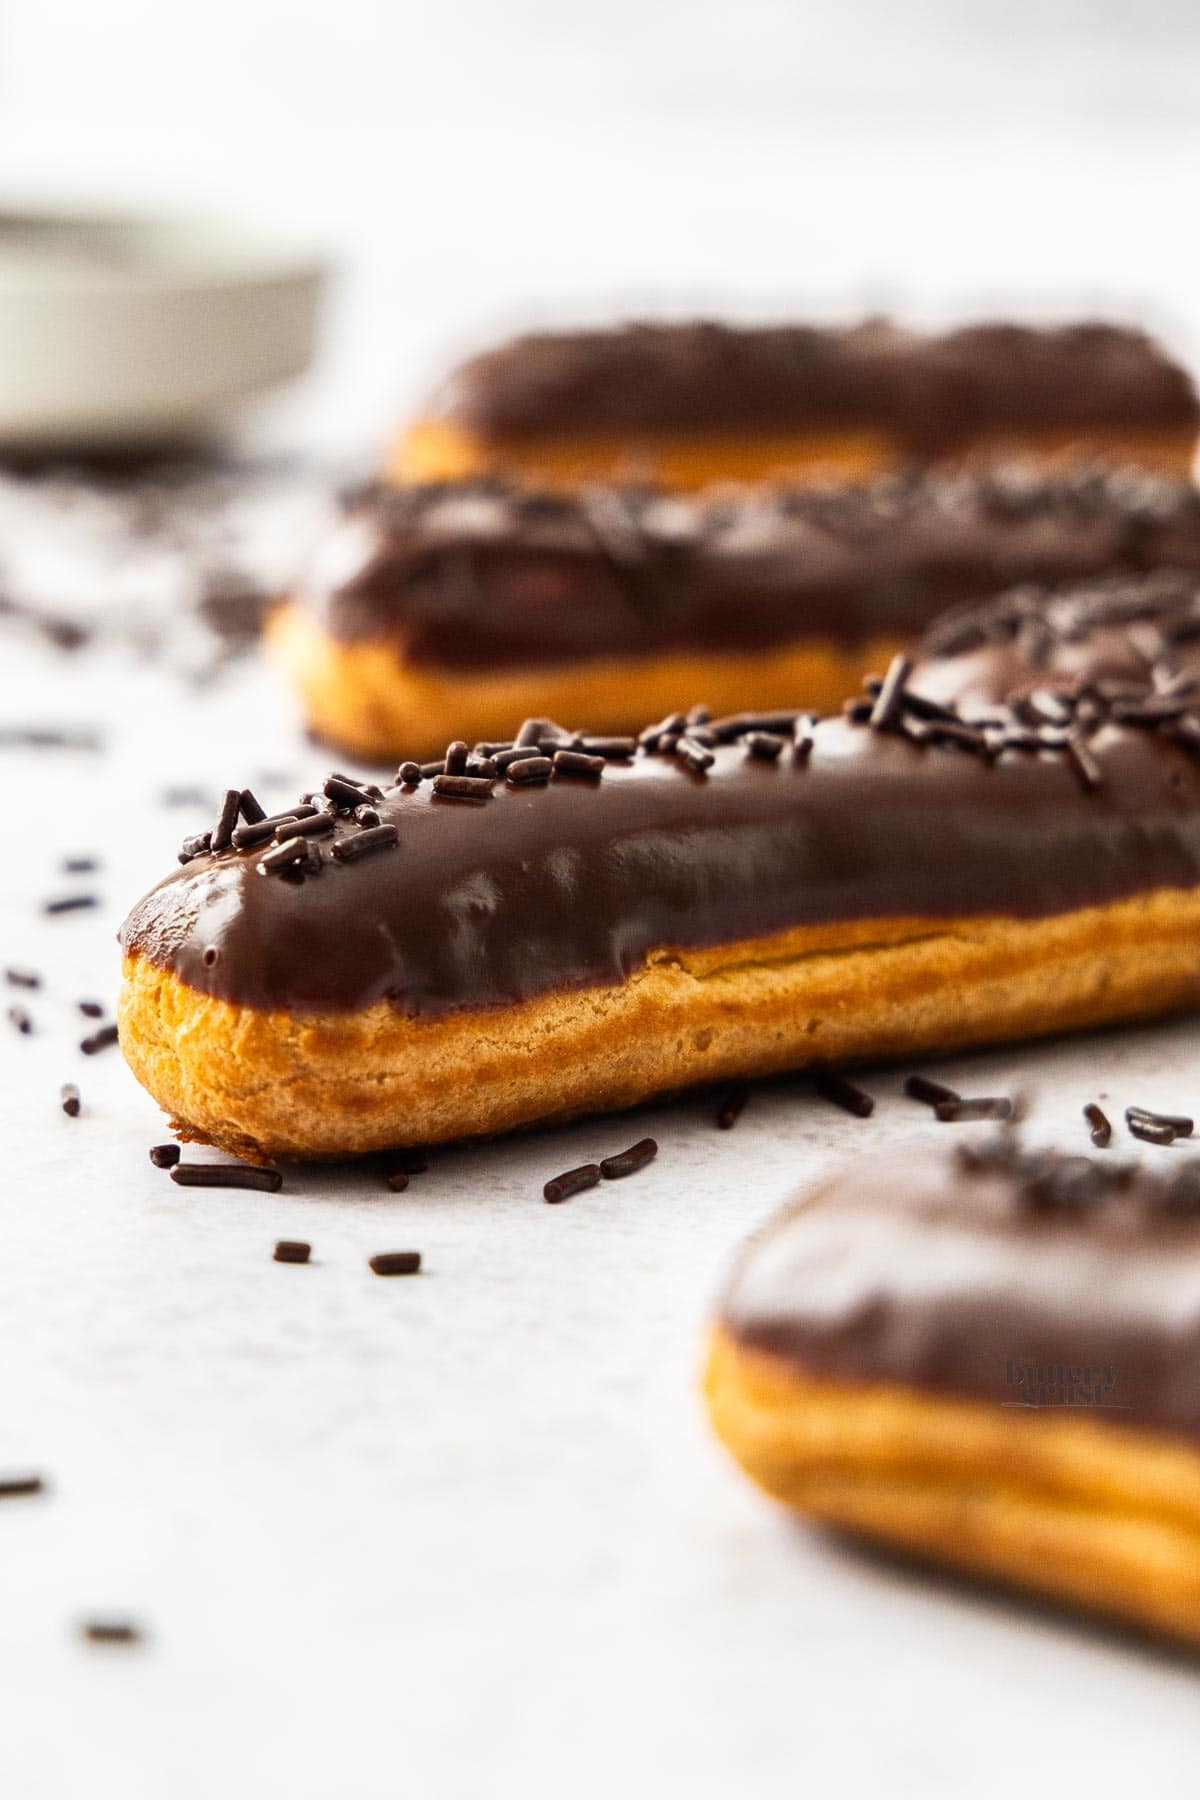
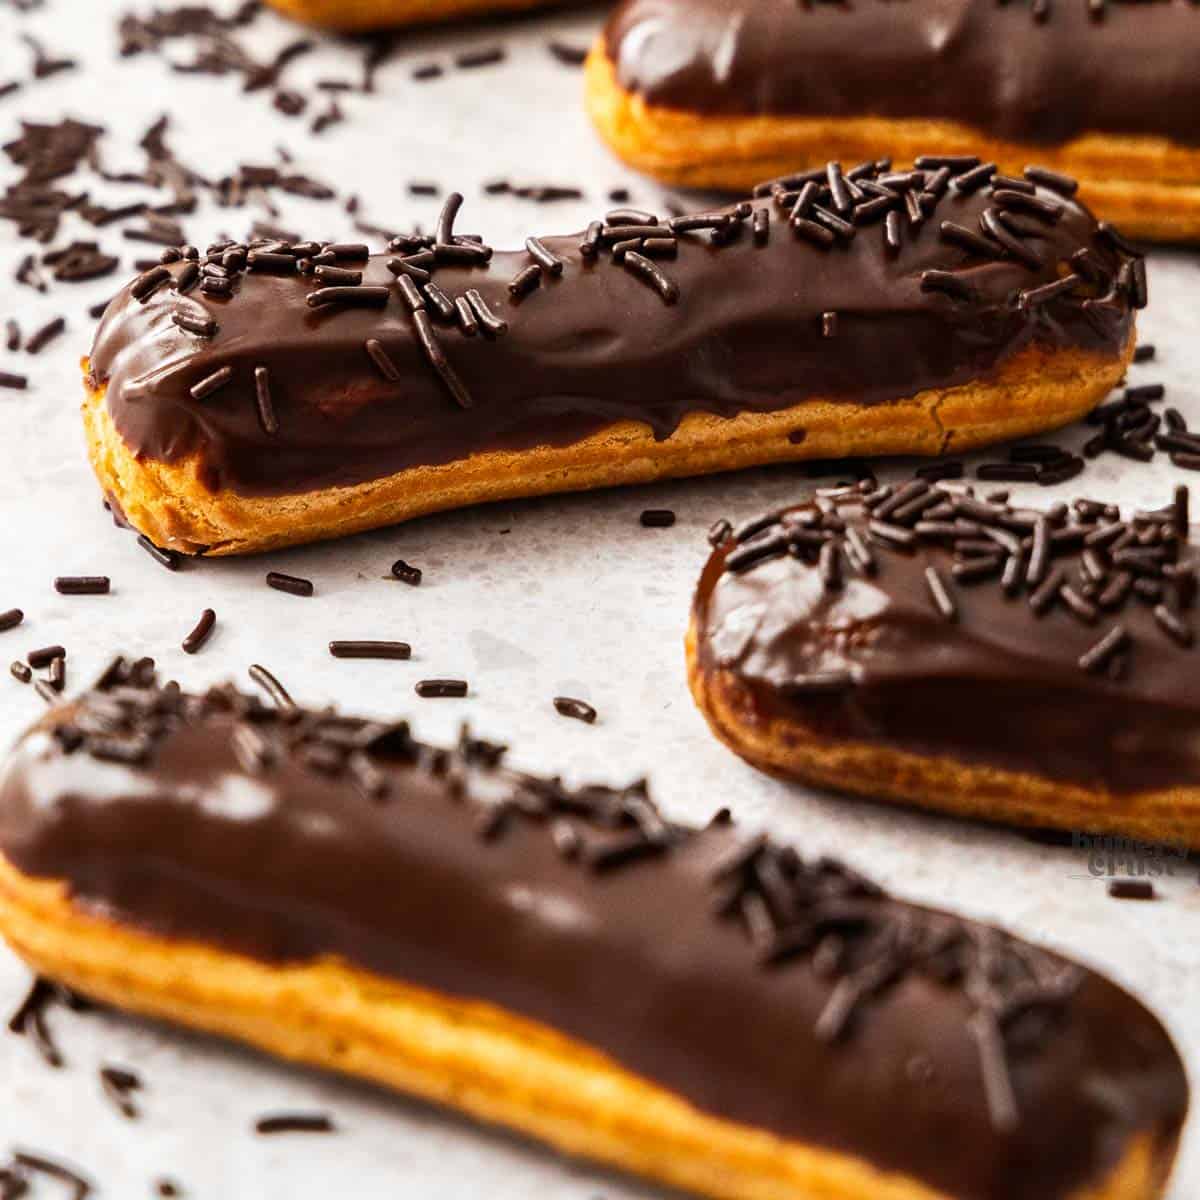
If you've ever wanted to make chocolate eclairs at home, this is the recipe you need. With crisp, choux pastry shells, luscious vanilla pastry cream and glossy chocolate glaze, these eclairs feel wonderfully impressive without being out of reach. I'll guide you through each component so you can create a beautiful batch at home.
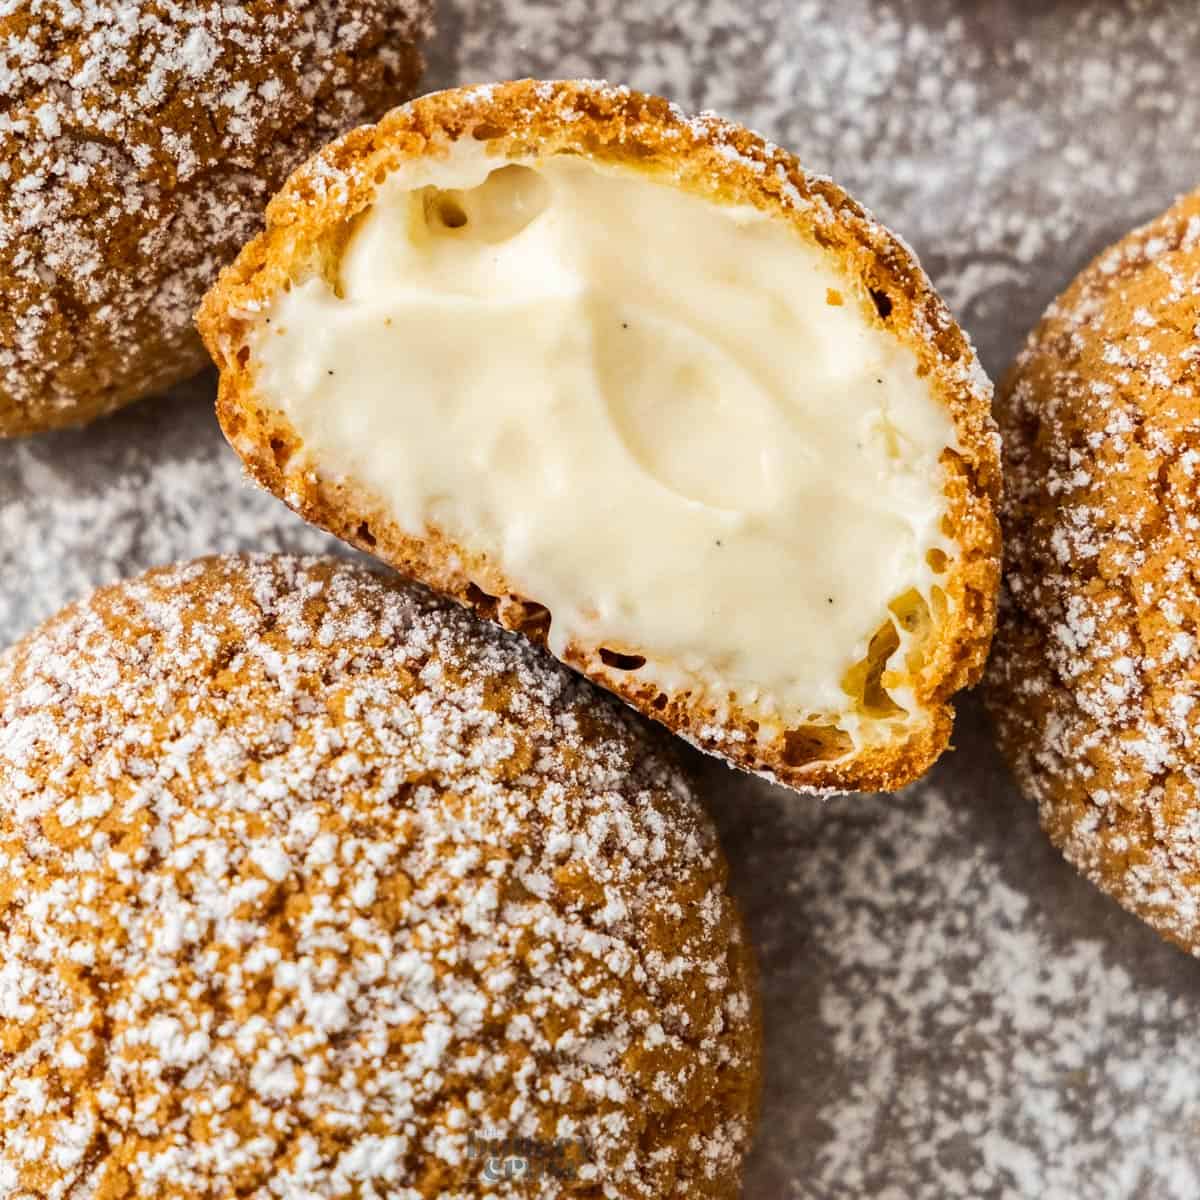
The finished eclairs are everything they should be - light shells with a delicate crispness, a creamy vanilla centre and rich chocolate topping that brings it all together. They look elegant, taste scrumptious and best of all, are completely worth the effort.
Never Miss a Recipe!
Get the latest recipes straight to your inbox!
Jump to:
- ❤️ Why this recipe works
- Before you start...
- Ingredients & substitutions
- How to make chocolate eclairs
- Make the eclair shells
- When is choux pastry ready - the visual cues
- How to make pastry cream
- The chocolate glaze
- Assembling your chocolate eclairs
- Tips and tricks
- Tools I use
- 😥 Troubleshooting
- Variations
- Storage
- ❓FAQs
- More recipes you'll love
- Chocolate Eclairs
- 💬 Comments
❤️ Why this recipe works
- Three classic components - crisp eclair shells, smooth vanilla pastry cream, glossy chocolate glaze.
- Tried and tested recipe - tested over, and over, and over so I know it will work for you every time.
- More beginner-friendly than it looks with all the tips and tricks you need to make perfect eclairs at home.
- No combo oven temperature: I prefer to use just one temperature throughout the cooking - no preheating at one temp and turning it down, since every oven cools at a different rate.
- Can be made in stages if you need to make them around other things.
- I show you how to fill the eclairs properly so each one is fully stuffed with delicious pastry cream.
Before you start...
Eclair shells can take a little practice to master, so don't be discouraged if your first batch isn't perfectly smooth or even. A few bumps or cracks are completely normal, and they'll taste incredible once filled with pastry cream and topped with chocolate glaze. As long as they're light and hollow you're on the right track.
This post has the tips and troubleshooting you need but for an even deeper dive on any of the components, I have a dedicated post for each one.
Ingredients & substitutions
- Bread flour works best for eclairs - it's higher protein content provides better structure and helps to prevent cracks. You can use plain flour / all-purpose flour but you may find you get cracks, especially along the bases.
- Eggs: There is no exact quantity of eggs, as choux pastry goes by texture and consistency, which you'll need to judge by eye. I give you all the tips to do that below, and you'll get better at recognising it as you practice. For the pastry cream, you'll only need the yolks, but you can freeze egg whites and use them later for meringue or pavlova or beat one up and fold it into cake batter for a lighter, fluffier cake.
- Milk and water are used in combination for eclairs. The milk just adds a little richness but too much will make the pastry too soft. Milk is also used in the pastry cream and glaze. Make sure to use whole milk for the best flavour.
- Cornflour, aka cornstarch, is a starch most often used to thicken things. Here, it is used to thicken the pastry cream further than the eggs can alone.
- Dark chocolate for the chocolate glaze works best as it balances the sweetness in the chocolate eclairs, whilst being super chocolatey. You could use milk chocolate if you want a sweeter topping.
- Sugar: I use caster sugar (aka superfine sugar, not powdered sugar) in all my baking. It's the one I keep on hand. It's just granulated sugar slightly more finely ground and I like it because it dissolves more quickly and easily into batters and fillings. You can swap it for granulated here if you prefer just take care to make sure it dissolves fully into the milk before proceeding.
- Unsalted butter is the best option here. It contains less water and it also allows you to control the salt level. Since choux is not very sweet at all, it's very easy for it to become savoury if you choose salted butter over unsalted.
- Vanilla extract or vanilla bean paste will give you the best flavour and the latter will give you gorgeous little specks in your pastry cream. Vanilla essence is a synthetic flavouring and doesn't have such a good or bold flavour.
How to make chocolate eclairs
The trickiest part of making these is definitely the eclair shells, but don't worry, if you're a beginner, remember rustic-looking eclairs will still taste incredible, and the more you practice, the easier they become.
- Eclair shells - take 1 hour or so, and benefit from an additional 30 minutes resting time. Need to be cool before filling. Can be made 3-4 days in advance.
- Creme patissiere (aka pastry cream) - takes 15 minutes but needs to be chilled completely before use. Can be made the day before.
- Chocolate glaze - takes just a couple of minutes and benefits from resting for 10 minutes before use.
⬇️Jump to the recipe card for full quantities and instructions.
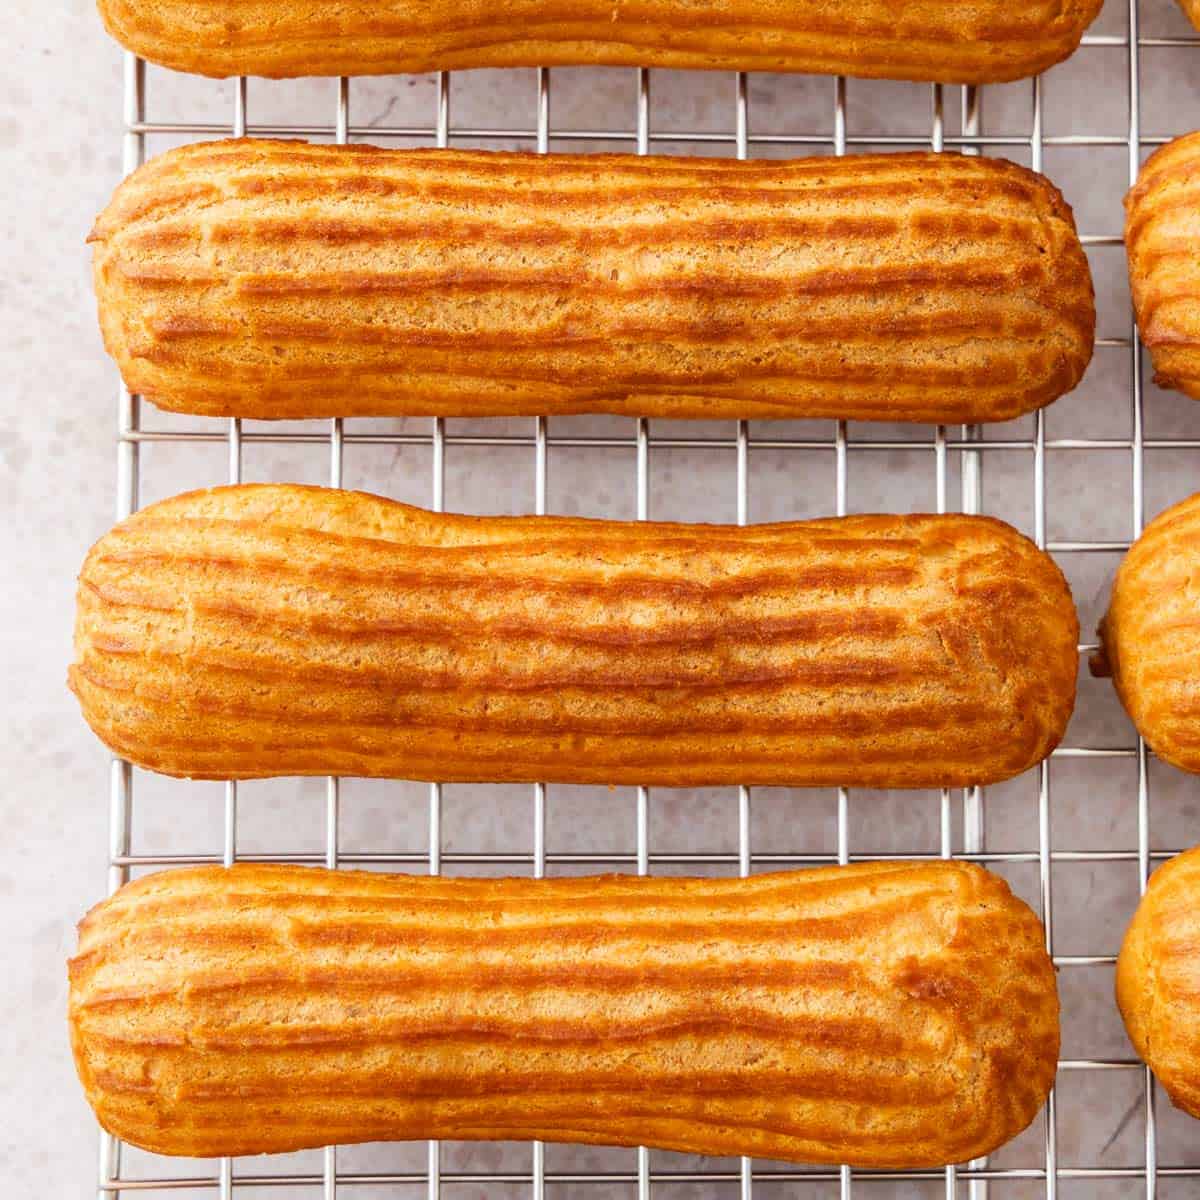
Make the eclair shells
These can be made 3-4 days in advance and stored in the fridge in an airtight container or up to 3 months in advance and stored in the freezer. If you do make them ahead, make sure to re-crisp them in the oven at 180C/350F for 8-10 minutes the cool before filling.
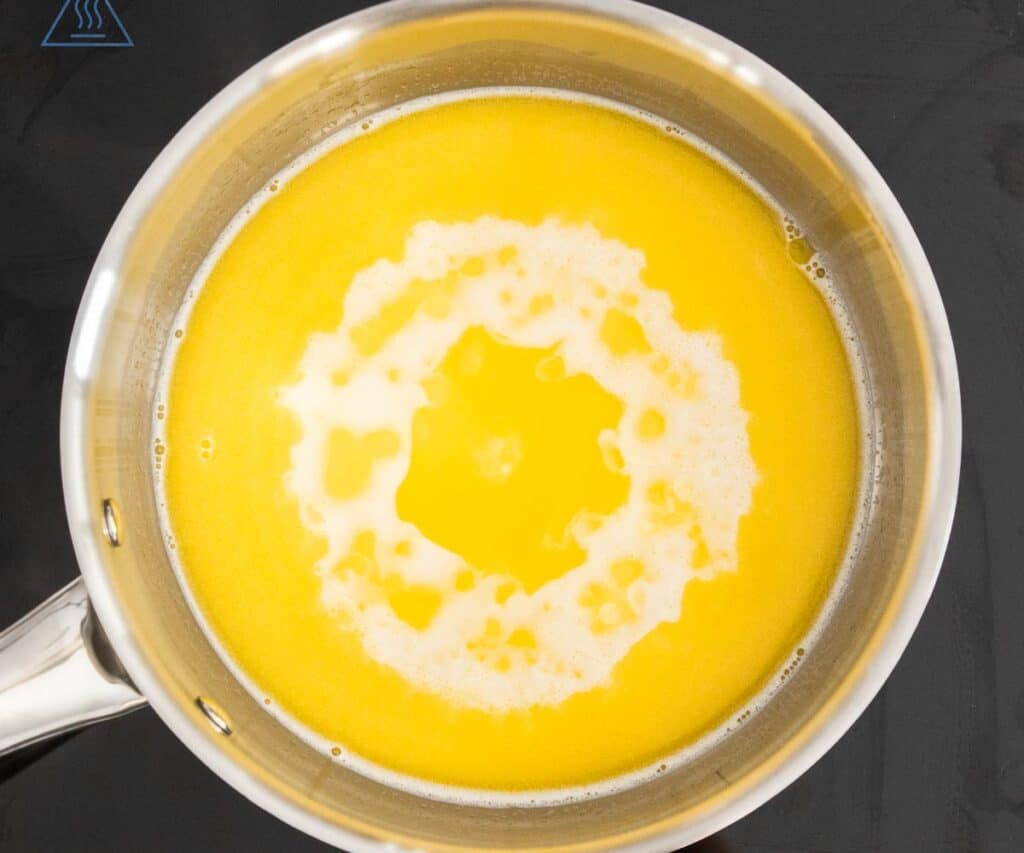
Heat the milk & butter
(2 minutes) Heat butter, milk and water in a medium heavy-based saucepan until melted and it starts to bubble.
Add flour
(1 minute) Immediately turn the heat off and sift in your flour. Mix with a wooden spoon or silicone spatula until you can see no more flour streaks or lumps.
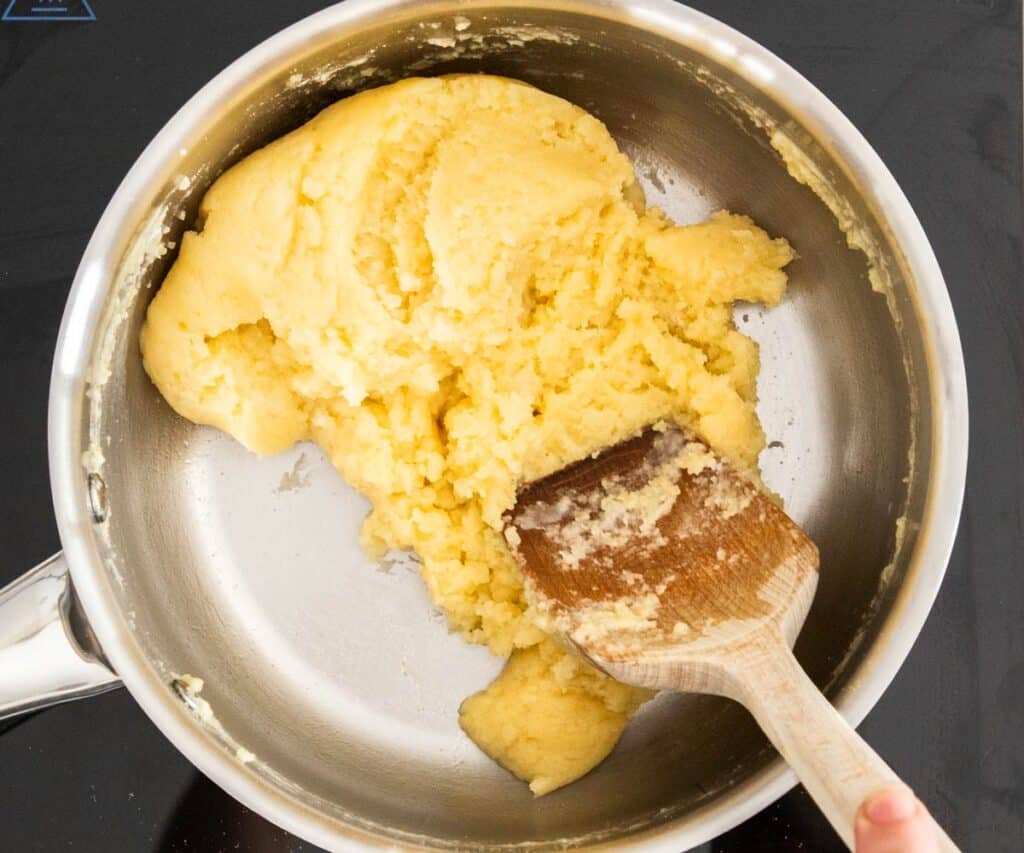
Cook the panade
(2 minutes) Return the pan to low heat and cook for 2 minutes, stirring and folding constantly. This is called the panade.
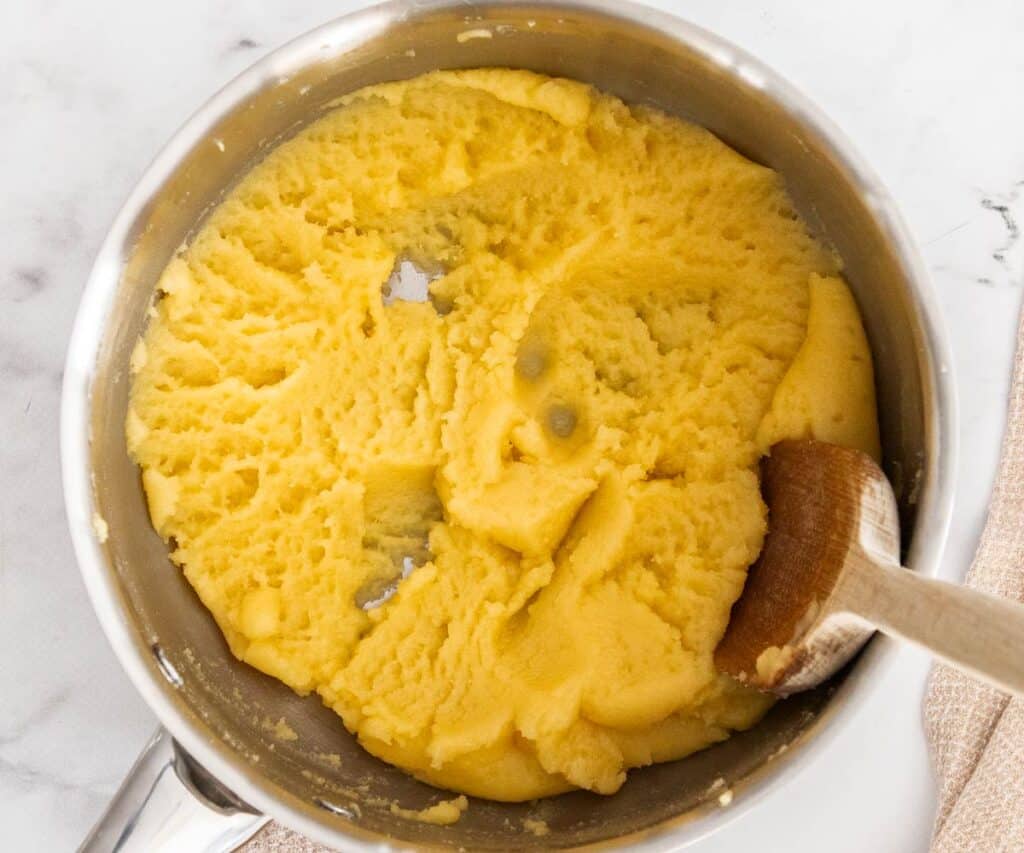
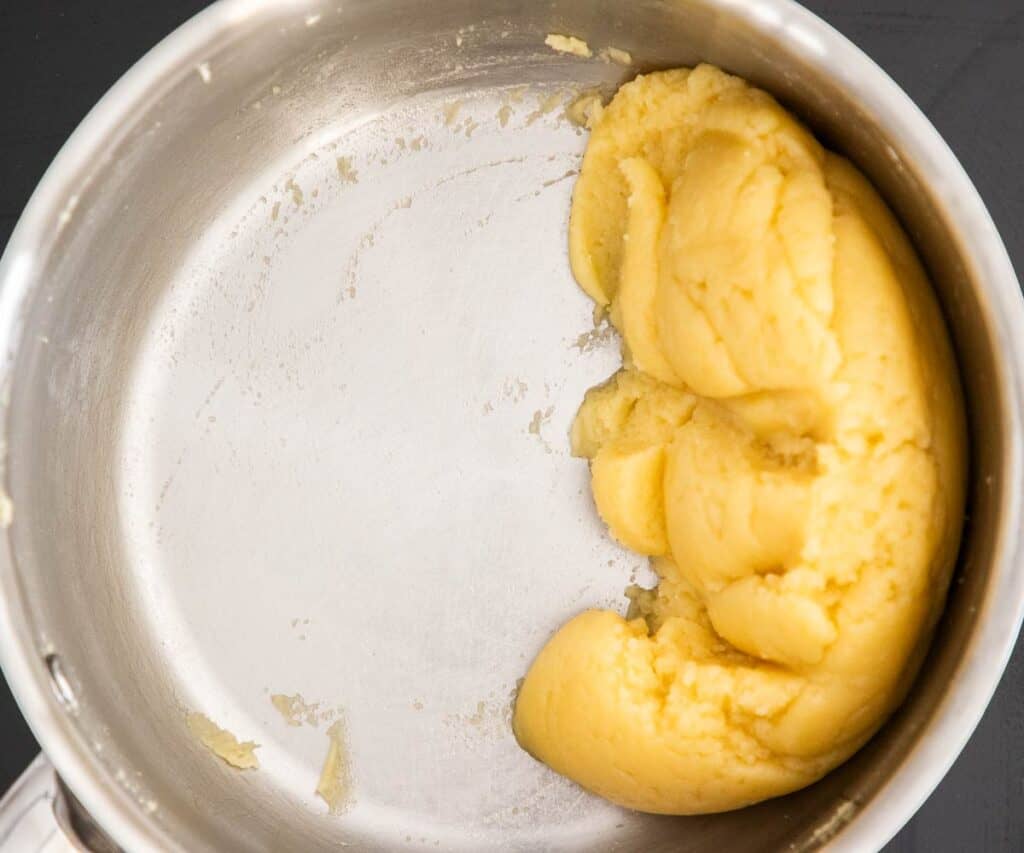
Cool the panade
(2-10 minutes) You can cool the panade quickly in a stand mixer on low for 2 minutes or you can spread it out in the pan and let it cool for 5-10 minutes. This step ensures your eggs don't scramble when they're added.
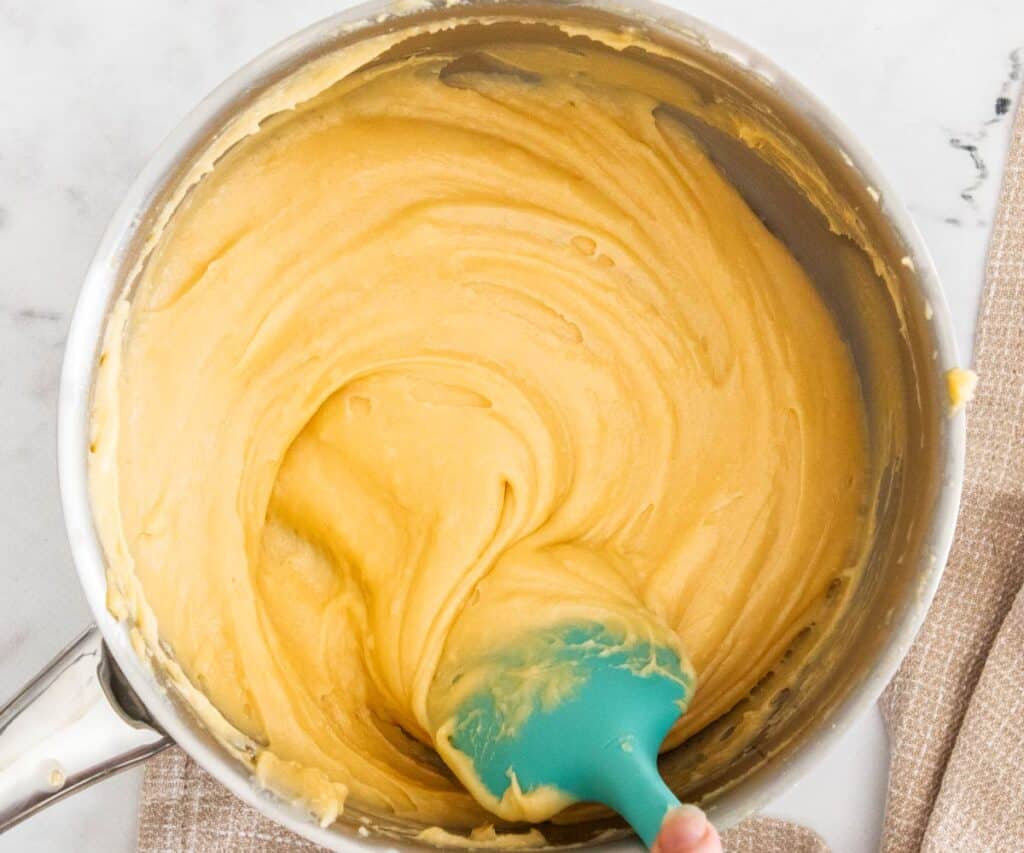
Add the eggs
(3 minutes) First, beat your eggs in a jug lightly which will help them blend into your eclair pastry more evenly. Add the eggs just a quarter at a time, beating the mixture between each addition until the eggs are fully incorporated. Do this in a stand mixer on low or by hand with a spatula.
When is choux pastry ready - the visual cues
There are a few visual cues to look for to check if your choux pastry is ready. Cues 1-4 below are the ones I use.
- Smooth and glossy: The dough will be very smooth and have a sheen to it.
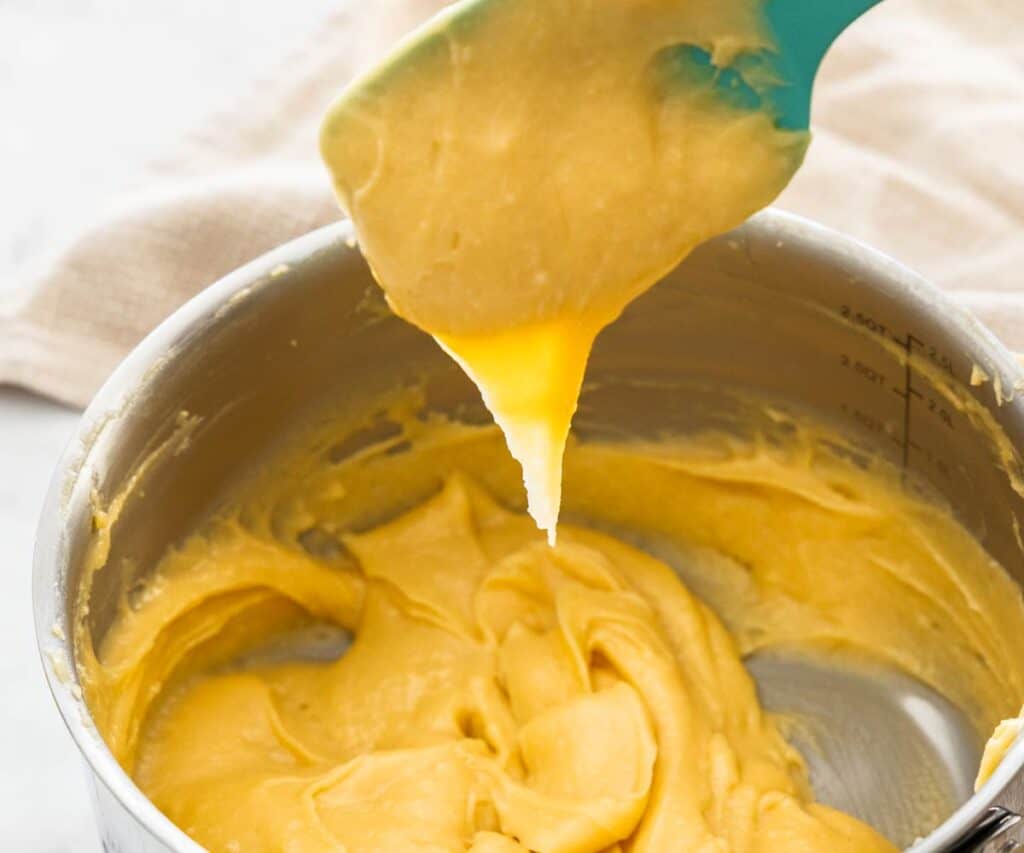
- The spoon and "V" test: Dip a spoon or spatula into the dough and it should reluctantly fall off the spoon leaving behind a fairly neat "V" of dough.
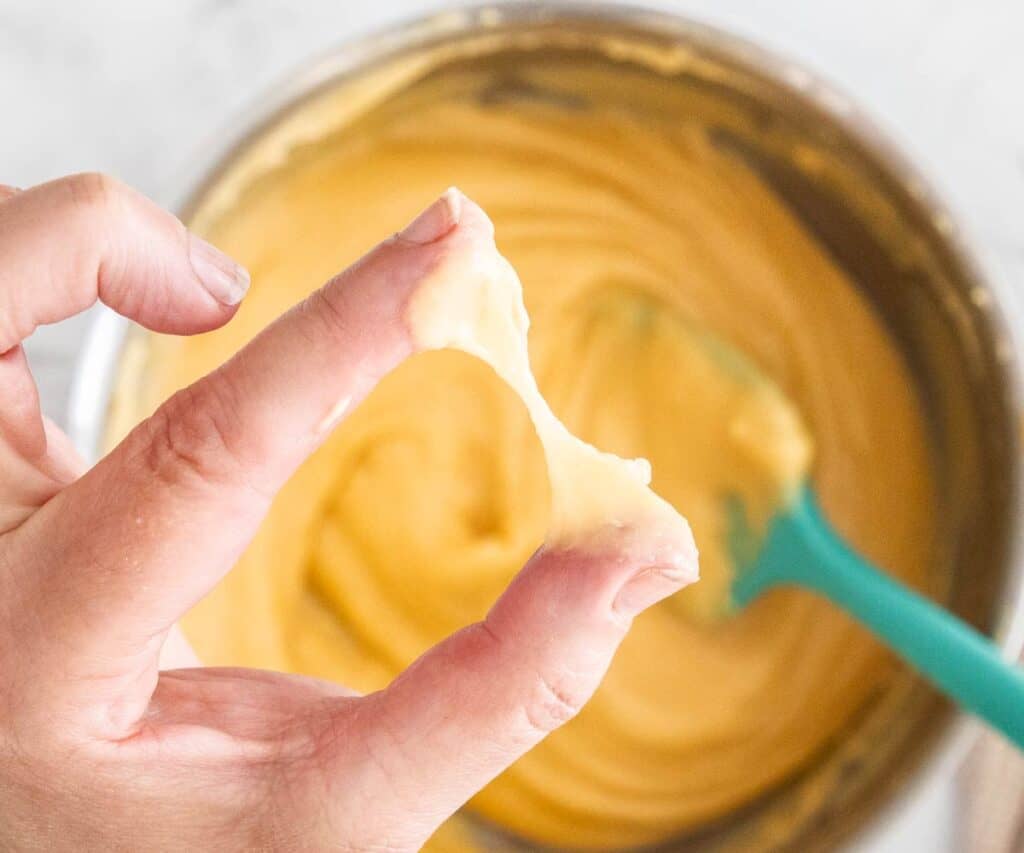
- The pinch test: Pinch a portion of dough (about 1cm / ½ inch thick) between your thumb and finger. Slowly draw your thumb and finger apart - you need to get to 4cm/1 ½ inches with at least a string of dough still intact.
- The trough test: When you draw a line in the dough with your finger, it should form a trough with straight upright edges and hold the shape.
- Pipeable but holding consistency: It should be fluid enough to pipe but not enough to spread out. You can test this by just dropping a small amount onto a plate with a spoon and seeing how well it holds its shape.
Prepare to pipe
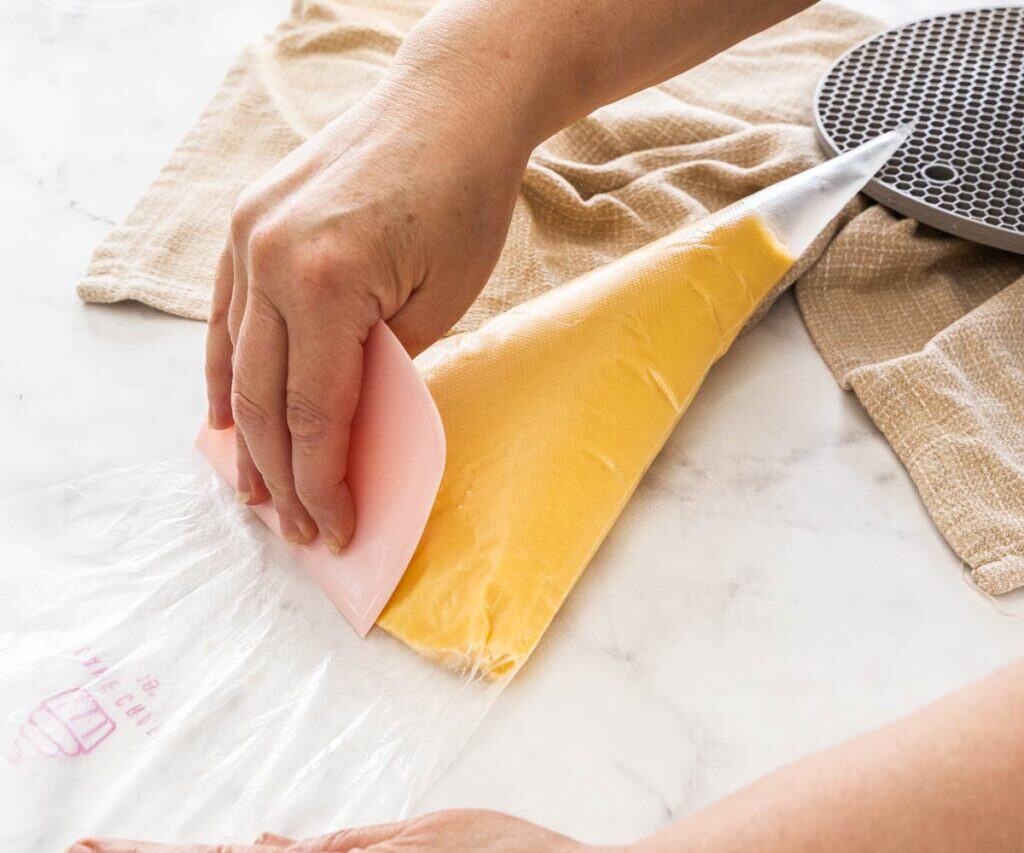
(5 minutes) Transfer your choux dough to a piping bag fitted with a large French star piping tip (1.25cm/½ inch opening). Be careful to avoid air bubbles by filling on one side of the bag and use a bench scraper on the outside of the piping bag while it's lying flat, to drag the dough down. Line a baking sheet with an eclair baking mat or regular perforated baking mat (these are the best options), a regular baking mat or baking paper (can work but not ideal).
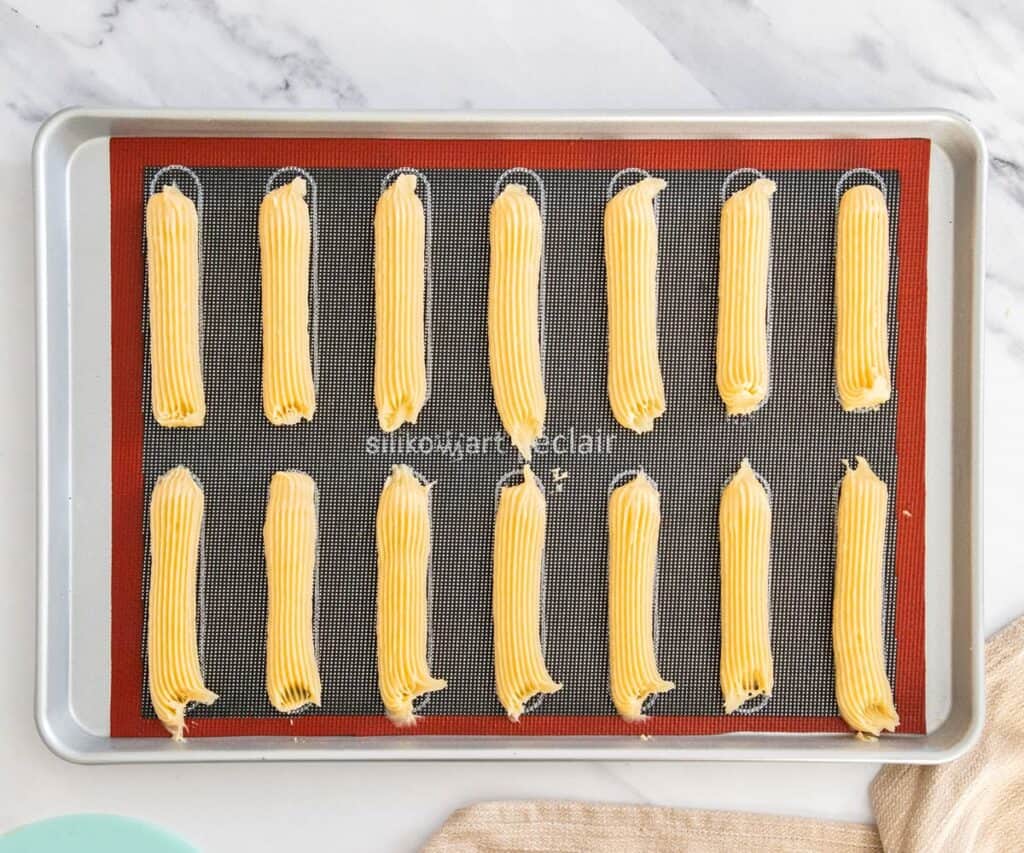
Pipe the eclairs
(5 minutes) Possibly the trickiest part, but practice makes perfect. With the piping bag at a 45° angle, pipe logs of dough onto your baking sheet about 12cm / ~5in long. If your mat doesn't have guides, you can use a piece of cardboard the right length (or the plastic bench scrapers I use are pretty perfect length) to guide you as you pipe. Try to pipe smoothly and move your arms towards you as you do. When you get to the end, press the tip down onto the baking mat, then lift up over the eclair and it should just break off with a small tail.
What if I see air bubbles
If you see air bubbles in the eclairs as you pipe them, you can either leave them and know that you might get a crack or blowout in that spot during baking, or use the flat sides of 2 dough scrapers, one on either side of the eclair to slide under and lift it off the tray. You can then just pipe a new one in its place.

Neaten the ends
(1 minute) If you have points or rough ends at the ends of your eclairs, just dip your finger in water and gently shape them smooth.
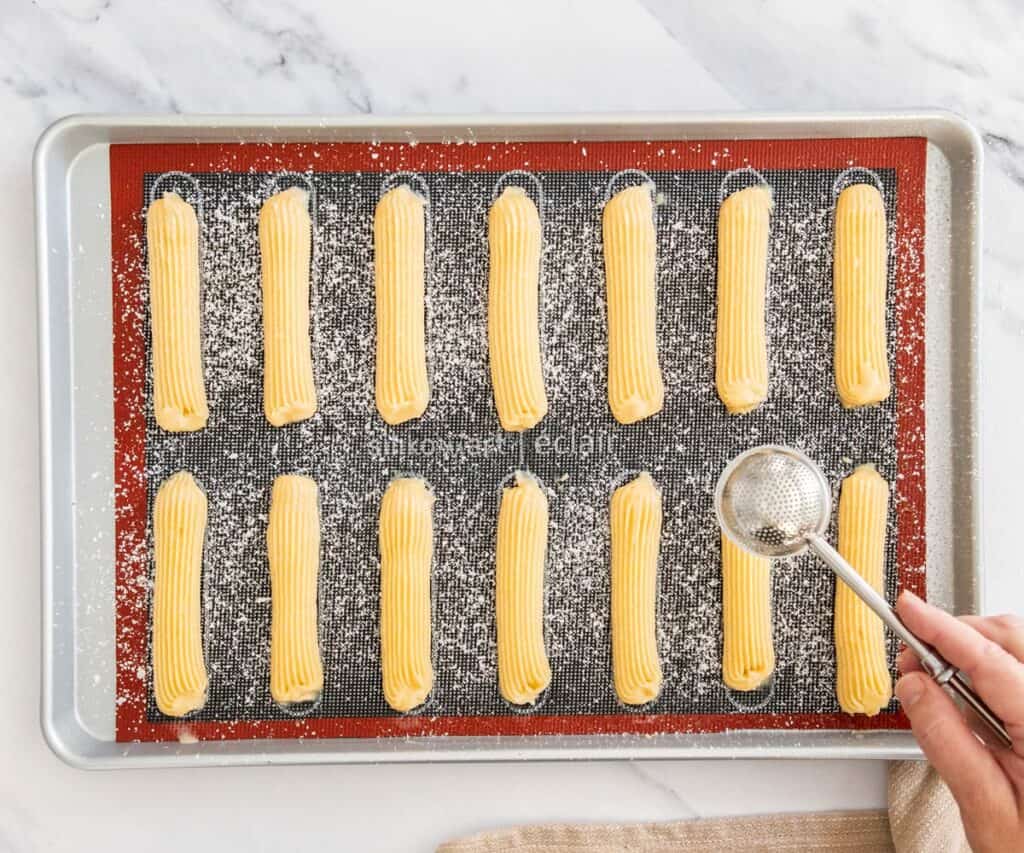
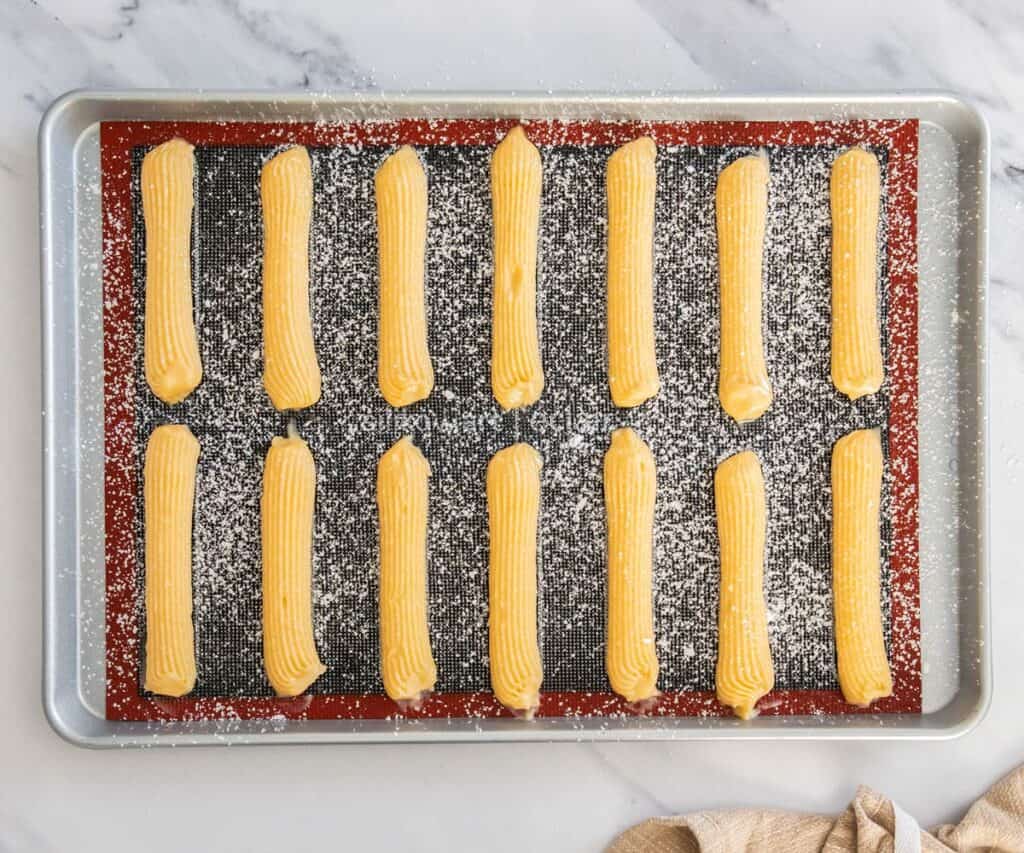
Spray and dust
(1 minute) A great tip to help you get nice smooth eclairs is to spray them with a light spray of oil, then dust them lightly, twice over, with some icing sugar. Don't dust too heavily. It acts as a protective layer that allows the dough to expand gradually as it bakes so that it doesn't crack.
Bake
(35-40 minutes) Place your eclairs into a preheated oven and bake for 35 minutes. Check them, then you may need to bake for another 5 minutes to get them nice and crisp.
Should I use silpat or baking paper?
For the best shape and most even bake, I recommend a perforated eclair mat if you have one. A regular silicone mat also works well, while baking paper can sometimes lead to a slightly concave base, more spread and more cracking.
Release the steam
(2 minutes) As soon as you can bear to handle them (immediately if possible), or using a tea towel to help, use a skewer to poke 3 holes in the base of each eclair (one at either end and one in the middle) and leave them to cool on a wire rack.
How to make pastry cream
This is my fool-proof, silky-smooth vanilla pastry cream, known in French as crème pâtissière. It's quick and easy to make but it will need to chill completely before filling your chocolate eclairs.

Heat the milk
Start by warming the milk and sugar over medium heat until it starts steaming heavily. Don't bring it to a boil.

Whisk the egg yolks and cornstarch
In a mixing bowl, whisk together the egg yolks, cornstarch and some reserved cold milk.

Temper the eggs
Tempering means to bring the temperature of the eggs up slowly and we do this so that they don't just scramble. By mixing as we slowly add the hot milk, the eggs fully incorporate smoothly into the hot milk to turn into a silky smooth custard. Make sure to drizzle the hot milk in slowly as you stir with a whisk.
Save this post!
No spam, I promise 😊

Heat the custard
Pour it all back into the saucepan and heat it again over medium heat and making sure to stir it constantly so that it doesn't turn lumpy. As soon as you see big bubbles starting to break the surface, stir the custard for 1 full minute. This helps to activate the cornstarch. If you don't let it boil like this for a minute, once cooled the pastry cream will just become very liquid again.

Add vanilla, butter & salt
Whisk in the butter, vanilla and salt until fully incorporated.

Storing the pastry cream
Pour your pastry cream through a strainer into a clean bowl or jug then cover it tightly with plastic wrap pressed tightly to the surface. The pastry cream can form a skin if air gets in. Chill it until cold.
The chocolate glaze
This chocolate eclair glaze is very quick and simple to make and takes just a few minutes.
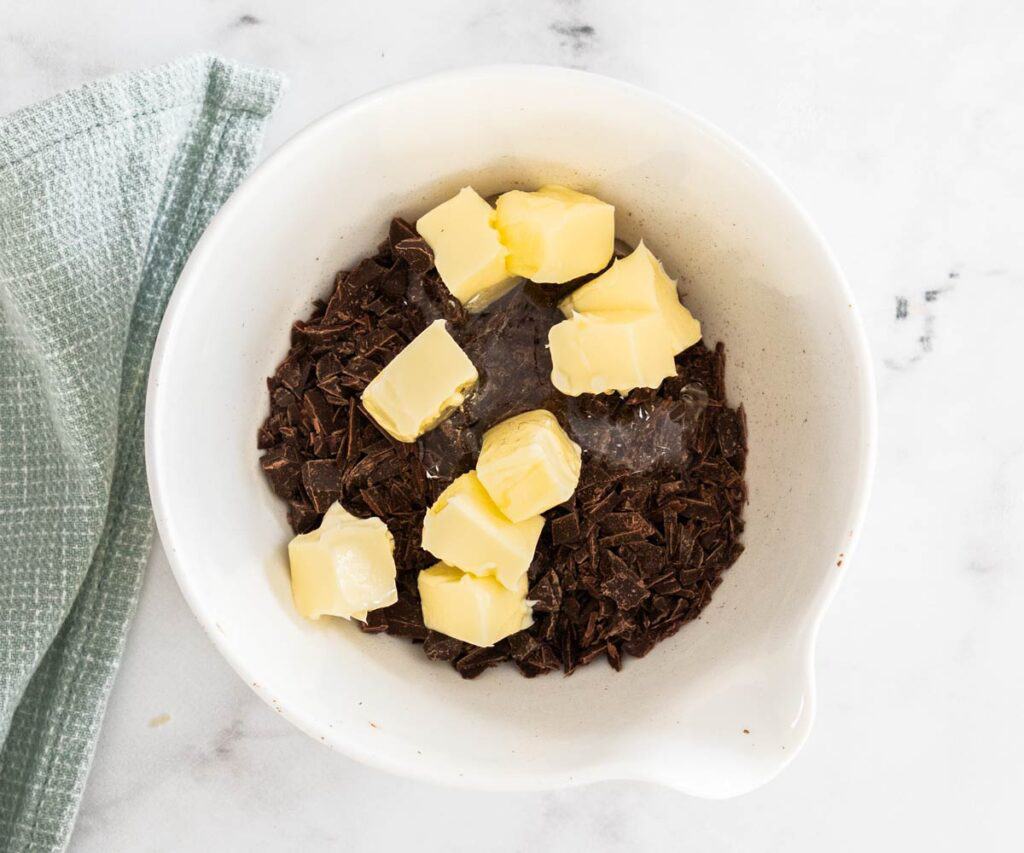
Combine the ingredients
Add the ingredients to a microwave-safe bowl.

Melt and mix
Melt in the microwave in 20-30 second increments, stirring well after each, until fully combined. You can also place the bowl over a saucepan of simmering water (not touching the water) and stir until melted.
Assembling your chocolate eclairs
Now, we get to the fun part and almost to the, even better, eating part. Everything above this section you could have made ahead of time but assembly is best done on the day you're serving them - as close to serving time as you can manage will allow the pastry to remain more crispy.
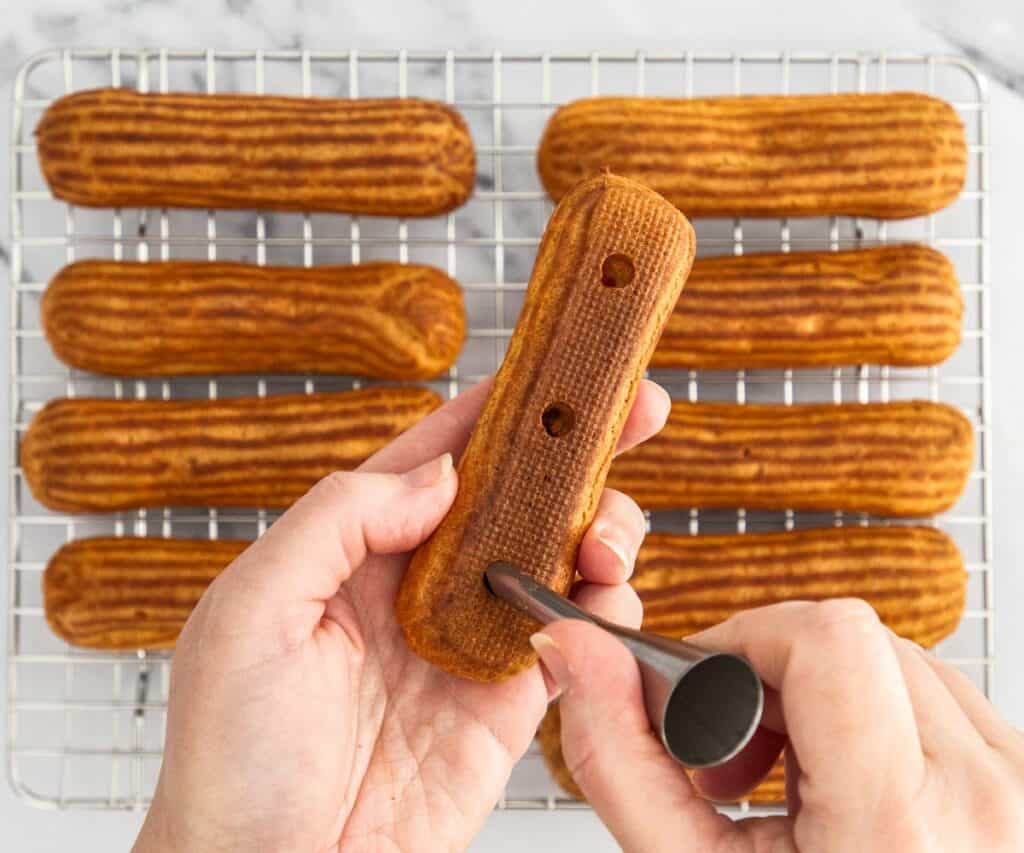
Create holes in the bases
(2 minutes) Use the thin end of a Bismarck piping tip or a small round piping tip to make the steam holes in the base of the eclairs bigger. You want them big enough to insert your piping tip.
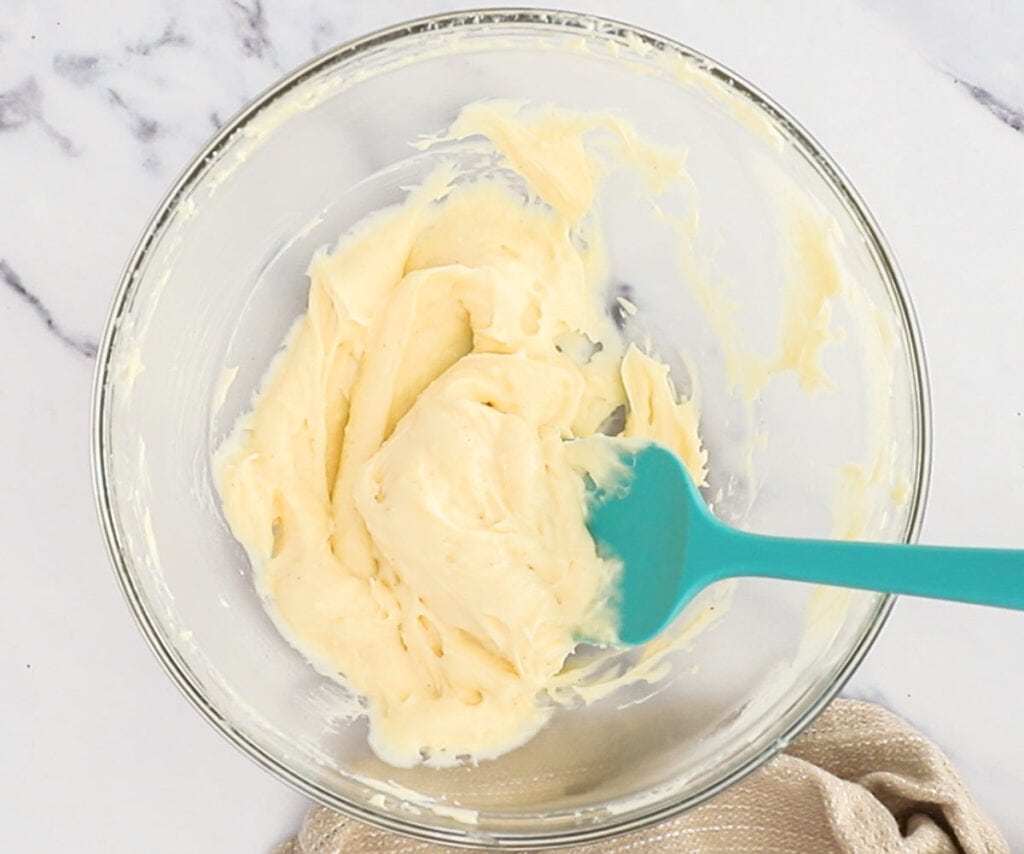
Rewhip the pastry cream
(1 minute) Use a whisk to give the pastry cream a mix until it's smooth and pipeable again.
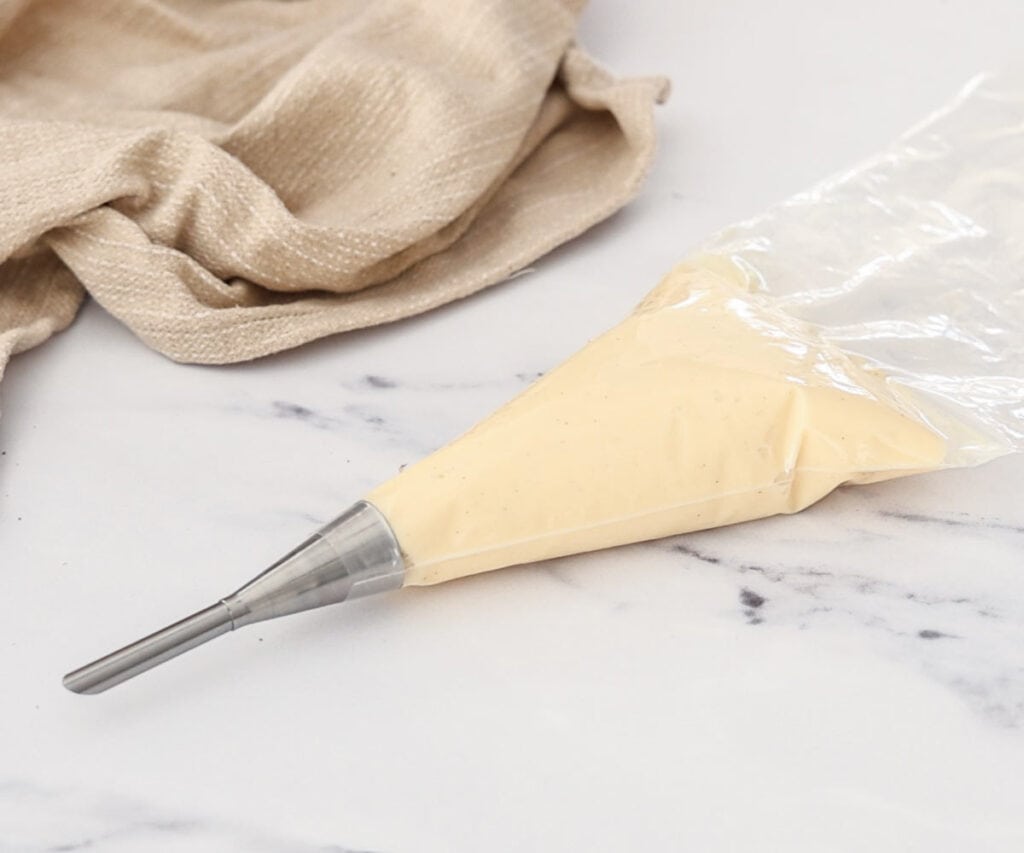
Add it to a piping bag
(1 minute) Transfer the pastry cream to a piping bag now fitted with your Bismarck tip or small round star tip.

Pipe the eclairs
(15 minutes) Push the piping tip into one of the end holes and point it so the filling will fill the end of the eclair. Apply gentle pressure to the piping bag until you feel a slight resistance, then turn the tip to fill in the other direction. Do the same thing in the other end hole, then top up the middle hole. Stop when you see the pastry cream pushing out of the holes.
How to know when an eclair is full
When you're piping into an eclair this way, it can be tricky to know when you have properly filled it with filling.
- First of all, make sure you adjust the direction the cream is being piped in by gently moving the piping tip around.
- Be really mindful of when you feel resistance on the piping bag and allow it to be pushed back towards you, or you may end up overfilling and cracking your eclairs.
- Use all 3 holes, filling at the end points first, then using the middle one as a top up.
- As it fills, you should see the pastry cream rising from the other holes, like the image above, then you know it's full.
- Now, just wipe away the excess cream and move on to the next one.
Don't worry, the filling won't drip out of the holes when you sit the eclair back on it's base - at the correct consistency, it's thick enough to hold inside the eclair.
Glaze the eclairs
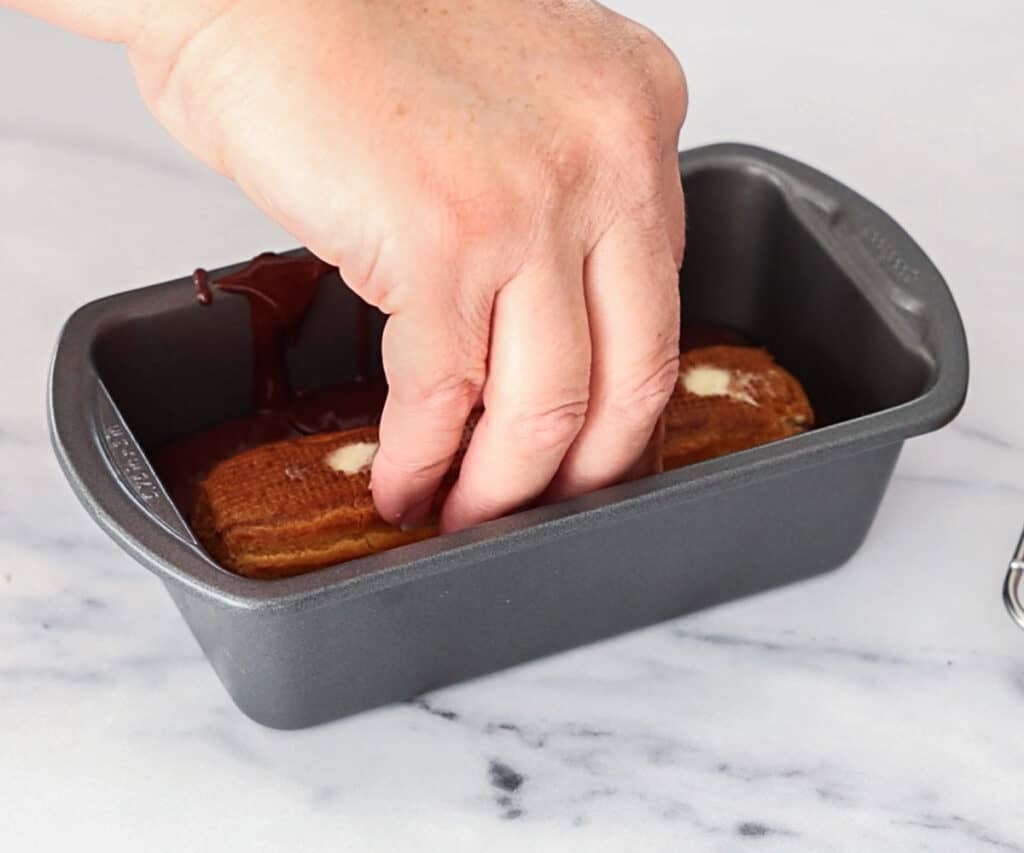
(5 minutes) Dip the top of each eclair into the chocolate glaze.
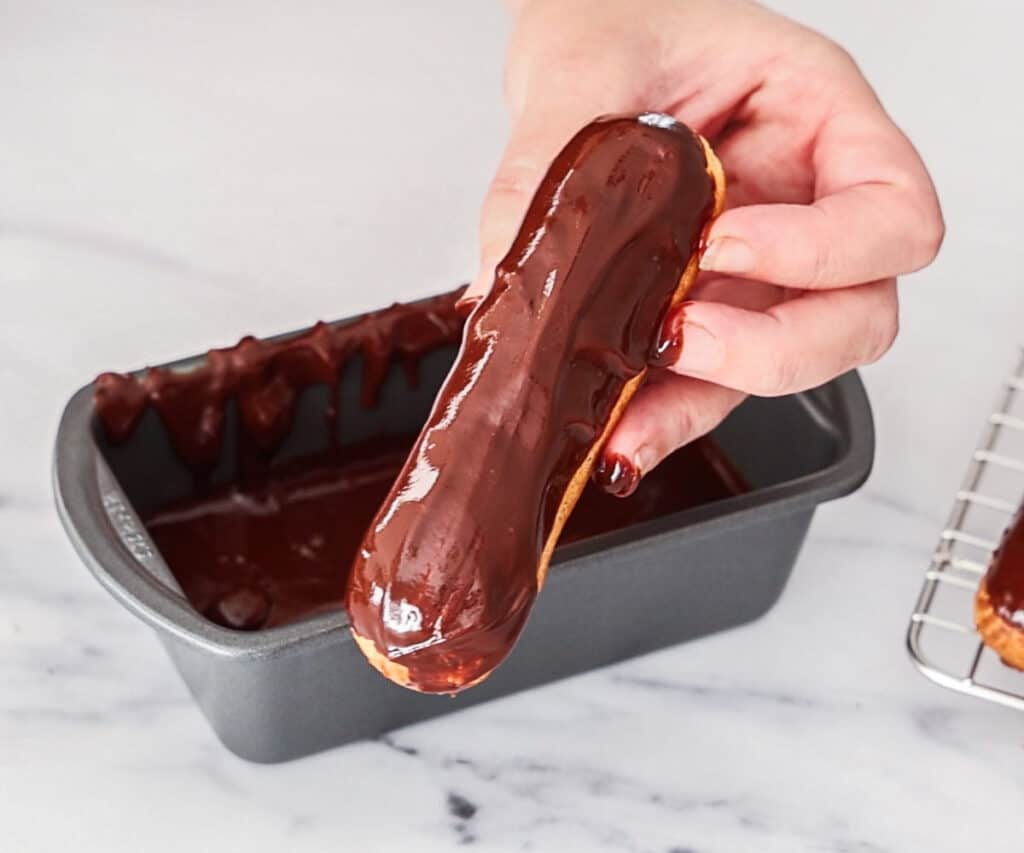
Level off
When you lift the eclair, let the excess drip off then gently run your finger down the eclair to level it out. Chill the eclairs to set.
Tips and tricks
- Don't boil the milk mixture, for the choux pastry: As soon as you see bubbles, turn off the heat or you'll lose too much liquid through evaporation
- Don't fill your eclairs too early: The pastry cream will gradually soften your pastry so fill them within a couple of hours of serving.
- Don't open the oven before 25 minutes or your eclairs may collapse.
- All ovens vary: You can bake a tester if you like first to see how long they take in your oven. Choux dough will quite happily sit and wait until you're ready.
- Using a large French star piping tip for you eclair shells will help to reduce cracks as the spiky edges on the tip help to remove air bubbles close to the surface of the choux.
- Bring the milk for the pastry cream just to a heavy steaming point before adding to the eggs.
- Add the hot milk to the eggs slowly to prevent scrambling the eggs.
- Whisk continuously as the pastry cream mixture heats so that it doesn't form lumps.
- Everything must be cool before assembly. The pastry cream should be cold and rewhipped before piping. The eclairs should be no warmer than room temperature (so, if you re-crisp them in the oven make sure to let them cool again). If either is warm, the pastry cream will melt and drip out of the eclair shells.
- For topping the eclairs, I use a mini loaf pan. It's just the right width and deep which means the chocolate stays high enough to dip even as you get through the batch. When it gets low in the pan, or just if you prefer, you can just spoon the glaze on and spread it out too.
Tools I use
These are the tools I use with links, in case you need them.

- Medium heavy-based saucepan: The heavy base makes for even heating.
- Stand mixer: I use a Kitchen Aid stand mixer for beating in the eggs. You could also beat the choux by hand. I also find it really handy for beating the flour in before returning the panade to the pan.
- Silicone spatula: So useful for all baking.
- Plastic bench scraper: These are so useful for everything from scraping down the bench to pushing dough down in your piping bag to pressing air bubbles out of the dough before loading it into your piping bag.
- Piping bags: For piping the eclairs.
- Large French star piping tip
- Silicone mats: I get the best results using a perforated eclair mat (which has the eclair outlines) or a plain perforated baking mat.
- Half sheet pans: These are the size I always use for my baking.
- Bismarck piping tip or small star tip.
😥 Troubleshooting
Eclairs can take some practice to master, especially if you're aiming for those perfectly straight and smooth, French-bakery-worthy eclairs. But don't let that put you off - even a rustic looking eclair will taste fantastic. These troubleshooting tips will help you build confidence and turn out beautiful, delicious eclairs every time.
If your eclairs turned out flat, it's most likely because the choux pastry was too loose (too much liquid) or because the oven was opened before the shells had properly set. Choux should be thick, smooth, glossy, and hold their shape when piped. Do not open the oven door before the 25-minute mark, and make sure your eclairs are a deep golden brown before removing them from the oven.
A few small cracks in eclairs are perfectly normal and acceptable but large cracks or blowouts usually come from air bubbles in the dough or from the surface drying too quickly before the pastry has finished expanding. Don't beat your choux pastry any higher than the first setting on your mixer, try to add the dough to your piping bag without adding air bubbles and using oil to protect the surface before baking all help to curb cracking.
If the centres are dense and not hollow, the choux may have been too wet or they weren't baked long enough. Eclairs need enough structure to hold a large air pocket so the dough consistency is crucial.
Soft shells are usually a sign of underbaking or too much trapped moisture. Make sure to bake them until deeply golden and poke small holes in the base as soon as they come out of the oven to release steam that's trapped inside. They will also naturally soften over time (you can re-crisp empty shells in the oven) and once filled.
If your pastry cream is runny, it's often because it wasn't cooked long enough or the eggs weren't tempered properly. You must add the hot milk to the eggs gradually and cook the pastry cream for a full minute or slightly more once it begins to bubble.
Try to dip the eclairs while the glaze is still warm, rather than spreading the glaze on. Also, don't overheat the mixture. Some chocolate brands are naturally more fluid than others when melted.

Variations
Once you've mastered the classic chocolate eclair recipe, try changing them up with some of these ideas.
- Chocolate pastry cream: If you want chocolate on chocolate, use my chocolate pastry cream recipe. While the classic filling is vanilla creme pat, you can technically fill these with any flavour pastry cream you like.
- Creme Legere: This is a lightened pastry cream - lightened with whipped cream - it's less sweet than straight pastry cream.
- Whipped cream or chantilly cream: Even lighter and less sweet again, some people love just a cream filled eclair. Or you could add a little of both - pastry cream and whipped cream.
- Extracts: You can add flavouring extracts to your filling, like mint or almond, for something different.
- Slice them in half: You don't have to pipe them from the base. Gently slice your eclairs in half and pipe in pastry cream and whipped cream or just nice big swirls of chantilly cream. This method allows for more filling.
- Mini chocolate eclairs: Pipe your eclairs smaller, using a smaller piping tip for a great party dessert.
- Coffee Glaze: With an espresso glaze you could give these a mocha twist.
Storage
Room temp
The finished/filled and topped eclairs can sit at room temperature for a short time before serving to take the chill off.
The empty eclair shells will keep at room temperature fine for 1-2 days.
Fridge
The finished/filled and topped eclairs should be stored in the fridge and will keep for 2-3 days. The eclair shells will soften over time and, once filled, you can't re-crisp them.
The empty eclair shells can be stored in the fridge in an airtight container for up to 4 days. Pastry cream will keep for 2-3 days.
Freezer
Eclair shells (unfilled) can be frozen for up to 3 months in an airtight container. Let them thaw then re-crisp in the oven at 180C/350F for 8-10 minutes.
The pastry cream is not suitable for freezing.
❓FAQs
Absolutely. The glaze is softer than just using chocolate making it nice to bite through. It's also richer with butter added. If you want to just top them with melted chocolate though, feel free.
You can make the component parts of chocolate eclairs ahead of time, but they are best assembled close to serving. Eclairs up to 4 days ahead - re-crisp in the oven before cooling and filling. Pastry cream up to 2 days ahead - rewhip before piping. Chocolate glaze 3-4 days ahead - rewarm before dipping.
Eclair shells will naturally soften over time. Luckily, you can easily get them back to their crispy best. Just place them in an oven preheated to 180C/350F for 8-10 minutes.
Yes, you can. Freeze for up to 3 months in an airtight container. This is great if you just want a few at a time, to make a double batch or have some extras that you didn't fill.
Once you bite through the crisp eclair shell into that luscious, creamy filling and chocolate topping, you'll understand why they've been a favourite for generations. I hope this recipe gives you the confidence to make bakery-style chocolate eclairs in your own kitchen.
Take your time, enjoy the process and remember even the wonky one are outrageously delicious.

If you made this chocolate eclairs recipe,
be sure to leave a ⭐⭐⭐⭐⭐ rating below. Thank you!
Hungry for more?
- Subscribe to Email, Facebook, Pinterest and Instagram.
- Add TBC to your Google Preferred Sources.
Chocolate Eclairs
Ingredients
ECLAIR SHELLS
- 160 ml water (⅔ cup)
- 80 ml whole milk (⅓ cup)
- 115 g unsalted butter (4oz / 1 stick)
- 2 teaspoons white granulated sugar
- ¼ teaspoon salt
- 130 g bread flour (1 cup, spooned and levelled/~4 ½oz)
- 200-230 g eggs (7-8oz / 4-5 large eggs, see notes)
VANILLA PASTRY CREAM (CREME PATISSIERE)
- 560 ml whole milk (2 ¼ cups)
- 67 g white granulated sugar or caster sugar (⅓ cup 2 ⅓oz)
- 40 g cornflour (US cornstarch) (⅓ cup / ~1 ½oz)
- 4 egg yolks from large eggs
- 1 teaspoon vanilla bean paste or vanilla extract
- 28 g unsalted butter (1 oz / 2 tablespoons)
- pinch salt
CHOCOLATE GLAZE
- 125 g dark chocolate (70% cocoa solids) finely chopped (4 ½ oz)
- 57 g unsalted butter (¼ cup / 2oz / ½ stick)
- 1 tablespoon liquid glucose or light corn syrup (4tsp, notes 1)
Instructions
- ECLAIR SHELLS:Preheat oven to 180C / 350F. Line 2 large baking sheets with perforated baking mats (recommended) or, silpats, baking paper/parchment paper.
- MAKE THE PANADE:Combine the water, milk, butter, sugar and salt in saucepan and heat over medium stirring to melt the butter, then allow it to start to bubble.
- Once you see the first bubbles, turn the heat off. Sift in the flour and stir in with the spatula until fully combined.
- Place the pan over low heat and cook for 2 minutes, moving constantly. Fold it over itself then press it out across the pan and repeat for 2 minutes.
- COOL THE PANADE:If using a stand mixer, transfer the dough to the mixer with a paddle attachment and beat on low for 2 minutes.
- If making by hand: Press the dough out flat over the base of the pan and leave it to cool for 5-10 minutes until it's no longer hot (warm is fine).
- ADD EGGS:Lightly beat 4 eggs together in a jug.
- Add a quarter of the eggs to the panade with one of these 3 methods;
- In the stand mixer with paddle attachment and mix on low.
- Beat by hand, directly in the saucepan with a silicone spatula or wooden spoon.
- Use a handheld mixer on low.
- Continue by adding another quarter of the eggs, beating until fully incorporated. Repeat with the third quarter of eggs.
- With the last quarter of the eggs, add them a little at a time until you have a smooth, shiny dough. It should reluctantly fall from the spoon, leaving a "V" shape hanging from it. It should be quite soft, not thick or dry-looking.
- Once the dough is the right consistency, transfer it to a piping bag fitted with a large French star piping tip.
- For the neatest eclairs, I recommend letting the dough rest for 30 minutes at this point. The dough will thicken slightly as it rests. If you pipe them first, the dough may spread and you'll have wider eclairs rather than thinner.
- PIPE THE ECLAIRS (can be made the day before):Pipe 12-14 logs of dough, roughly 12 cm/5 in in length, onto your prepared baking sheet, at least 1 inch apart. When you get to the end of each one, press the tip down towards the baking sheet, then lift up over the end of the eclair. You will be left with either a little pointed end or maybe a rough end (either is fine).
- Wet your finger, then gently tap the ends of the eclairs where required to neaten them up.
- Give the eclairs a light spray with spray oil, and a light dusting of icing sugar, then a second light dusting of icing sugar.
- Bake for 35 minutes. Check whether they're crispy or still soft. You may need to bake for a further 5-7 minutes.
- Do not open the oven before 25 minutes.
- As soon as you remove your eclairs from the oven, poke three holes in the base of each one with a skewer (one hole at either end and one in the middle), then set them on a wire rack to cool.
- Once cool, your eclairs are ready to be filled but are best filled within an hour two of serving. If you made your eclairs in advance, re-crisp them in an oven preheated to 180C/350F for 8-10 minutes then let them cool again before filling.
- VANILLA PASTRY CREAM:In a heavy-based, medium saucepan, over medium heat, heat 2 cups of the milk and all the sugar, stirring to dissolve until it reaches a steaming point.
- Add the cornflour, eggs and remaining ¼ cup of milk to a medium mixing bowl. Whisk, using a balloon whisk until smooth and combined.
- While gently whisking, very slowly drizzle the hot milk into the eggs. Don't pour it too quickly or you'll cook the eggs.
- Return the custard mixture to the pan and cook over medium heat, whisking gently the entire time until it starts to thicken and bubble.
- As soon as you see the first bubbles appear, continue cooking and stirring for a full minute to activate the cornflour.
- Remove from the heat and stir in the butter, vanilla and salt until the butter has melted and is fully incorporated.
- Pour the vanilla pastry cream into a clean dish and place plastic wrap over the top, pressed to the surface.
- Chill to cool completely.
- CHOCOLATE GLAZE (when you're ready to start filling your eclairs):Combine the glaze ingredients in a microwave-safe bowl and heat in 30-second increments, stirring well between each, until fully melted and combined.
- Transfer the chocolate glaze to a small wide dish - you want it wide enough to just get an eclair in but also deep. Let the glaze rest for 10 minutes before coating the eclairs.
- ASSEMBLY:Use the end of a Bismarck piping tip to cut the holes in the eclair bases large enough to pipe.
- Give the pastry cream a whip to get it smooth again then transfer to a piping bag fitted with the Bismarck tip (or just a 5mm/⅕ inch round tip).
- Insert the piping tip into one of the end holes and pipe, first towards the end of the eclair, then turn it to pipe towards the middle. When you feel the piping bag pushing back a little, remove and start piping the other end. When you see the filling starting to push out of the other holes, you know it's full. Use the middle hole if you need to add some more there. Wipe away the excess.
- Dip the top of each eclair into the chocolate, then lift letting some of the excess drain away. Use your finger to lightly run along the top of each eclair to level out the chocolate. Transfer to a plate.
- Chill for 20 minutes for the chocolate to firm up then serve.
- Please take a moment to leave a comment & rating. It's appreciated and so helpful.
Notes
- How many eggs? With eclairs, the texture is best judged by eye, not by quantity of eggs. Add the eggs until the dough is at the right texture. For me it's between 3 ½ and 4 large eggs but the amount you require will be determined by many variables - egg size, amount of moisture cooked out of panade, protein content of flour and even humidity in the air.
- The eclair shells can be made 3-4 days in advance. Store in an airtight container in the fridge. They can also be frozen for up to 3 months in an airtight container. Re-crisp the eclairs before use in a 180C/350F oven for 8-10 minutes.
- They are only crispy straight from the oven and will begin to gradually soften.
- Don't fill until they're cool.
- The pastry cream will soften the eclair pastry so they're best filled as close to serving as possible.
- The filling and topping is enough for 10-15 eclairs, depending on their size.


Comments
No Comments