

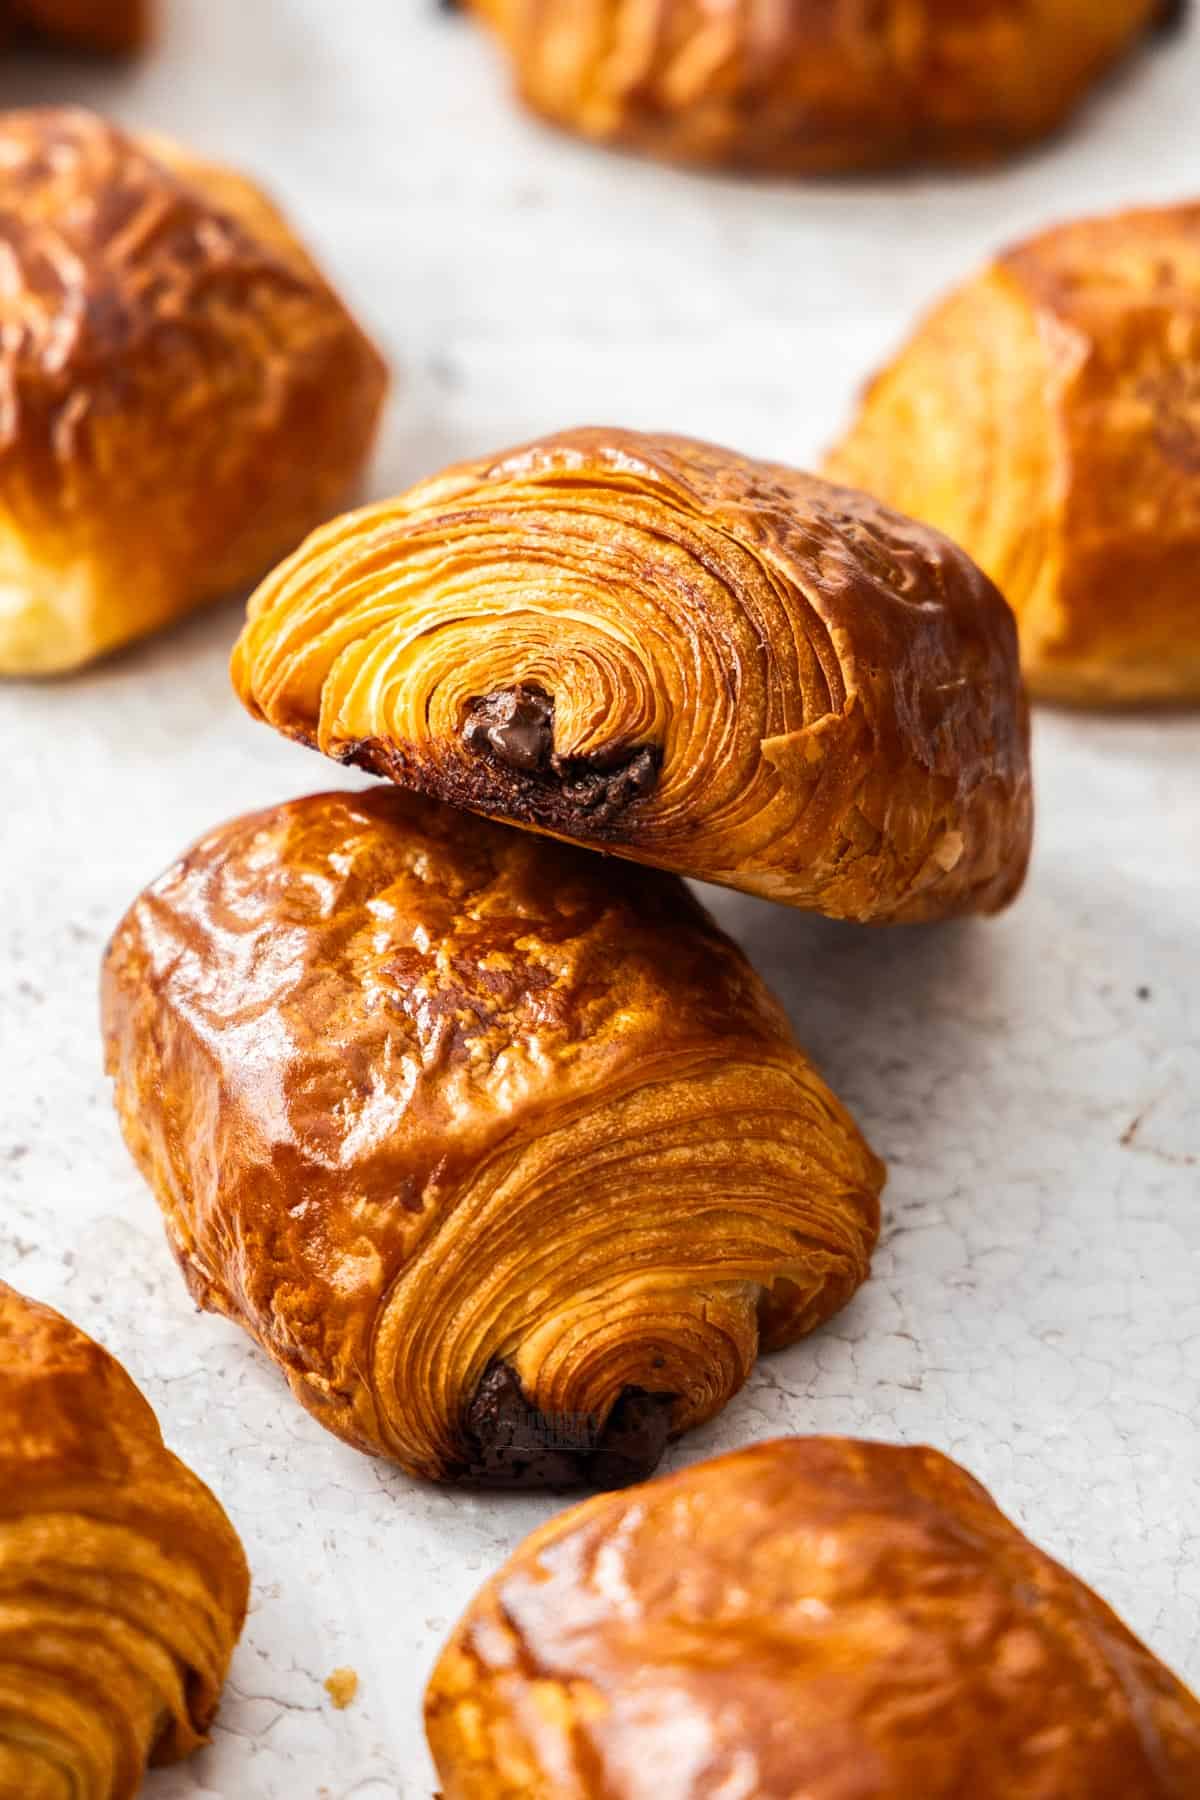
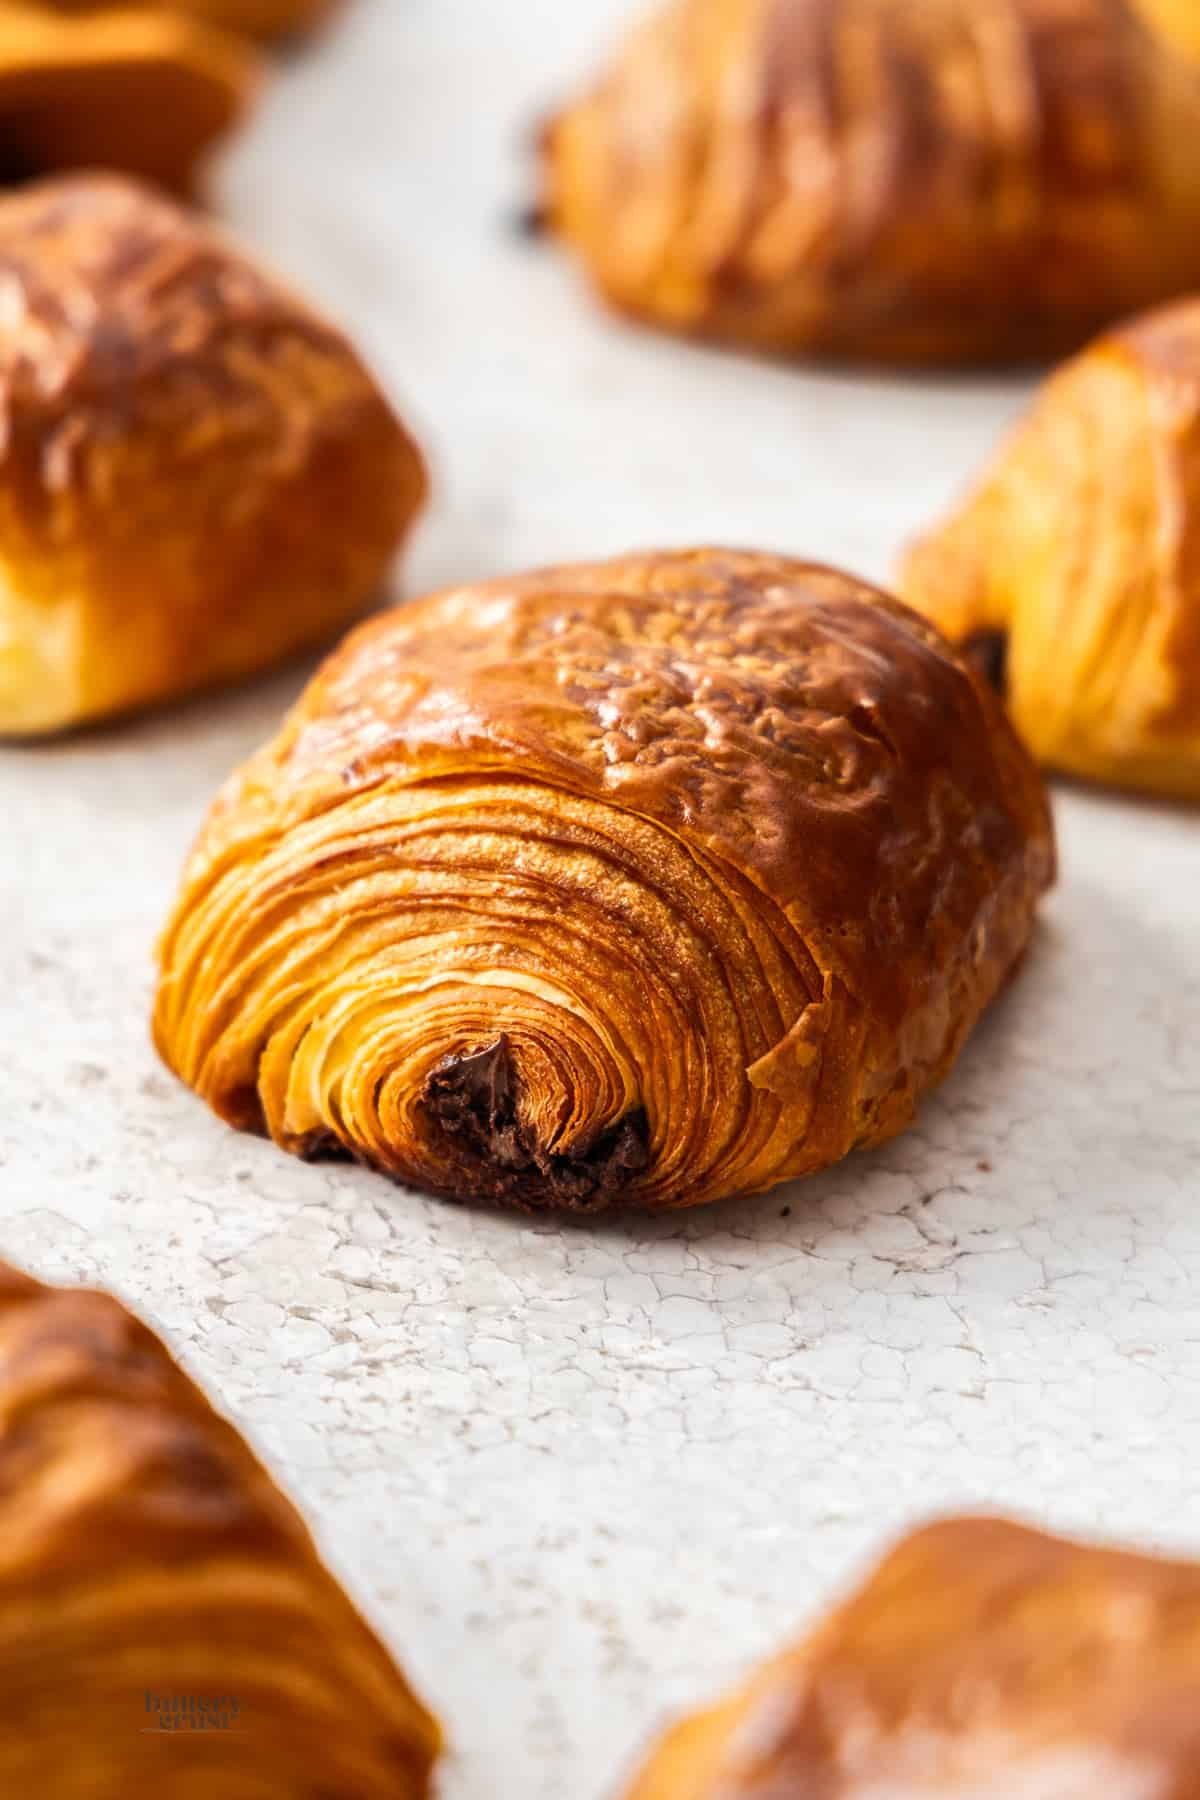
This pain au chocolate recipe turns beautifully laminated croissant dough into, crisp golden pastries, filled with rich, melting chocolate. There's no need to hunt down special chocolate batons either
Make them over a few wonderfully buttery hours or spread the steps across a more relaxed schedule that fits easily around everyday life.
Jump to:
❤️ Why use this recipe
- True croissant pastry: The homemade laminated dough creates crisp, distinct outer layers with a soft, airy centre that puff pastry cannot replicate.
- No special chocolate required: You can make the chocolate batons yourself at home using a regular block of baking chocolate.
- A genuinely flexible schedule: The dough can be prepared, laminated, shaped and baked in one day or rested between stages to fit around work, family and everyday life.
- Clear visual cues: Rather than relying only on the clock, this method shows you how the dough, butter and proofed pastries should look and feel at every important stage.
Never Miss a Recipe!
Get the latest recipes straight to your inbox!
What are pain au chocolat?
Also known as chocolate croissants, pain au chocolate are rolls of croissant dough filled with chocolate then baked until golden brown. When eaten still warm, the outside is crispy, flaky and buttery, while the inside is tender and soft. The chocolate is lovely when it's still gooey.
Pain au chocolate literally translates to chocolate bread or chocolate pastry.
Ingredients & substitutions
Pain au chocolate have 8 very simple ingredients.
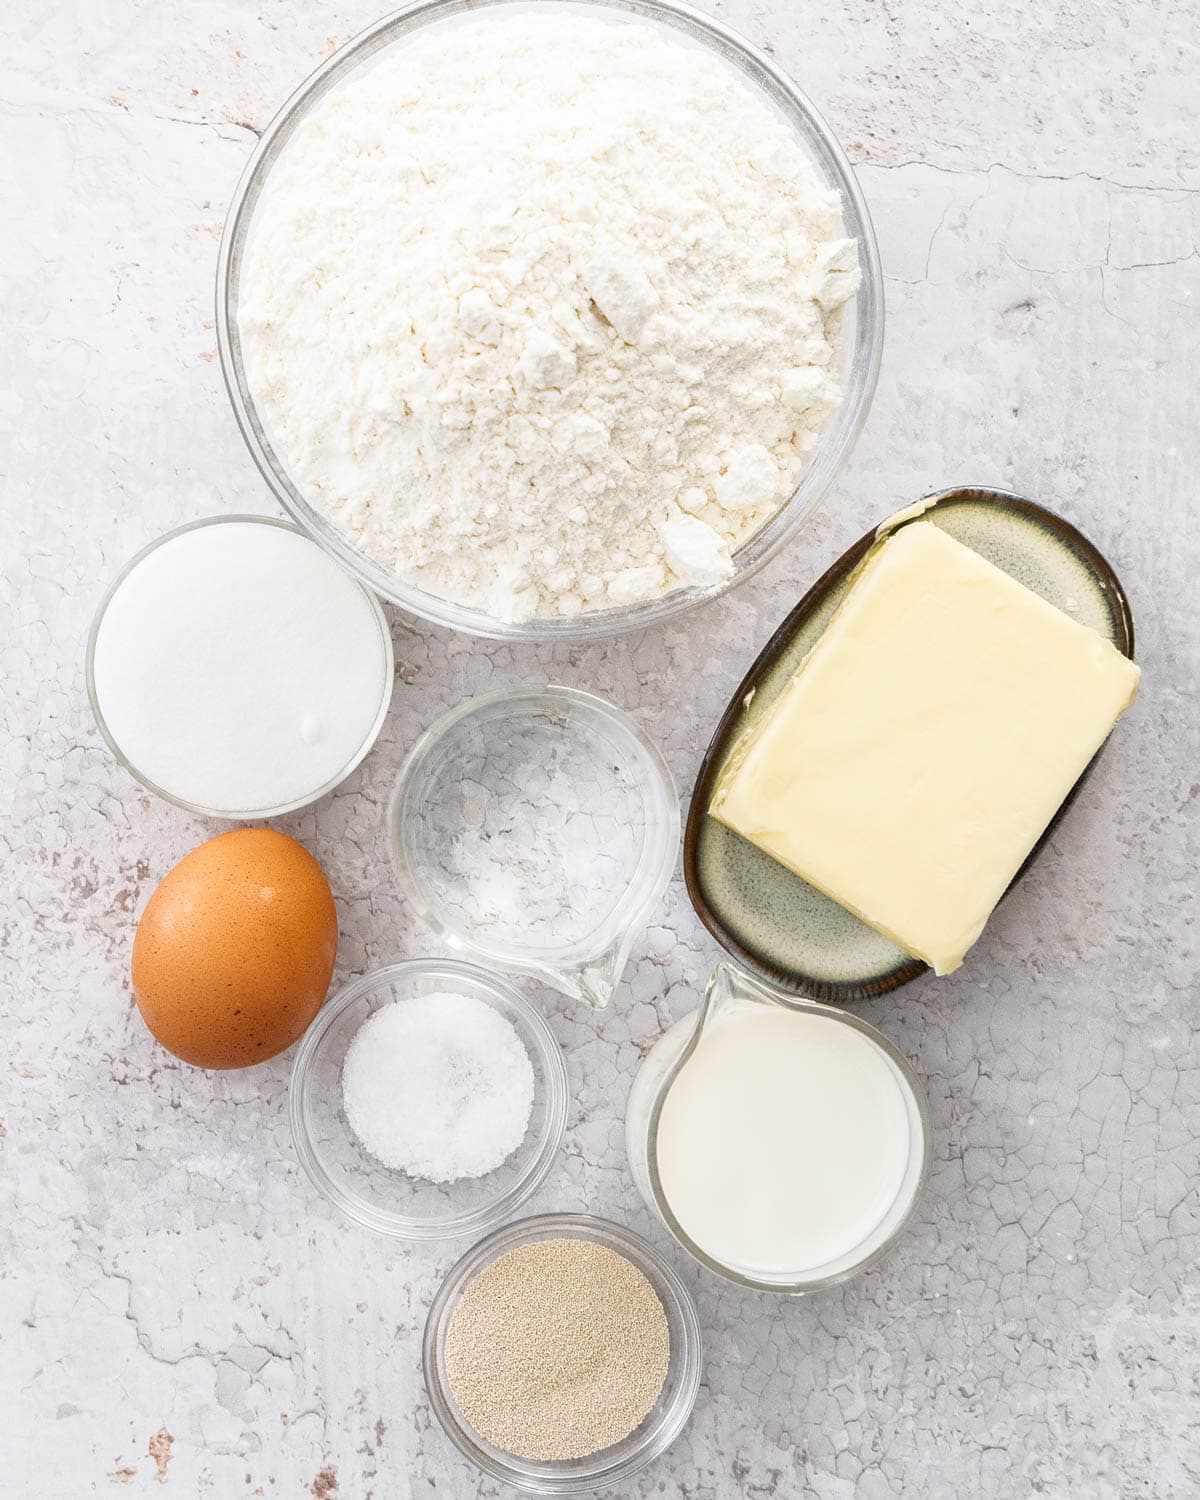
Jump to the recipe card for full quantities and instructions.
- Flour: Use bread flour for pain au chocolat to get a wonderful texture and more crisp exterior.
- Yeast: I use instant dry yeast for this recipe. You can also use active dry yeast without any other changes. If you want to use fresh yeast, you'll need about 3x as much.
- Milk: Use whole milk for richness.
- Butter: The best type of butter for any croissant dough is one with 82-84% fat. Make sure there are no ingredients other than milk or cream. You don't want a butter with added water for instance as that will just make the butter too breakable when cold. To find the fat content, look at the ingredients panel and, if it has one, under the "Quantity per 100g" - you want that to be 82g or higher.
- Egg: There is no egg in pain au chocolat dough but you will want one to egg wash the outside.
- Sugar: Just caster sugar or white granulated sugar.
- Salt: Just a pinch of salt will intensify flavours
- Chocolate (not shown in image): Bakeries use specialised bake-stable chocolate batons for their pain au chocolate. They're usually made of dark or semi sweet chocolate with 45%-55% cocoa solids. To keep things simple at home, I use a good quality baking chocolate and cut it into batons using the heated blade of a sharp knife and a little patience.
Before you start
Like croissants, pain au chocolat are not simple to get perfect. They take patience and practice to get bakery-worthy results. That said, the first batch of croissants and pain au chocolat I made was still great and completely edible, and it's very hard not to make something delicious.
Practice makes perfect. The more you make them, the better you'll get. You'll start to really understand what's happening inside that dough, what works and what doesn't work. Please don't make pain au chocolate or croissants thinking it's a one-and-done thing. I promise you'll become addicted to making them better and better each time, and when you're rewarded with delicious golden, flaky pastries straight from the oven, it's hard not to want to do it again.

How to make chocolate croissants at home
Ok, let's get into how to make pain au chocolate. I use my basic croissant dough but just make a few adjustments to the sizes when rolling the dough out.
Keep in mind the dough and butter should always be cool but pliable. If the butter block can break when you bend it, it's too cold (it will break into small pieces in the dough as you roll it). If it's melting in your hands, it's too warm (it will work it's way into the dough rather than staying as a distinct layer). Similarly, the dough needs to be soft enough that you can roll it without too much pressure which may force that butter to break or work it's way into the dough.
When rolling you want gentle pressure and take your time. Keep the dough as straight as you can by tapping in the edges from time to time.
If at any time you find the dough bouncing back as you roll it, rest the dough in the fridge. Forcing it to roll out will push your butter around unevenly inside or break the butter up.
Jump to the recipe card for full quantities and instructions.
Make the base dough (détrempe)
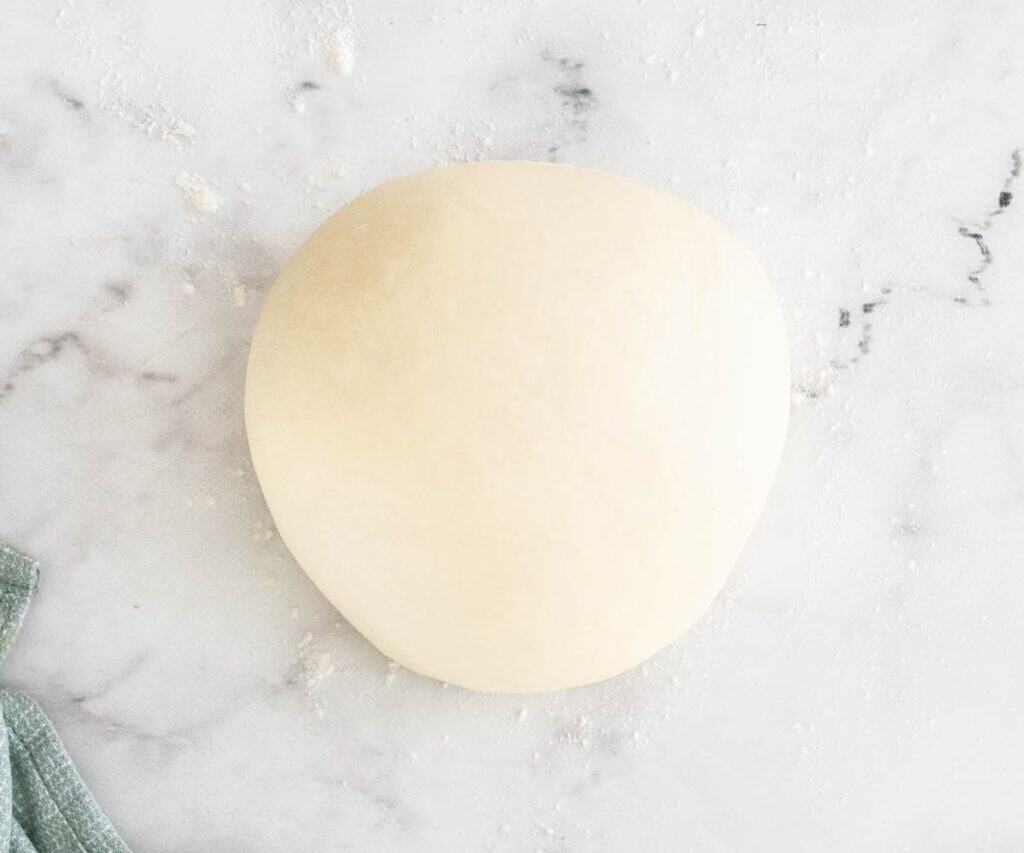
The dough, known in French as détrempe, is very simple to mix together. I use a stand mixer with dough hook attachment to save the upper body workout but you can knead it by hand. Mix all the ingredients in the bowl, then knead on the lowest setting until the butter has worked it's way into the dough. Turn the mixer up to the next setting and knead for a further few minutes until the dough is smooth. Rest the dough for 30 minutes under a bowl so that it doesn't dry out. At this point the dough should be very soft and malleable but not sticky. A tiny bit of tacky texture is fine.
Roll and rest
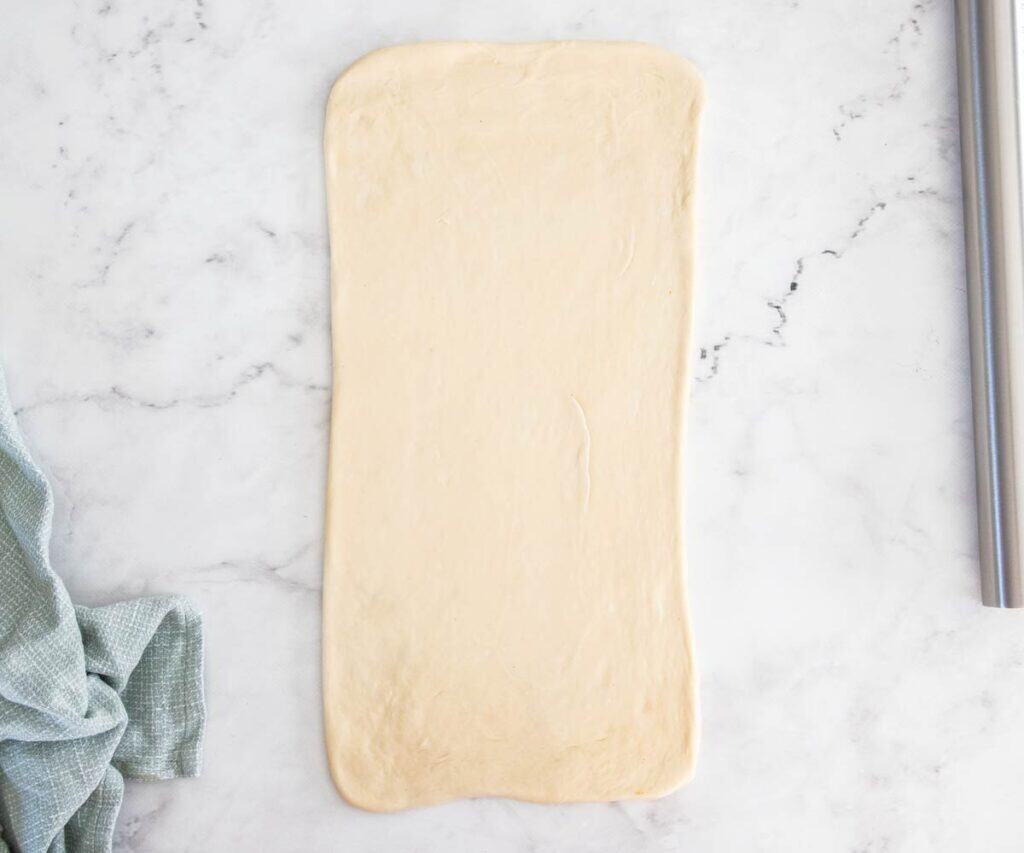
Roll the dough out to about 20x30cm (8x12inch). Transfer it to baking mat or baking paper on a large chopping board or baking tray and freeze overnight (or for at least 2 hours).
The butter block (tourrage)
To make a butter block, you may want to experiment with butter brands. I use Pepe Saya butter which is specifically made for croissants and puff pastry however it comes in pre-rolled 1kg blocks. I only use ⅕ in each batch of my at home croissant dough, so one block gets me 5 batches (over time, not all at once). It's worth looking into seeing if you can get either Pepe Saya or another specialised croissant butter since I find it the same price and sometimes cheaper than the normal supermarket butter I buy anyway.
But if accessibility is a thing for you, supermarket butters can absolutely work, however I needed to do a lot of trial and error before finding the one that worked best for me.
I make the butter block for my pain au chocolate 20cm x 15cm (8in x 6in).
Prepare the butter package
Fold a long piece of baking paper in half, then measure and fold it so you have an enclosure of 15cmx20cm (6inx8in). Place large slices of butter inside and fold it back up with the paper folds underneath.
Bash and roll the butter
Give the butter a good bash with rolling pin and rolling it until it is even and fills the entire 15cmx20cm (6inx8in) baking paper enclosure. Chill until required.
Rolling and folding
Before you start, take your dough out of the freezer and leave it at room temperature for about 1 hour. You want it to be cool but not stiff at all - it should be soft and pliable.
The butter block should be the same - cool but pliable - so take it out of the fridge at least 10-15 minutes before you add it to the dough. It shouldn't break when you bend it but it also shouldn't just melt in your hands either.
Add the butter block
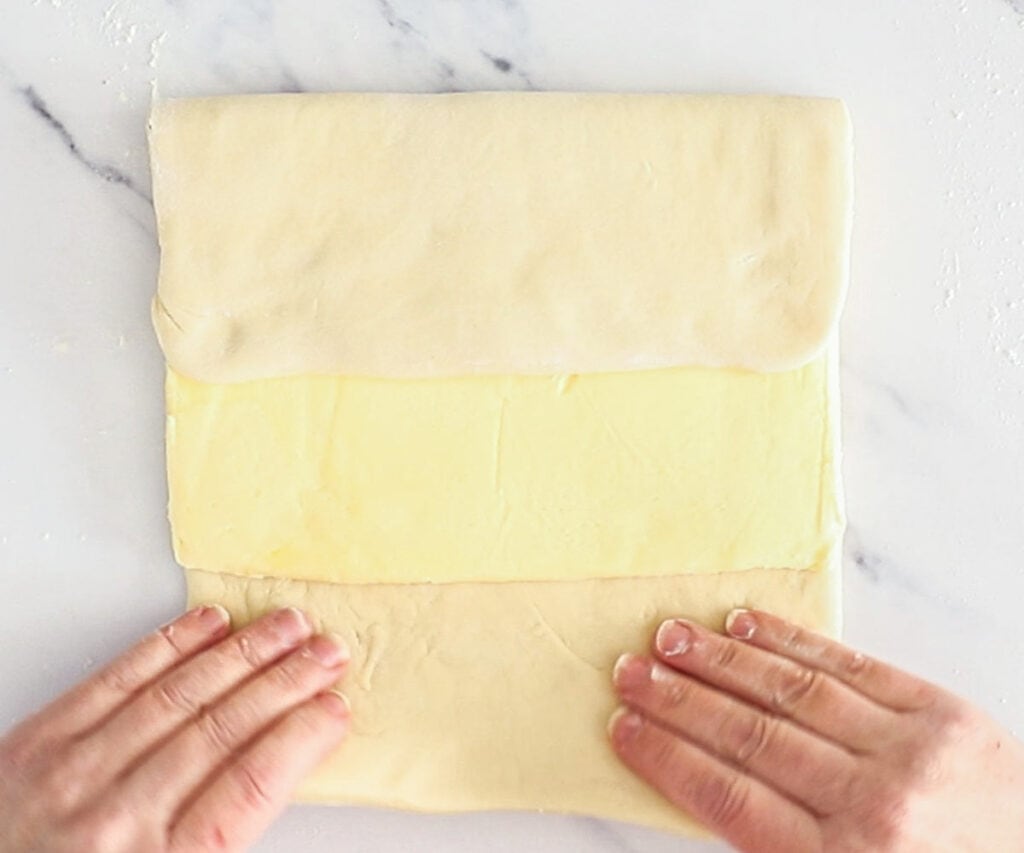
Make sure the dough has as square corners as possible and gently roll it to just slightly over 30cm (12inch) long. Give the butter block a gentle pound with the rolling pin to help make it pliable. Place the butter block in the middle of the dough and fold each end over the top, meeting in the middle. Press the seam together with your fingers.
First roll and fold
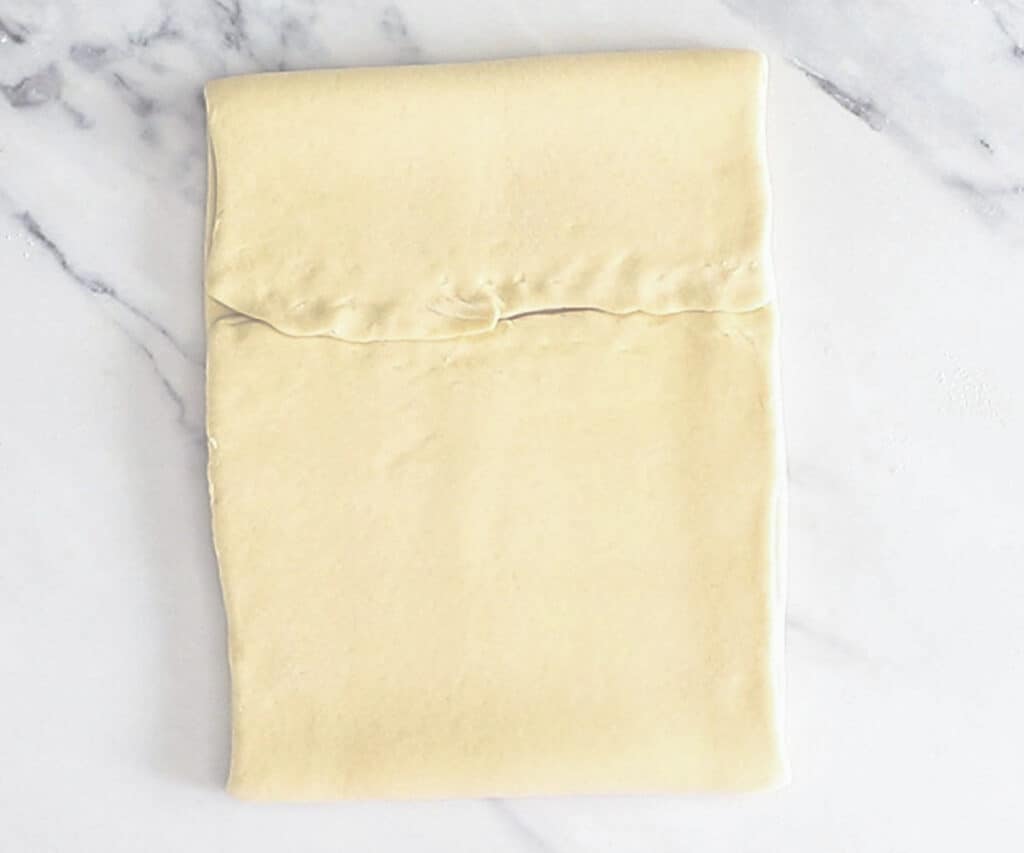
Turn the pain au chocolat dough 90° so the join is running vertically away from you. Roll the dough out into a large rectangle 20x50cm (8x20inch). Imagine the dough in thirds and fold the third closest to you over the middle third. Now fold the top third in half, so the two edges meet. Create a seam there.
Save this post!
No spam, I promise 😊
The double fold
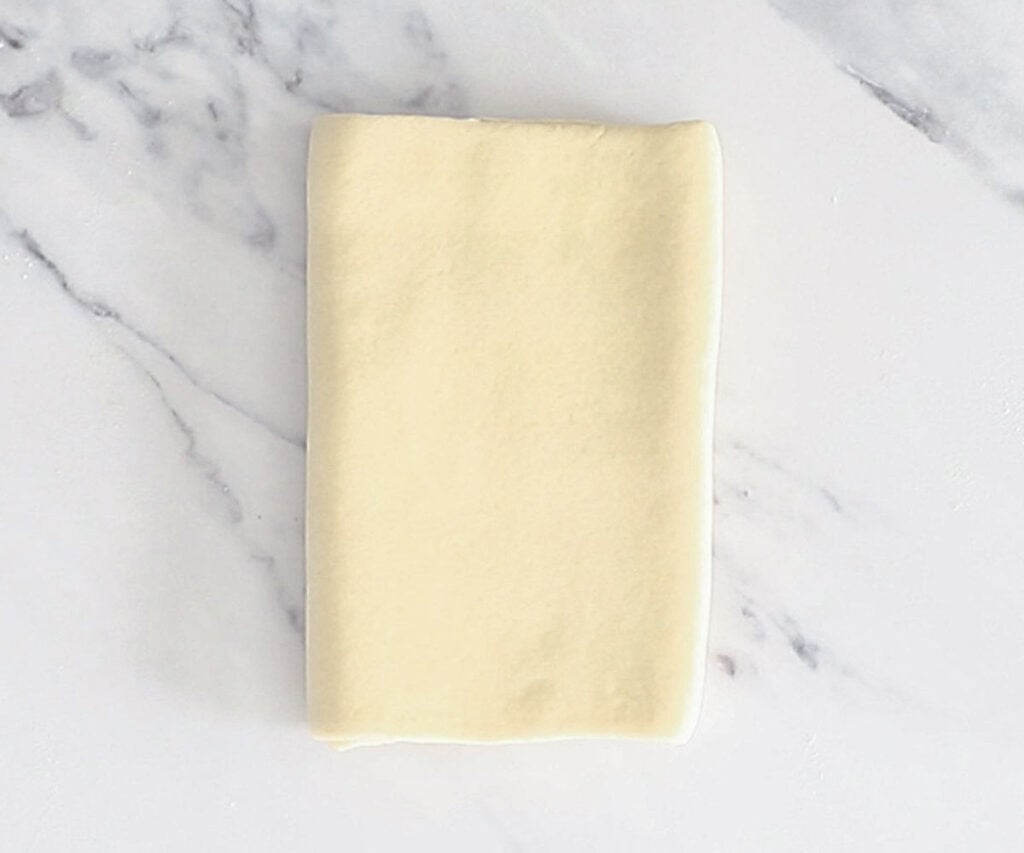
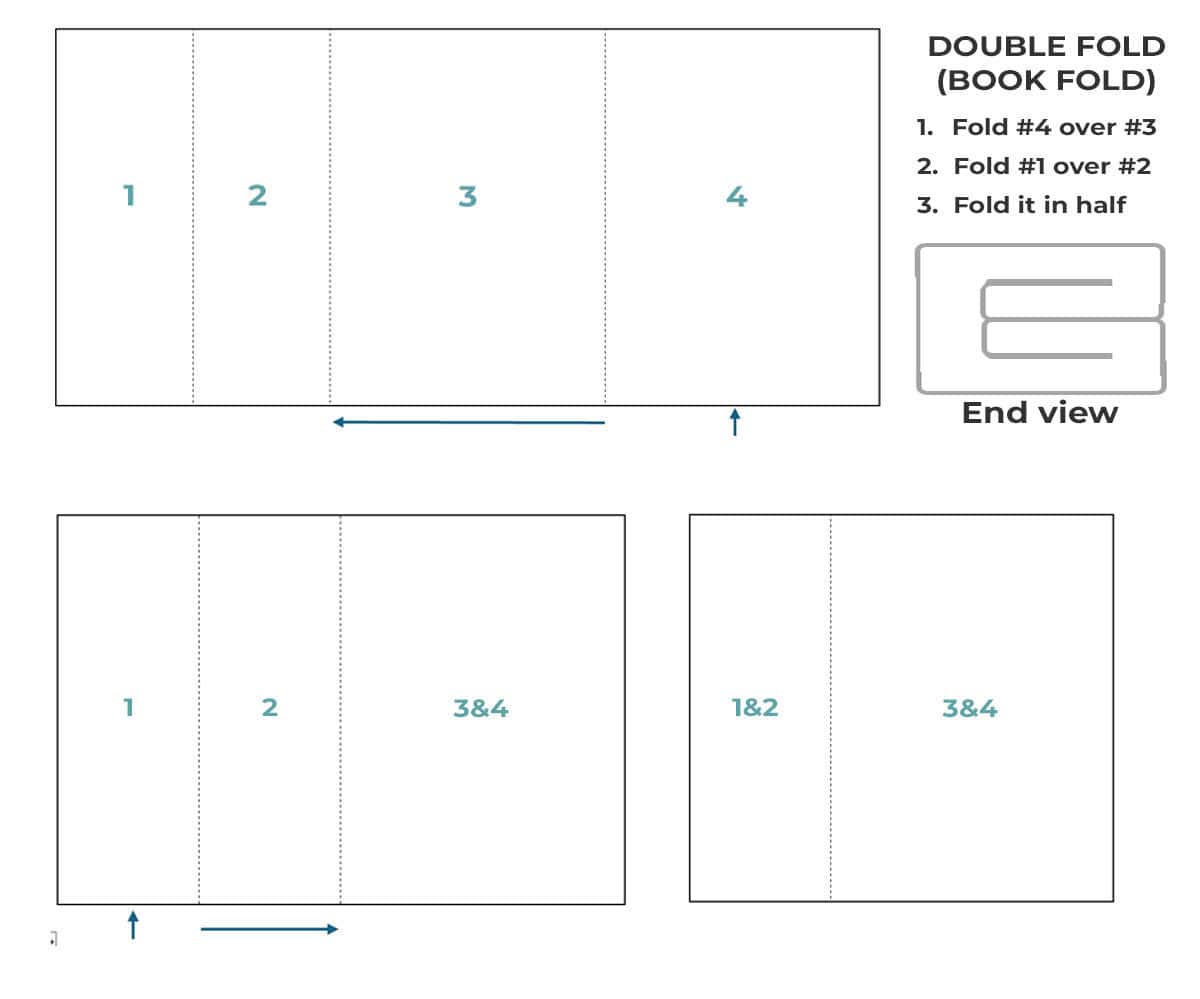
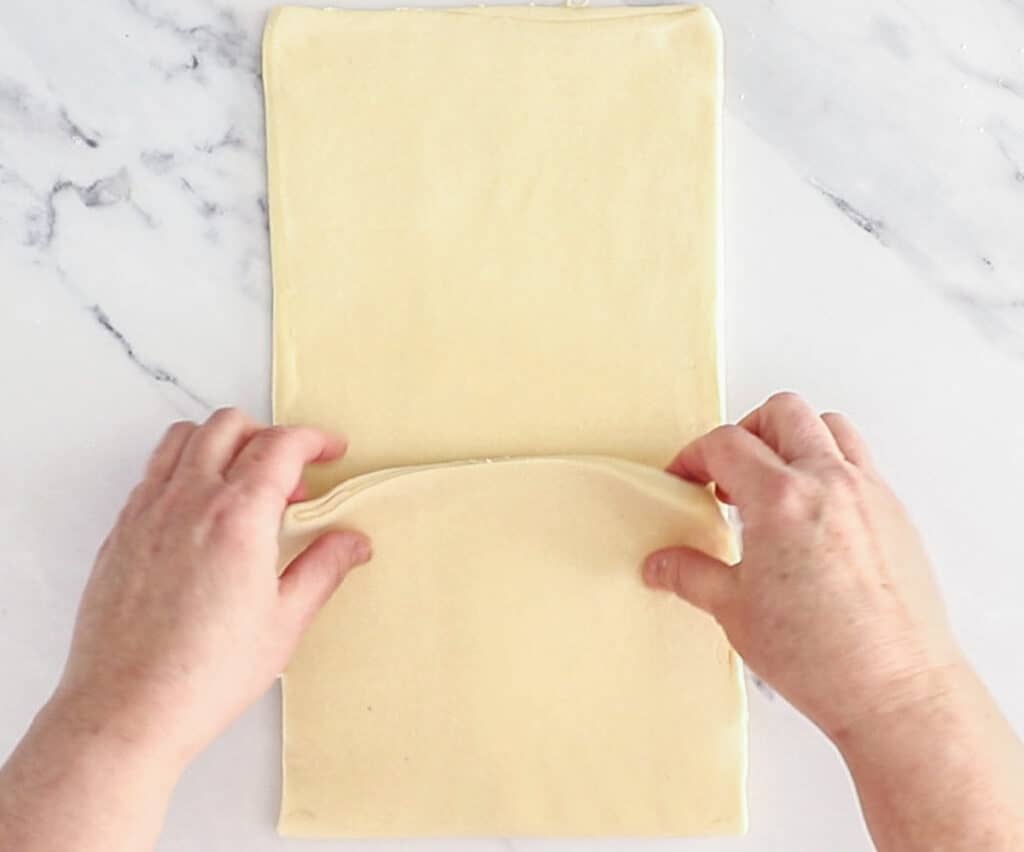
Now fold the dough in half with the seam inside. This is called a double fold or a book fold. You can see 4 layers of dough. Chill the dough for 10 minutes. Once again, you'll turn it 90 degrees before rolling. You want the dough with the visible layers facing you whenever you roll.
The single fold
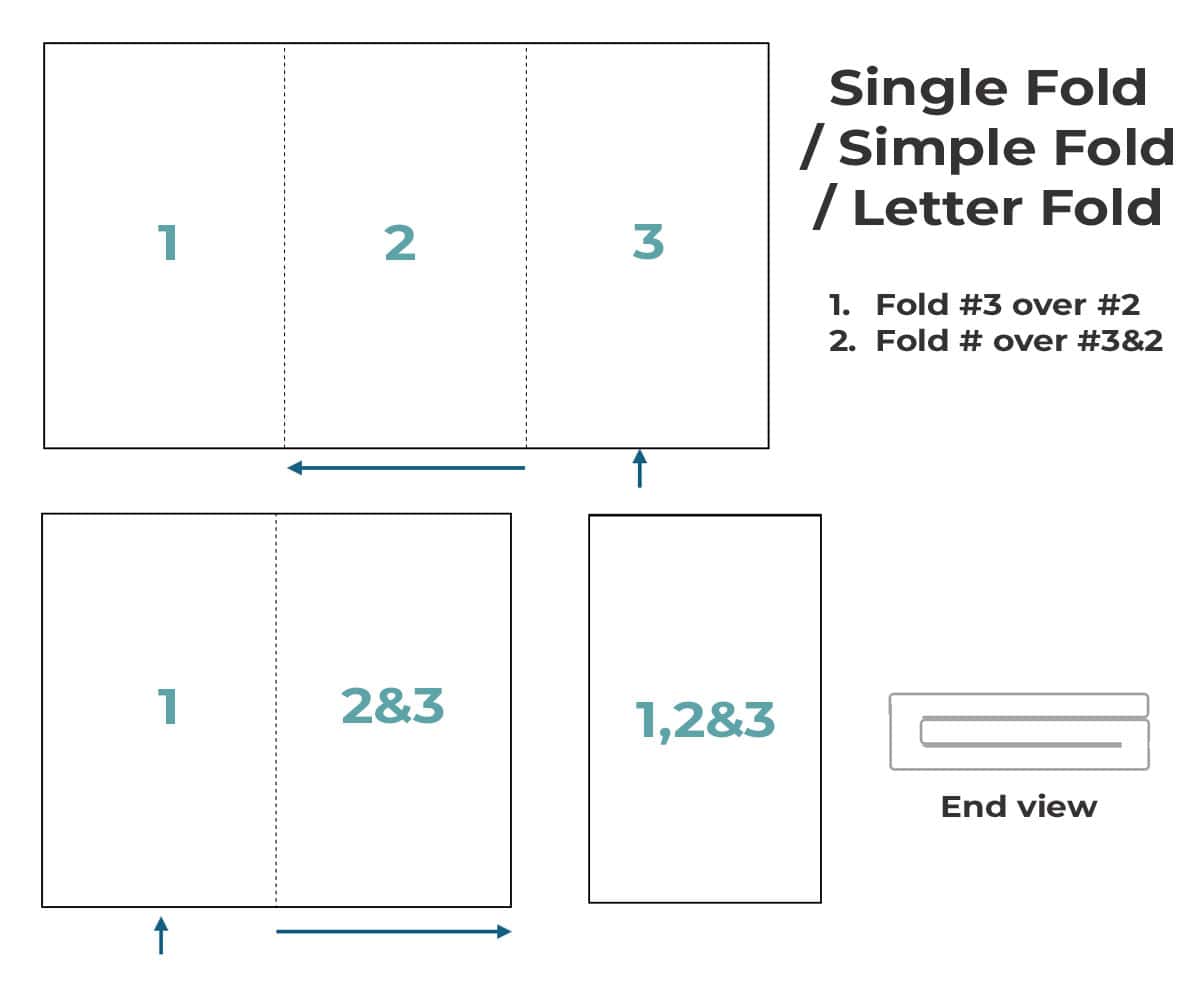
Once again, roll the pain au chocolat dough out to 20x50cm (8x20inch). Imagine it in thirds again. Fold the closest third up over the middle third, then fold the top third down over the top. This is called a single fold, letter fold or simple fold.
Making pain au chocolate
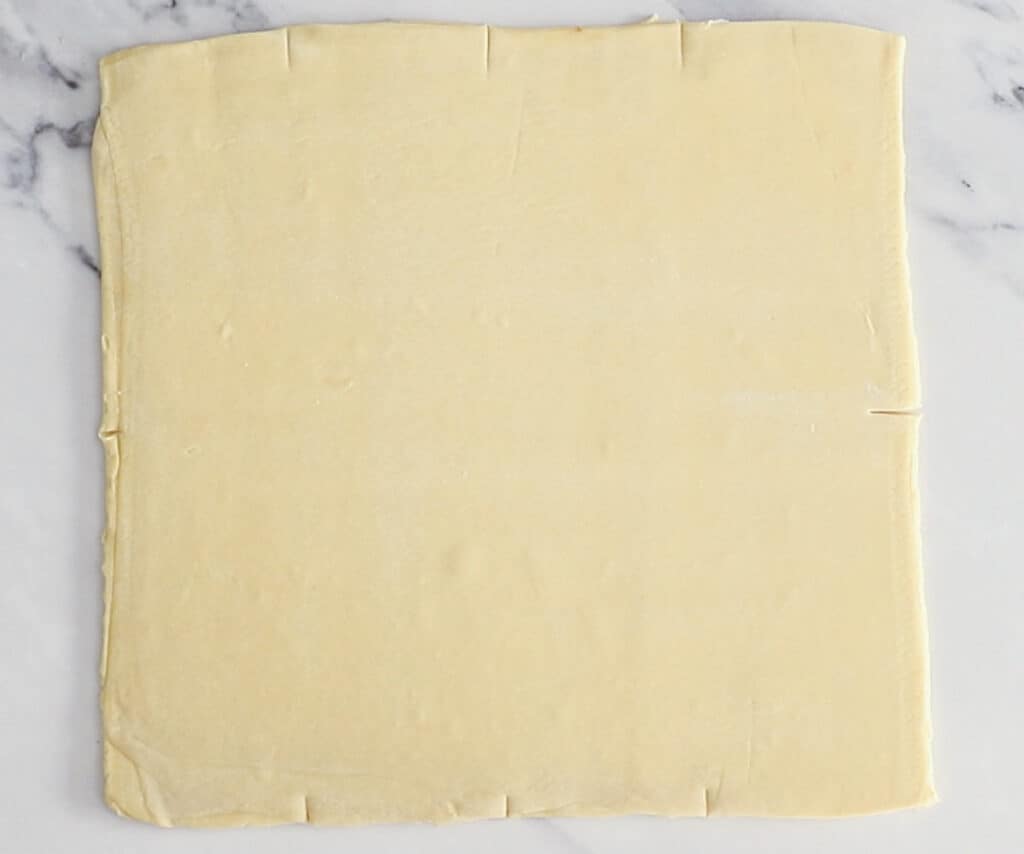
Now that the pain au chocolat dough has been worked it will need a little rest again but your dough is ready to make chocolate croissants. Chill for 10-15 minutes. It's best to roll the dough out in two stages or you'll find the dough trying to spring back. This is because of the gluten that has developed in the pain au chocolat dough over all the rolling you've done so far. Roll it out to about 1cm thick, focusing on rolling it roughly square at this point. Give it a 20-30 minute rest, then roll it out to about 4-5mm thick and to a final size of 32x32cm /12 ½x12 ½inch.
Measuring the pain au chocolate
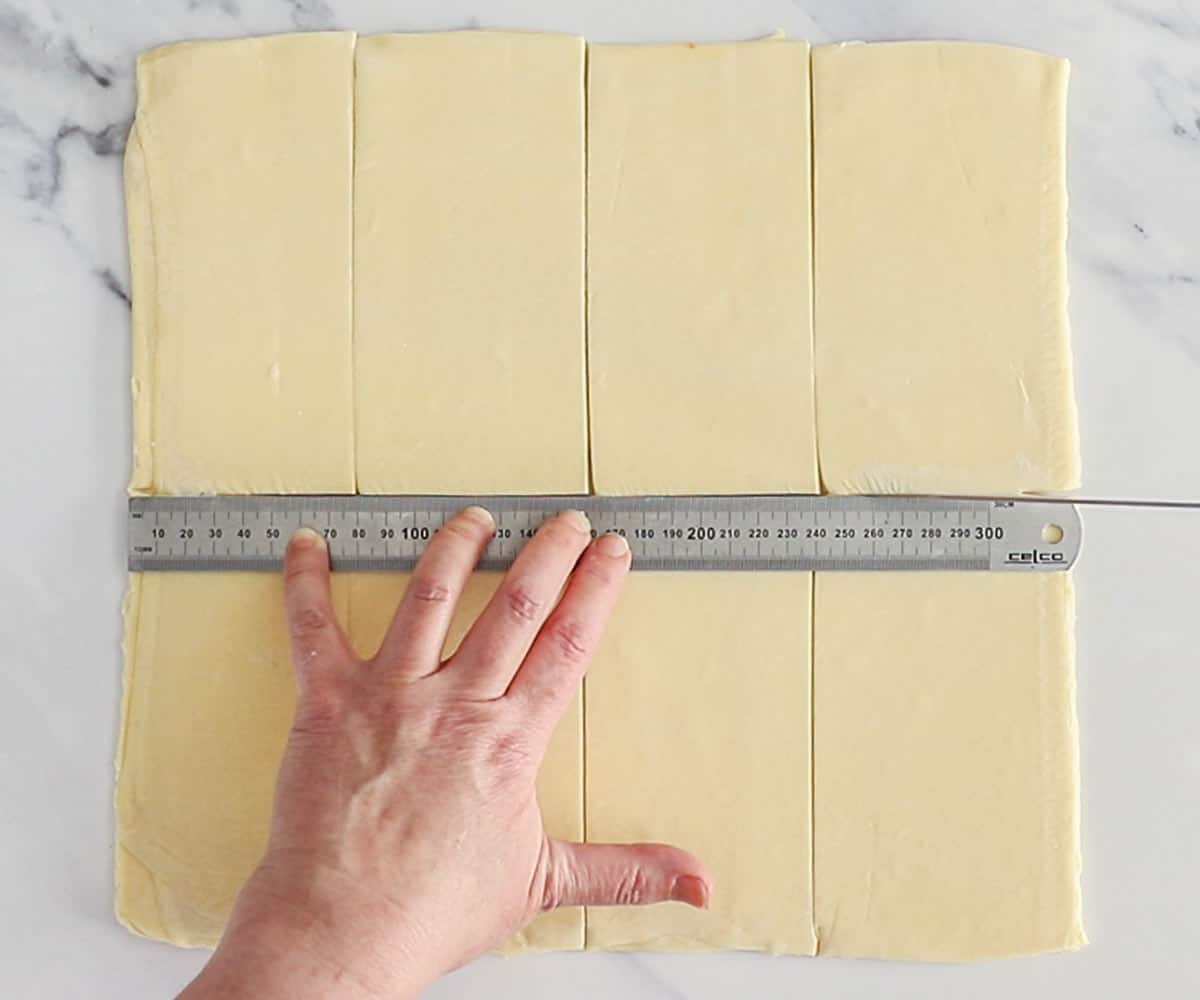
Use a ruler to help you cut even rectangles 8cmx16cm. You'll get 8 from one square of rolled out dough.
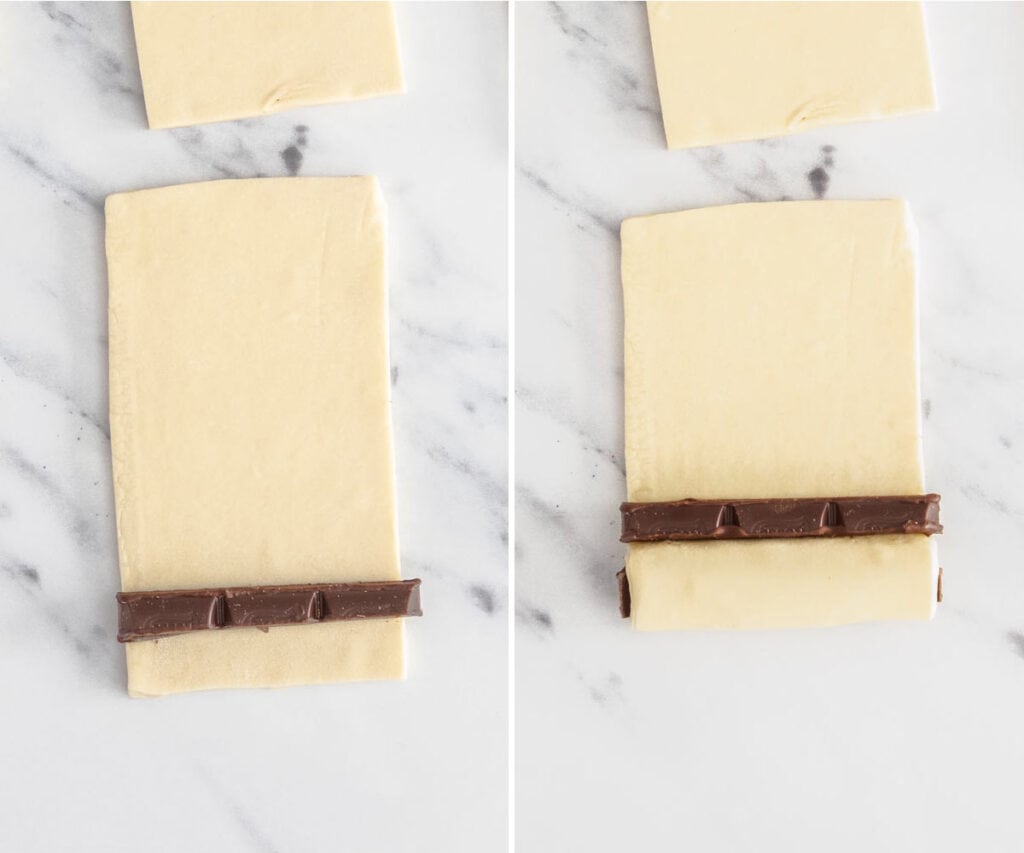
Roll the pain au chocolat
Place a baton of chocolate just in from the end of the dough (on the short end). Roll it over once, then add the second and continue rolling.
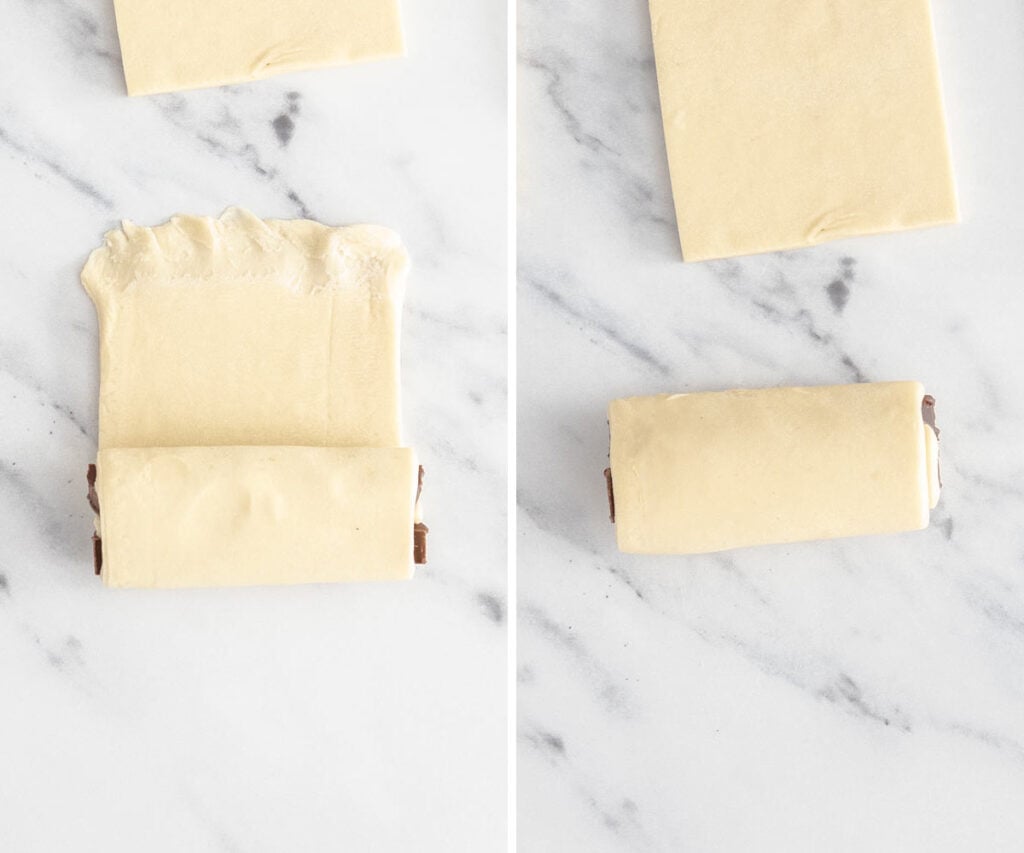
Roll the pain au chocolat
Once you get near the end, press the end of the dough against the worktop and finish rolling, pressing that end down underneath the Roll the pain au chocolat as the seam.
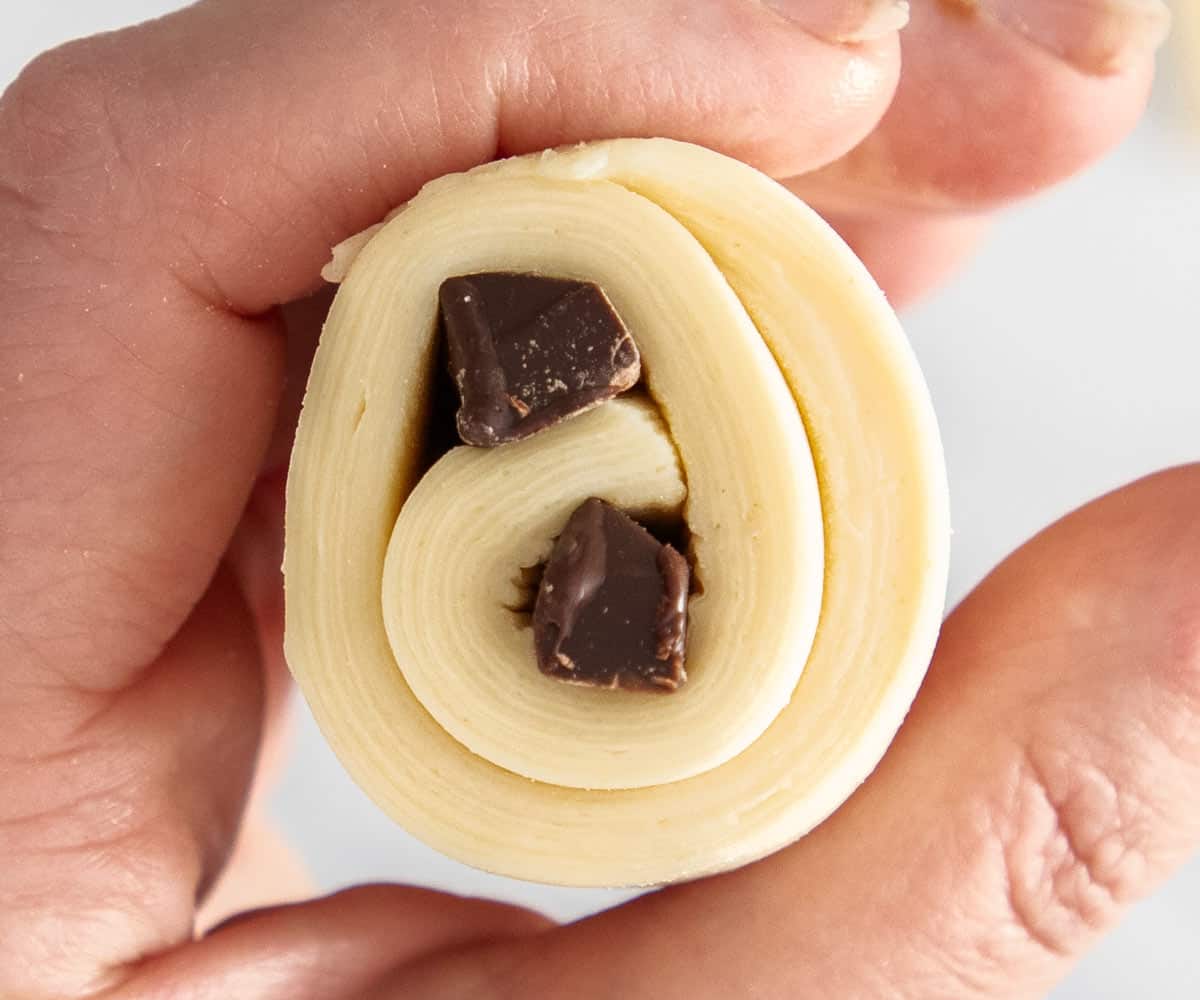
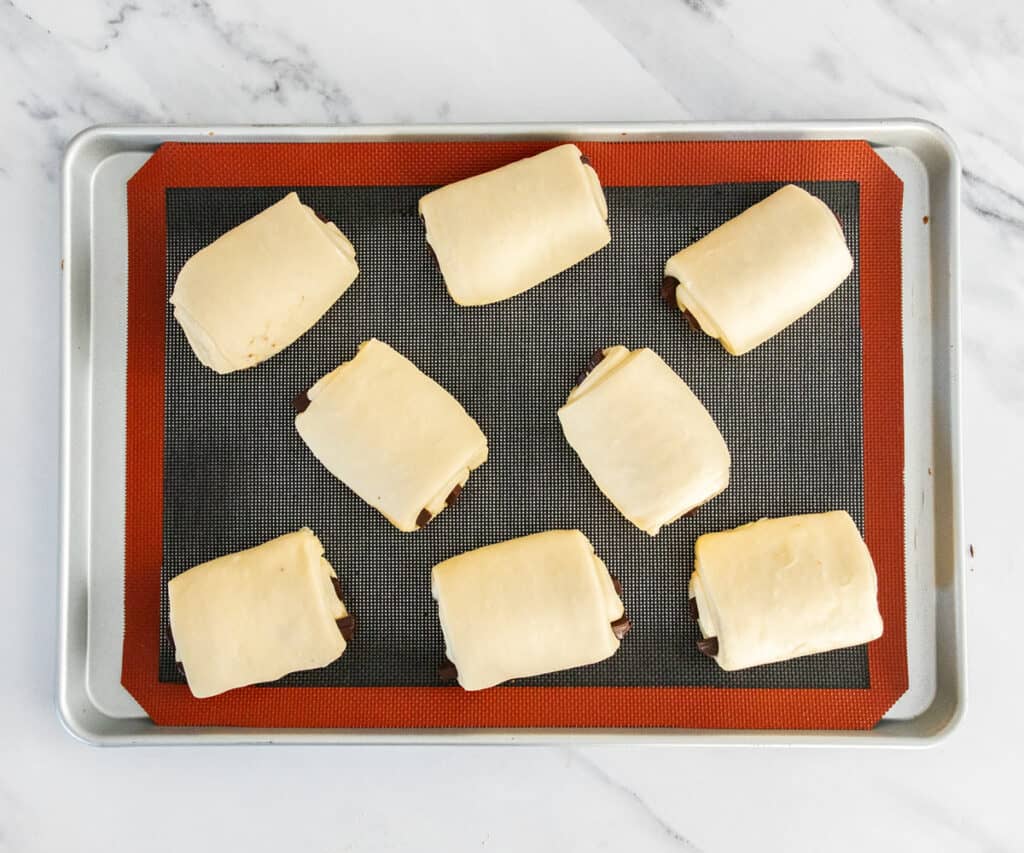
Proof the pain au chocolate
Place the pain au chocolat onto a baking sheet lined with a baking mat or baking paper with the seam underneath. Let them proof somewhere warm but not hot (24C is perfect but higher than that and you risk melting the butter. Cover with plastic wrap with a small ramekin with hot water in the middle. Brush them with eggwash before baking.
When I proof chocolate croissants, I use plastic sheet pan covers that allow room for the pain au chocolat to rise. The hot water adds humidity which helps prevent the pain au chocolat from drying out.
When it's cold in the house (say 19-20C or below), I use a long underbed storage container with a proofing mat underneath so I can control the temperature. Without it, the rising can take many hours. When it's hot, I generally have the AC on and/or proof them in the turned-off oven. On in-between days, I do it close to a window but not in the sun.
Because of the rich nature of pain au chocolat dough, they will take longer to rise than a regular loaf of bread, but often 1 ½ to 2 hours is enough.
How to know when pain au chocolat are proofed
- Pain au chocolat are ready when they look puffy.
- If you give the tray a shake, they will have a cute jiggle about them.
- Gently press the pain au chocolat with your finger and the dent should slowly spring back to halfway.
Tips and tricks
There are so many little things in pain au chocolate that need to be perfect. Here's a list to keep in mind when you start making chocolate croissants.
- Use a kitchen scale for accurate measurements. It really makes a difference. If you choose to use cups to measure your ingredients, there is every chance they won't be quite right. A scale is cheap and a good one will last forever.
- Cold but pliable is important for both the dough and the butter. If the dough is feeling warm or not cool, stick it in the fridge for 10-15 minutes.
- Be patient - don't rush the dough. Resting is as important as rolling and folding.
- Use an 82%-84% fat unsalted butter - it's more pliable than a butter with less fat.
- Focus on thickness - when you roll the dough out, make sure it's an even thickness.
- Brush away excess flour - if you're adding flour as you roll to prevent sticking, brush any excess away as you fold.
- Don't be heavy-handed - using too much force when rolling the dough can cause the butter to break or push it to the ends of the dough rather than evenly spread throughout.
- Watch the dough, not the clock - proofing times for pain au chocolat can vary depending on temperature and humidity. The pain au chocolat should look puffy and jiggly before going into the oven - not necessarily doubled in size.
- The "finger-dent" test - to check if your pain au chocolat have proofed sufficiently, gently press the dough with your fingertip. If the indentation slowly springs back halfway, the pain au chocolat are proofed and ready to bake. If it springs back quickly, they are not yet proofed and if the dent doesn't spring back, the pain au chocolat are overproofed.
- Egg wash carefully - don't eggwash the cut edges as the egg can glue the layers together, preventing the layers from rising properly. Brush the flat surfaces only and do it delicately so you don't poke holes or dents into your dough. You can also use a mini spray bottle.
- Preheat the oven well - turn the oven on at least 30 minutes before baking so the whole oven is evenly heated.
- Practice makes perfect - pain au chocolat improve dramatically with repetition. Even "failed" pain au chocolat will taste outstanding and probably still look pretty good too.

Storage and reheating
The dough
Pain au chocolat dough can be frozen, wrapped well in plastic wrap for up to 3 months. You can also roll the pain au chocolat and freeze them for up to 3 months. Freeze them first on a baking tray, then transfer them to a bag or container once solid. If you proof them before freezing, they can be baked from frozen or thaw in the fridge overnight and bake first thing in the morning.
Baked pain au chocolat
Baked pain au chocolat will store at room temperature in an airtight container for 2-3 days. They also freeze very well. Freeze on a tray until solid, then transfer to a freezer bag or air tight container in the freezer for up to 3 months.
Reheating pain au chocolat
To get nice, crisp layers again with that soft, gooey chocolate inside, reheat pain au chocolat in an oven preheated to 180C/350F for 10 minutes. Never reheat in the microwave, or you'll just end up with soft all over.
😥 Troubleshooting
Learning to make pain au chocolat and croissants is a labour of love and you will have hiccups along the way. I have made countless batches of pain au chocolat - each one taught me something new. I put together this troubleshooting guide to help you understand what went wrong so you can make changes to your next batch.
Your dough may not have been cold enough, it may have proofed in too warm an environment or the butter may have broken when rolling. Chill longer between folds, never proof higher than 24C/75F, and use gentle pressure when rolling.
Thay were probably underproofed. Pain au chocolat should look puffy and a little jiggly before baking. If your kitchen is cold, extend the proofing time or use a warm (not hot) spot. Also, check that your yeast is within date and has been stored correctly.
Overproofing will make pain au chocolat lose their structure and they will collapse during and even after baking. The dough becomes too fragile to support the layers, leaving them flat instead of tall and flaky.
This can happen with the dough is too warm and/or rolled too aggressively. Work quickly, keeping the dough cool and avoid pressing too hard on the dough.
Dense pain au chocolat are usually caused by overworking the dough, the layers have pressed together or they were underproofed. Roll with gentle pressure and allow plenty of resting time.
Cracked butter is caused by the butter being colder than the dough and not pliable enough. Let the dough sit for a few minutes then try rolling again using gentle pressure.
This is due to gluten-development. The more you work a dough, the tighter the gluten strands become, making the dough more elastic. Let the dough rest for 10-15 minutes so the gluten can relax and try again. You don't want to force it.
This is likely due to the dough not being rolled into an even layer resulting in thin and thick spots. Take care to make sure the dough is rolled evenly.
Your oven may run hot or the pain au chocolat were too close to the top element. Bake them on the middle rack and test reducing the temperature slightly if needed.
This happens if your baking sheet is too thin or it was placed too low in the oven. Use a sturdy baking sheet and bake on the middle rack.
They're probably underproofed or too much yeast has been added. Measure yeast accurately and allow a full, slow rise for the best flavour.
More recipes you'll love
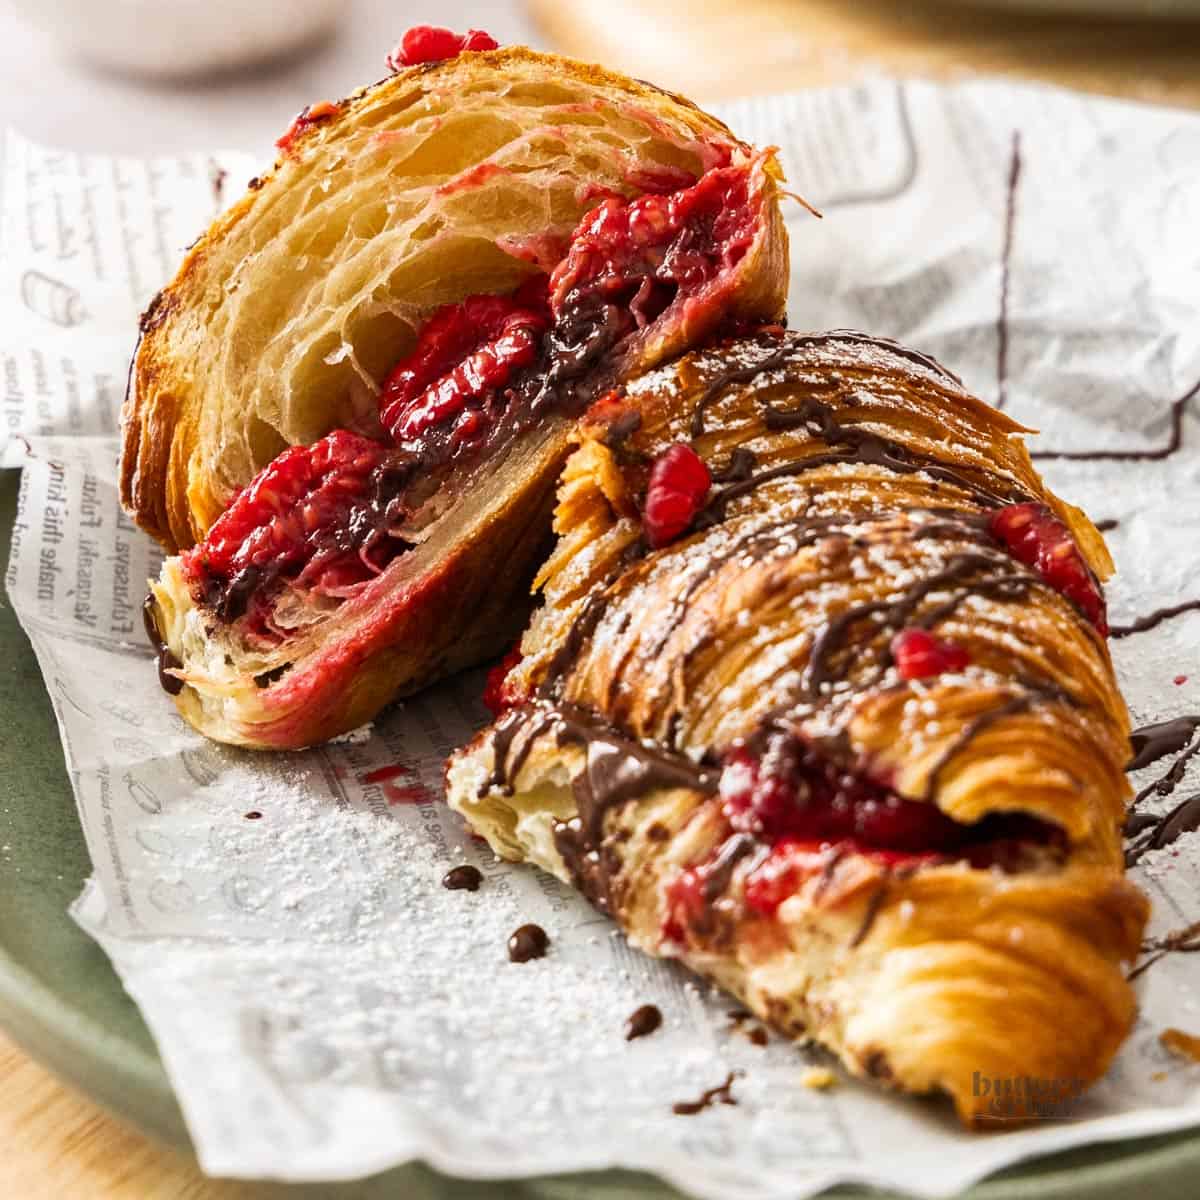


If you made this pain au chocolat recipe,
be sure to leave a ⭐⭐⭐⭐⭐ rating below. Thank you!

Pain Au Chocolate Recipe
Equipment
- Stand mixer with dough hook attachment helpful but not essential
- Or mixing bowl
- Dough scraper
- Ruler or tape measure
- Knife or pizza cutter
- Insulated baking trays helpful but not essential
- Silicone baking mat helpful but not essential
- Proofing mat helpful in cold weather but not essential
Ingredients
FOR THE DOUGH (DETREMPE)
- 335 g bread flour (~11 ¾oz / ~ 2½ cups)
- 50 g white sugar (~ 1 ¾oz / ¼ cup)
- 5 g salt (~1 tsp)
- 8 g instant dry yeast (2 ⅔ tsp)
- 125 ml water (½ cup)
- 80 ml whole milk (⅓ cup)
- 21 g unsalted butter cold and cubed (1 ½ oz)
BUTTER BLOCK (TOURRAGE)
- 200 g unsalted butter (82-84% butter fat) (14oz)
FINISH
- 1 egg yolk
- 20 ml whole milk or thickened cream/heavy cream
- 16 dark chocolate batons 8-9cm / 3 ½ inches (notes 2)
Instructions
- THE CROISSANT DOUGH (DETREMPE): Place the flour, sugar and yeast to a mixing bowl or the bowl of a standmixer. Place the salt on the opposite side of the bowl to the yeast. Add the water, milk and 21g of cubed butter. Beat with the dough hook attachment on low or your hands until the butter has worked it's way into the dough.
- Turn the stand mixer up to the second setting or knead by hand for a further 5-8 minutes until the dough is mostly smooth, elastic and the sides of the bowl are clean. If kneading by hand, it will just become less sticky over time and look mostly smooth and elastic.
- Turn the dough out onto a clean work surface and place the bowl upside down over it. Rest for 45 minutes at room temperature.
- Once rested, roll the dough out to a rectangle, 20x30cm (8x12 inch). Transfer to a sheet of baking paper or baking mat on top of a baking tray or chopping board, cover with plastic wrap and freeze overnight (or for at least 2 hours).
- THE BUTTER BLOCK (TOURRAGE): Cut the butter into slices of similar thickness.
- Fold a long piece of baking paper in half, then measure a rectangle 20cmx15cm (8x6in) folding along all the lines. Place the butter inside. Flip it over so the folded bits are underneath. Beat firmly but not aggressively with a rolling pin until it spreads out evenly into the rectangle.
- Chill until required.
- ADDING THE BUTTER BLOCK TO THE DOUGH: Take the frozen dough out of the freezer at least 1 hour before you want to start rolling and folding. Make sure its corners are as square as possible and that it is at least 20x30cm (8x12in).
- Take the butter block out of the fridge and give it a gentle bash again with the rolling pin (not hard, you shouldn't break the paper). Unwrap the butter block and place in the centre of the dough (if needed, pull out the side edges so the butter doesn't overhang the dough).Make sure the butter is pliable but not soft. You should be able to bend it without breaking but it shouldn't be melting in your hands.
- Fold each of the ends of the dough over the butter to meet in the centre and press the seam together as best you can. Run a knife gently down the folded edges just to release a bit of tension - no need to cut all the way through.
- FIRST FOLD: As long as it still feels cool to the touch (if not, chill for 10 minutes), roll the dough out to 20x50cm (8x20in). Keep it as rectangular as possible, tapping in the sides to straighten them from time to time. If you find it feeling sticky or sticking to the work top you can dust with a little flour but if it's happening too often it probably needs to be chilled more. Turn and flip the dough as required.
- Choose the ugliest side of the dough and face that upwards (this will then get encased inside so you end up with a smooth dough). With the short side closest to you, imagine the dough in 3 sections - fold the closest third up and over the middle third.
- Now, fold the top section in half so that the two ends meet (not over the top of the middle but to meet the first one you folded to create a join). Press those two ends together gently to form a seam.
- Finally, fold it in half away from you (so the bottom edge meets the top edge).- You should now have 4 visible layers and this is called a double-fold or book fold.
- Chill for 15 minutes.(Or, you can freeze the dough to proceed with another day if you prefer. Make sure it thaws - it should be malleable but still cold before you start rolling again.)
- SECOND FOLD: Score the folded edges with a knife again. Roll the dough out once again to 20x50cm (8x20in). Keep it as rectangular as possible, tapping in the sides to straighten them from time to time.
- With the short side closest to you, imagine the dough in thirds again. Fold the bottom third up over the middle. Fold the top third down over the top.- You should now have 3 visible layers and this is called a single-fold, simple fold or letter fold.
- Chill the dough for 10 minutes in the fridge.
- PREPARE THE CHOCOLATE IF YOU DON'T HAVE BATONS.If you can't get the ready-made chocolate batons that bakeries use, just use a block of good quality baking chocolate. - Heat a sharp knife for a few seconds over a flame or with a kitchen blowtorch. Boiling water will work too but make sure to dry it off before the next step.- Lay the blade of the knife on top of full lines of chocolate 8-9cm/3 ½ inches and very gently saw backwards and forwards to cut it into two strips. Don't put too much pressure on them or the chocolate will break.- Clean the knife off between cuts with paper towel and reheat as often as necessary. If your chocolate does break, you can still use it.
- TURN THE DOUGH INTO PAIN AU CHOCOLATE: Score the folded edges of the dough again. Roll the dough out to 32x32cm (12 ½ x 12 ½in) keeping the sides as straight as possible. The dough should be about 4-5mm thick.
- Place a ruler along the long edge furthest from you. Use the tip of a sharp knife to make small nicks at 8cm intervals. Repeat on the edge closest to you.
- Place the ruler along the side edges and make a cut at 16cm (centre) and repeat on the other side.
- Now use a very sharp knife and ruler to cut from all the top nicks to the matching ones along the bottom. Then cut across the centre one in the other direction, so you have 8 rectangles of dough.
- ROLL THEM UP: Place a baton of chocolate on one piece of dough just in from the edge (on the thin side). Roll the edge of dough over it.
- Add a second baton of chocolate, then continue rolling the dough all the way up.
- When you get near the end, squish the far end of the dough against the worktop, then finish rolling the dough up, using the squished end as the seam underneath the pain au chocolate.
- Repeat with all the rectangles of dough.
- Proof the dough rolls at room temperature or up to 24C for 1 ½-3 hours on a baking sheet lined with a baking mat. The cooler it is the longer the dough will take to rise but you don't want it to get too warm or the butter will melt. They are ready when they look puffy, pillowy and they jiggle when you shake the tray. You can gently press the dough with your fingertip and the indentation slowly springs back halfway, they're ready to bake.- You can freeze the pain au chocolate at this point. Let them thaw on the day of baking or overnight in the fridge then continue.
- BAKE: When you can see they're getting close to being fully proofed, preheat the oven to 170C fan forced (or 190C/375F with no fan) - I find fan best for pain au chocolat. Try to preheat at least ½ an hour to make sure the oven is fully heated throughout. You can transfer the pain au chocolat to the fridge if you need to slow down the proofing process.
- Mix together the egg yolk and milk (or cream), then gently brush it over the pain au chocolat rolls.
- Bake for 20-25 minutes until golden brown on the outside. Let them cool before cutting.
- Please take a moment to leave a comment & rating. It's appreciated and so helpful.
Notes
- Tablespoons: I use a standard Australian 20ml tablespoon (equal to 4 teaspoons). Check yours before measuring.
- Chocolate Batons: If you can't get the ready-made chocolate batons that bakeries use, just use a block of good quality baking chocolate.
- Heat a sharp knife for a few seconds over a flame or with a kitchen blowtorch. Boiling water will work too but make sure to dry it off before the next step.
- Lay the blade of the knife on top of full lines of chocolate 8-9cm/3 ½ inches and very gently saw backwards and forwards to cut it into two strips. Don't put too much pressure on them or the chocolate will break.
- Clean the knife off between cuts with paper towel and reheat as often as necessary.
- If your chocolate does break, you can still use it.
- Chocolate can be prepared ahead of time.
- Nutritional values are based on 8 pain au chocolate



Comments
No Comments