
If you've always wanted to make éclairs at home but found them intimidating, you're not alone. Choux pastry, and especially making éclairs, can feel technical at first but once you understand the dough and how it behaves, I personally believe it's one of the easiest pastries to make.
In this guide, I'll share all my tips and tricks for perfect éclair shells, right here. Over many, many hours of learning, trials and testing I created this straightforward, fail-proof tutorial so you can learn how to make eclairs, as beautiful as any bakery, in your very own kitchen. You'll also learn how to avoid or fix common mistakes like flat or deflating éclairs, cracked éclairs, no hollow insides and soggy insides.
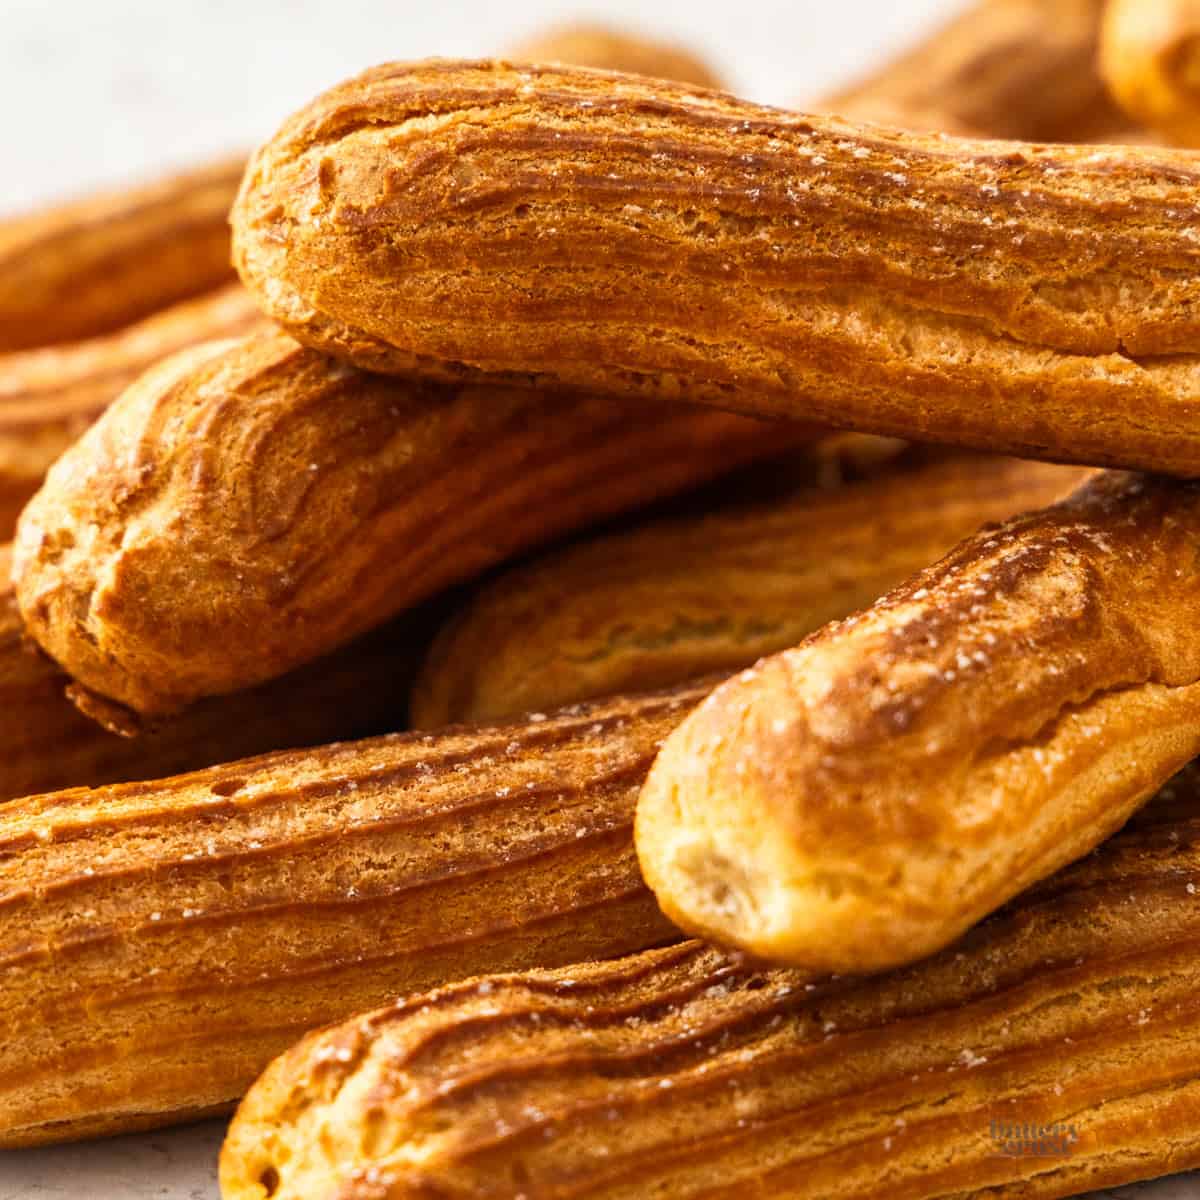
We'll start here with the classic éclair pastry, also known as pâte à choux. And when they're done, they're ready to be filled with anything from silky pastry cream to whipped cream and custard-based or fruity fillings.
Never Miss a Recipe!
Get the latest recipes straight to your inbox!
Jump to:
- ❤️ Why this éclair pastry recipe works
- What are eclairs?
- Ingredients & substitutions
- How to make éclairs (perfect éclair shells)
- What is a panade and how to know when it's ready
- When is choux pastry ready - the visual cues
- What if I see air bubbles
- Should I use silpat or baking paper?
- Tips and tricks
- 😥 Troubleshooting
- Eclair flavour ideas
- Try the Custom Choux Recipe Builder
- Storage
- Can I make eclairs ahead of time?
- Tools I use
- More recipes you'll love
- How to make Eclairs (Choux Pastry for Eclair Shells)
- 💬 Comments
❤️ Why this éclair pastry recipe works
Éclair pastry has a delicate buttery and only lightly sweet flavour. I've adapted my recipe from my choux pastry recipe (you can see my comprehensive choux pastry tutorial here). It's easy, reliable and results in shells that bake evenly, hold their shape and have a beautifully crisp crust. In this guide you'll get;
- Clear visual cues for success since you can't rely on weights alone for a perfect choux pastry.
- A balanced water/milk ratio for the perfect flavour and texture
- Which flour to use for strong, well-shaped éclairs
- How to prevent cracks to get those perfect bakery-style éclairs
- Step by step instructions with photos to guide you
- Versatile recipe - once mastered you can fill these with endless flavour combinations.
- Troubleshooting tips to help you master the perfect éclairs
Once you have your first homemade éclair shells, fill them with this vanilla pastry cream and top them with chocolate glaze for classic chocolate eclairs.
What are eclairs?
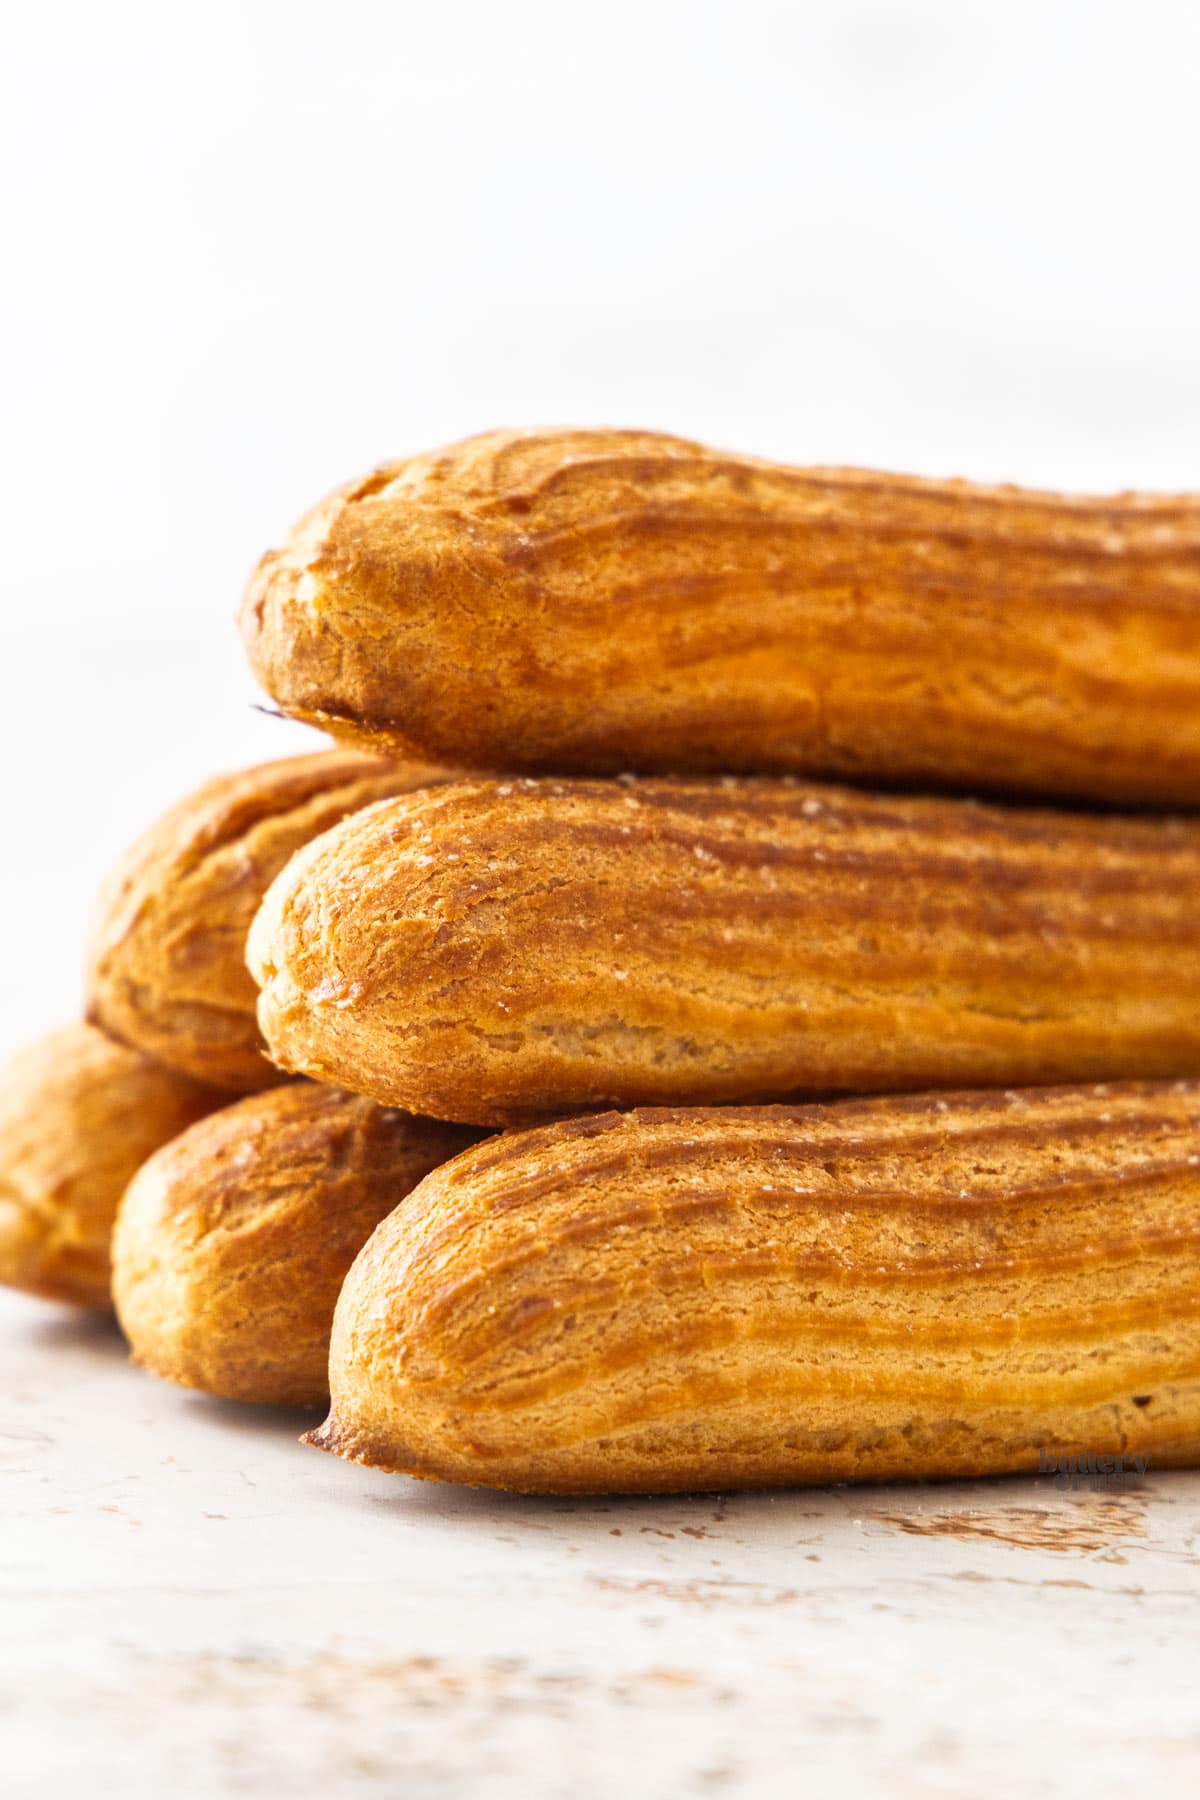
An eclair is a French pastry made from light and airy choux dough baked until golden brown, crisp and hollow inside. The name eclair means "flash of lightning" and likely refers either to how quickly they're eaten or how the glaze shines.
Shaped into a long pastry tube with closed ends, they're often filled with pastry cream (aka crème pâtissière) or other creams or custard fillings. They are typically topped with some form of glaze, classically chocolate.
There really is no limit to how an eclair can be filled and topped. Any flavour pastry cream or other french cream, ganache, caramel, jams. The only limit is the imagination.
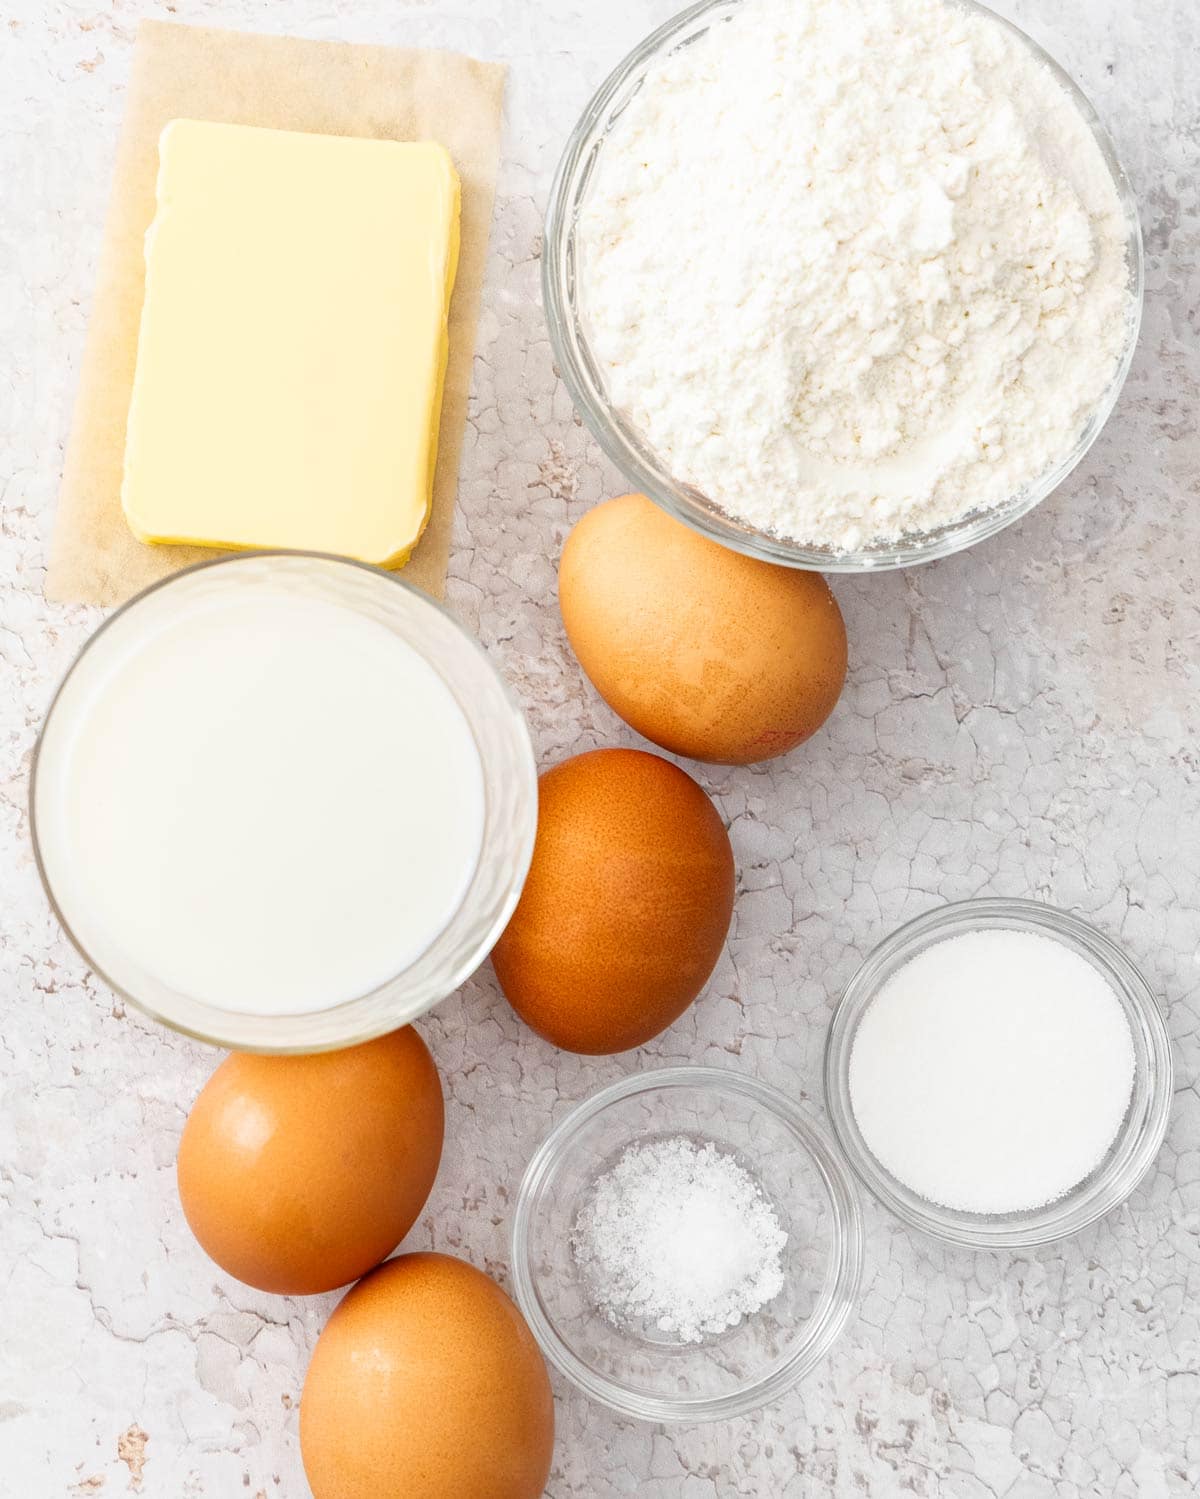
Ingredients & substitutions
While the ingredients are simple - milk, water, butter, eggs, flour - liquid ratios and types of flour can be adjusted to suit the result you want.
⬇️Jump to the recipe card for full quantities and instructions.
Flour
Plain flour (all-purpose flour) works great in this recipe. This gives a good stable eclair shape. If you want a crisper, more sturdy eclair shell you can swap to bread flour. Bread flour can also absorb a little more liquid due to its higher protein content. Pastry flour doesn't create a strong enough shape for eclairs.
Milk and water
A higher proportion of water in the choux dough tends to produce a crispier eclair shell. Water creates more steam as the pastry bakes, helping the choux expand well in the oven and dry out slightly more, which results in a lighter, crisper exterior.
Increasing the proportion of milk, however, adds richness and flavour thanks to the milk fats and sugars. This produces a pastry with a softer interior and slightly more tender crust. The more milk, the more the eclairs will brown as well.
Because of these differences, creating an eclair recipe is a balancing act. Too much water can make the shells very crisp but less rich while too much milk can soften the exterior. I've found that a 2:1 ratio of water to milk gives the best results overall for eclairs. For my recipe, that looks like ⅔ cup water to ⅓ cup milk
Eggs
Egg quantity is the one thing you can't measure in choux pastry - it needs to be added by eye until your dough is the right consistency. So many factors can affect the moisture in your dough, from the length of time you cooked the dough in the pan, over exactly what temperature to the protein content of the flour you use even to the humidity in the air. This is why it's essential to use visual cues when perfecting your eclair dough.
How to make éclairs (perfect éclair shells)
Once you know the how and the visual clues, éclairs are surprisingly simple.
- Make the choux pastry dough
- Pipe into long logs*
- Bake until golden and crisp
* The most challenging part of making eclairs is piping them into perfect long and uniform shapes without air bubbles. That said, even an ugly eclair will taste amazing and practice makes perfect! Don't be too hard on yourself while you're learning and have some fun.
⬇️Jump to the recipe card for full quantities and instructions.
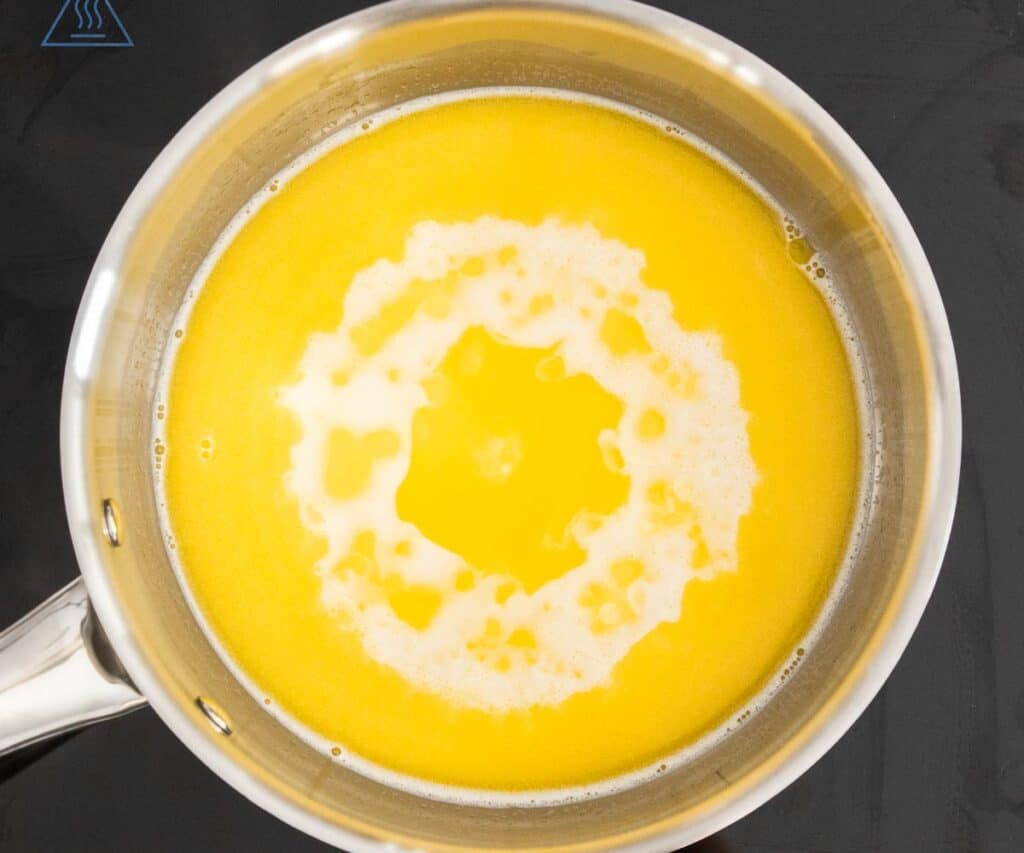
Heat the milk & butter
(2 minutes) Heat butter, milk and water in a medium heavy-based saucepan until melted and it starts to bubble.
Add flour
(1 minute) Immediately turn the heat off and sift in your flour. Mix with a wooden spoon or silicone spatula until you can see no more flour streaks or lumps.
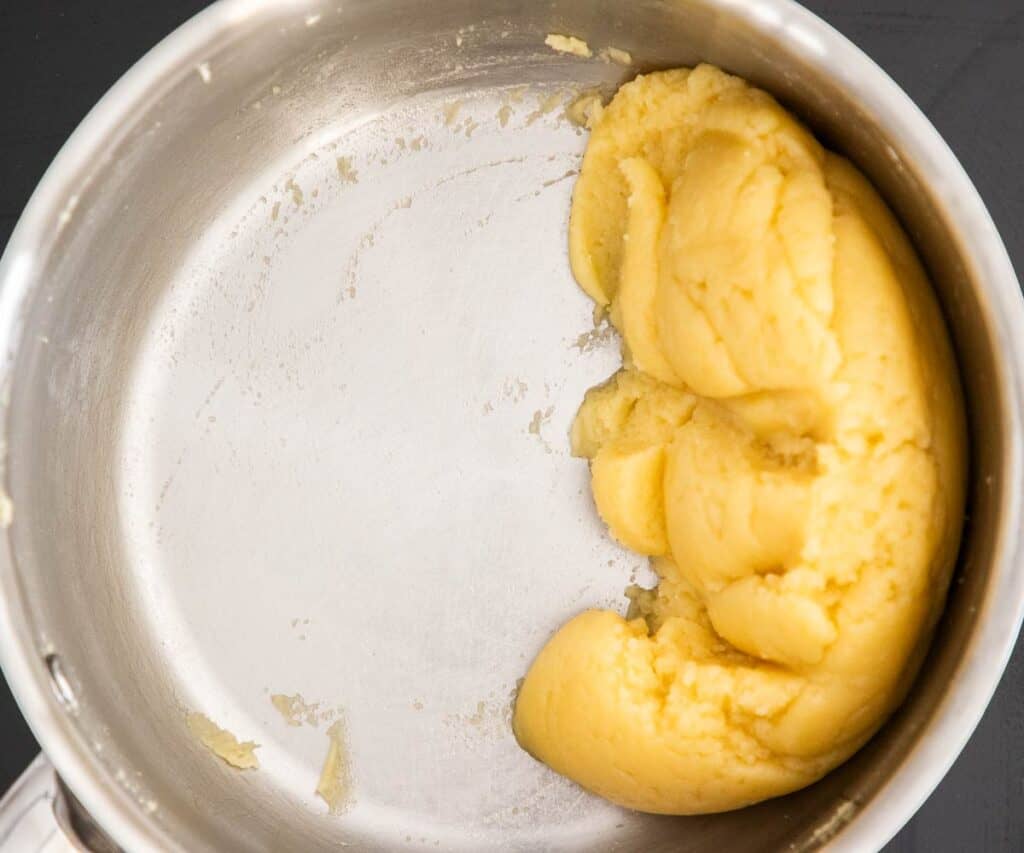
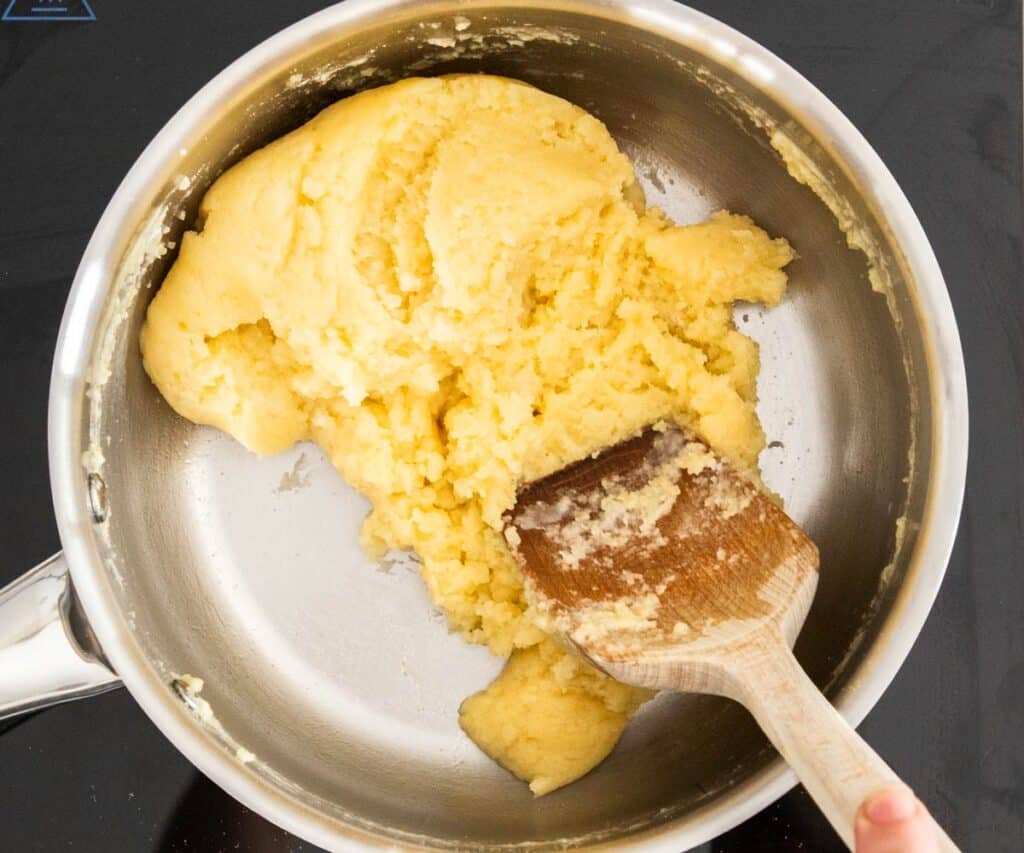
Cook the panade
(2 minutes) Return the pan to low heat and cook for 2 minutes, stirring and folding constantly.
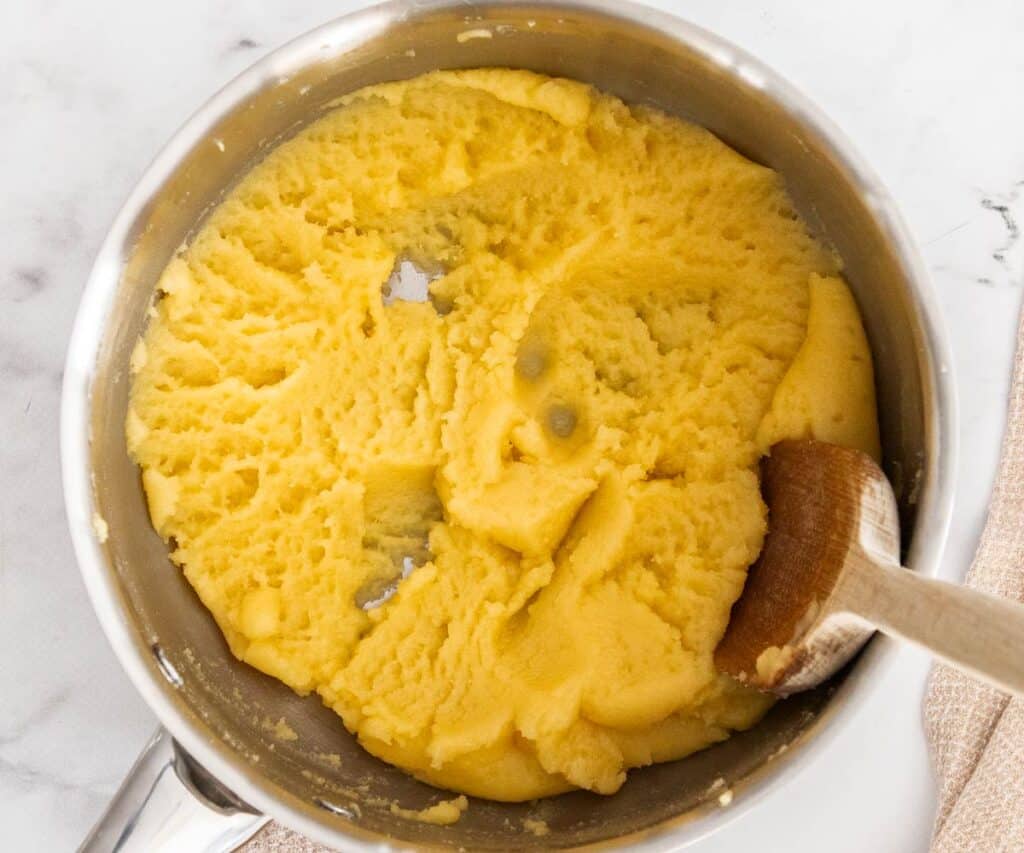
What is a panade and how to know when it's ready
A panade is the word used for butter, milk/water and flour cooked in a pan. This process gelatinizes the starches in the dough which allows the dough to absorb more moisture. It helps to develop the gluten and create a sturdy shell.
While many recipes say to "look for a film on the bottom of the pan" to know when it's ready, I find this unreliable since there is pretty much always some sort of film on the bottom of the pan. Instead focus on time - cooking, stirring and folding over low heat for 2 minutes. By the end the dough will look more smooth and move around the pan easily.
Cool the panade
(2-10 minutes) You can cool the panade quickly in a stand mixer on low for 2 minutes or you can spread it out in the pan and let it cool for 5-10 minutes. This step ensures your eggs don't scramble when they're added.
Add the eggs
(3 minutes) First, beat your eggs in a jug lightly which will help them blend into your eclair pastry more evenly. Add the eggs just a quarter at a time, beating the mixture between each addition until the eggs are fully incorporated. Do this in a stand mixer on low or by hand with a spatula.
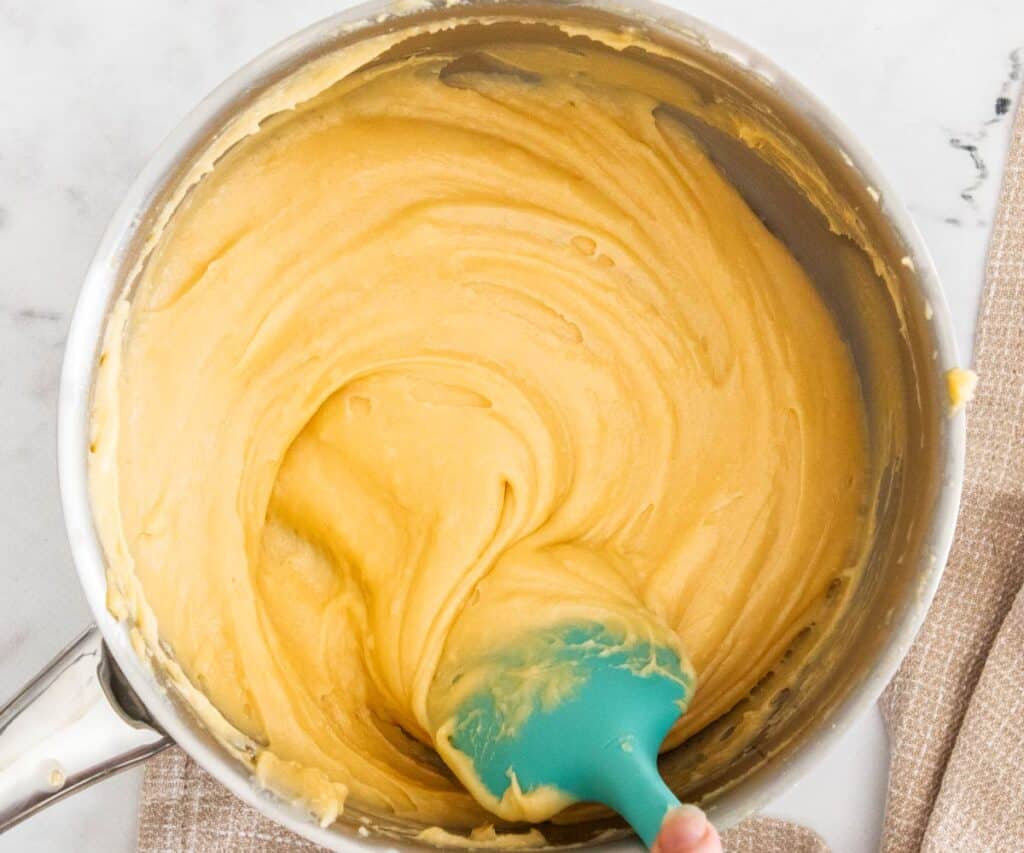
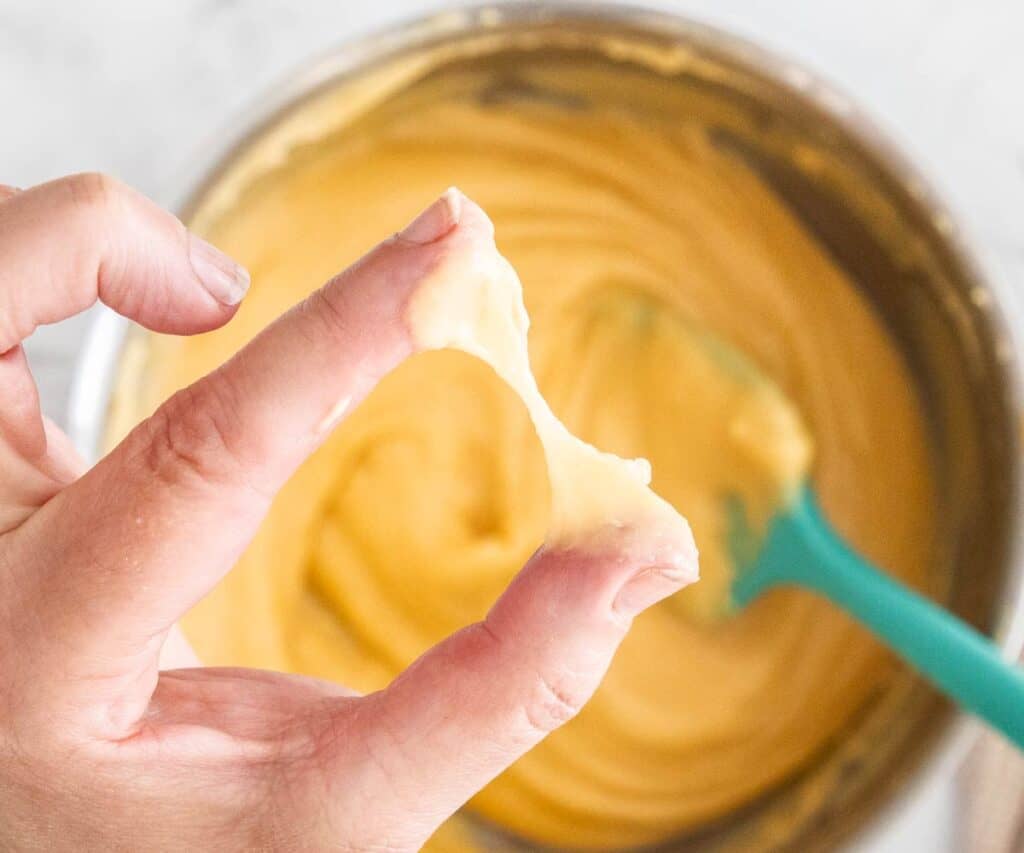
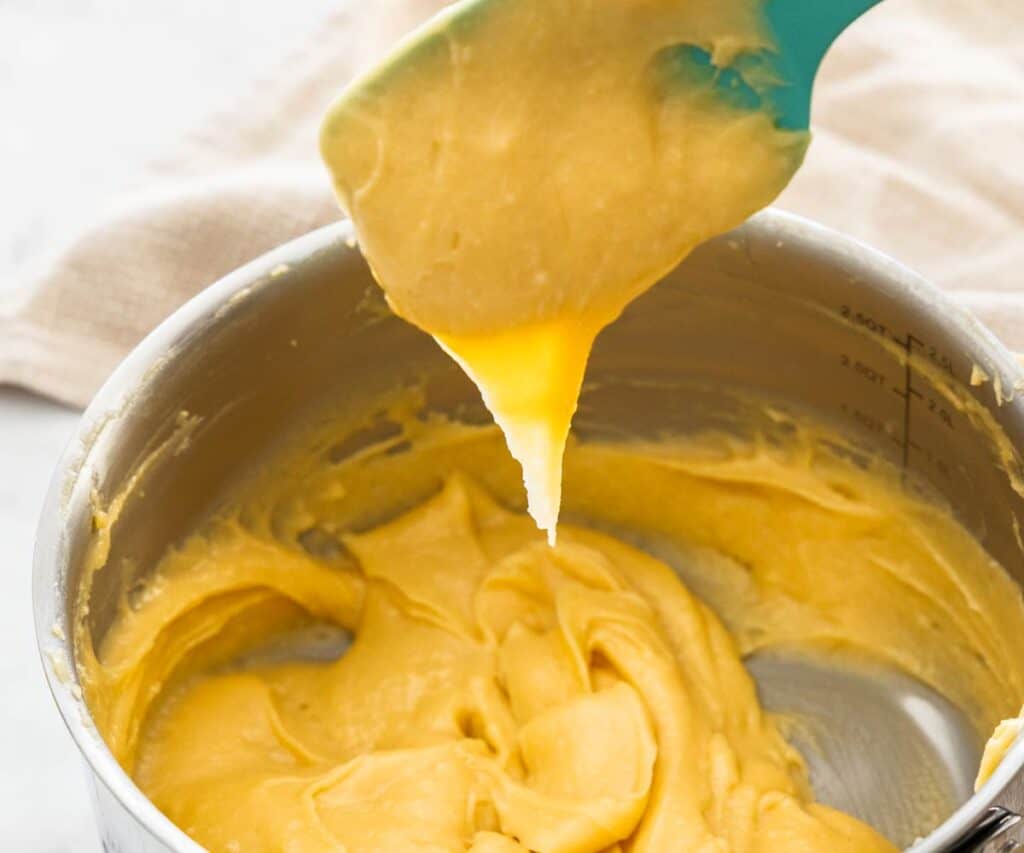
When is choux pastry ready - the visual cues
There are a few visual cues to look for to check if your choux pastry is ready. Cues 1-4 below are the ones I use.
- Smooth and glossy: The dough will be very smooth and have a slight sheen to it.
- The spoon test: Dip a spoon or spatula into the dough and it should reluctantly fall off the spoon.
- The "V" test: When the dough falls of the spoon, it should leave behind a fairly neat "V" of dough hanging.
- The pinch test: Pinch a portion of dough (about 1cm / ½ inch thick) between your thumb and finger. Slowly draw your thumb and finger apart - you need to get to 2 inches with at least a string of dough still intact.
- The trough test: When you draw a line in the dough with your finger, it should form a trough with straight upright edges and hold the shape.
- Pipeable but holding consistency: It should be fluid enough to pipe but not enough to spread out. You can test this by just dropping a small amount onto a plate with a spoon and seeing how well it holds its shape.
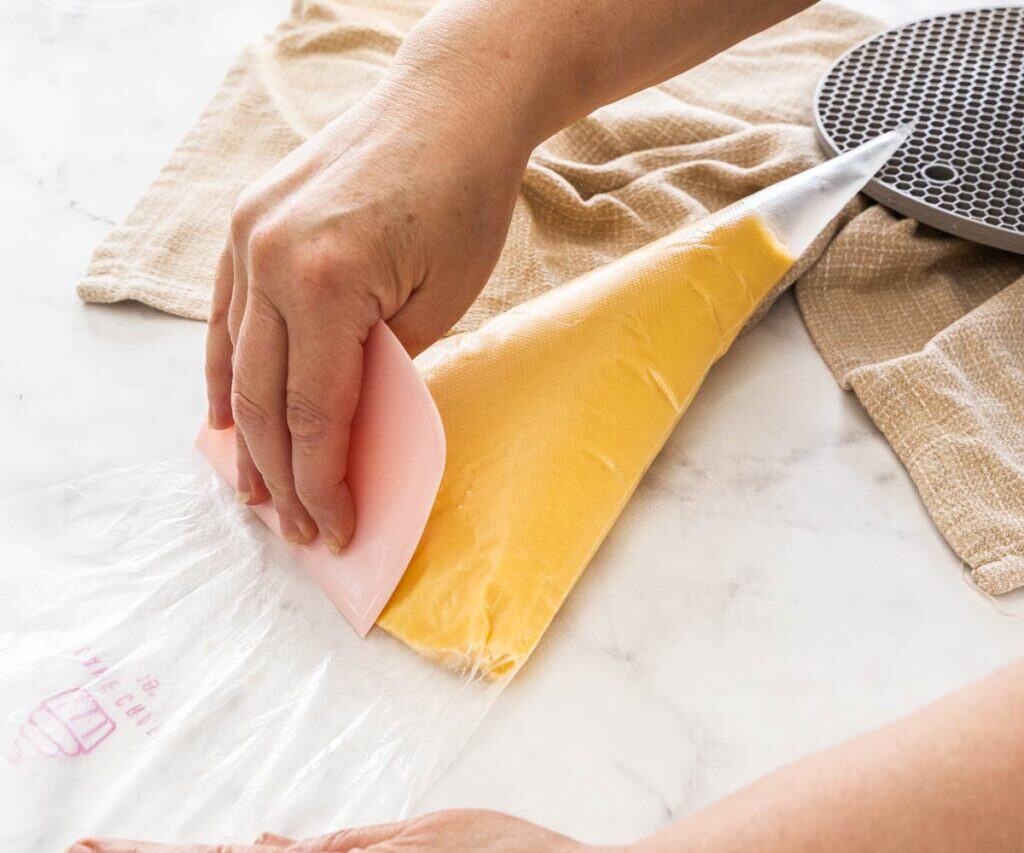
Prepare to pipe
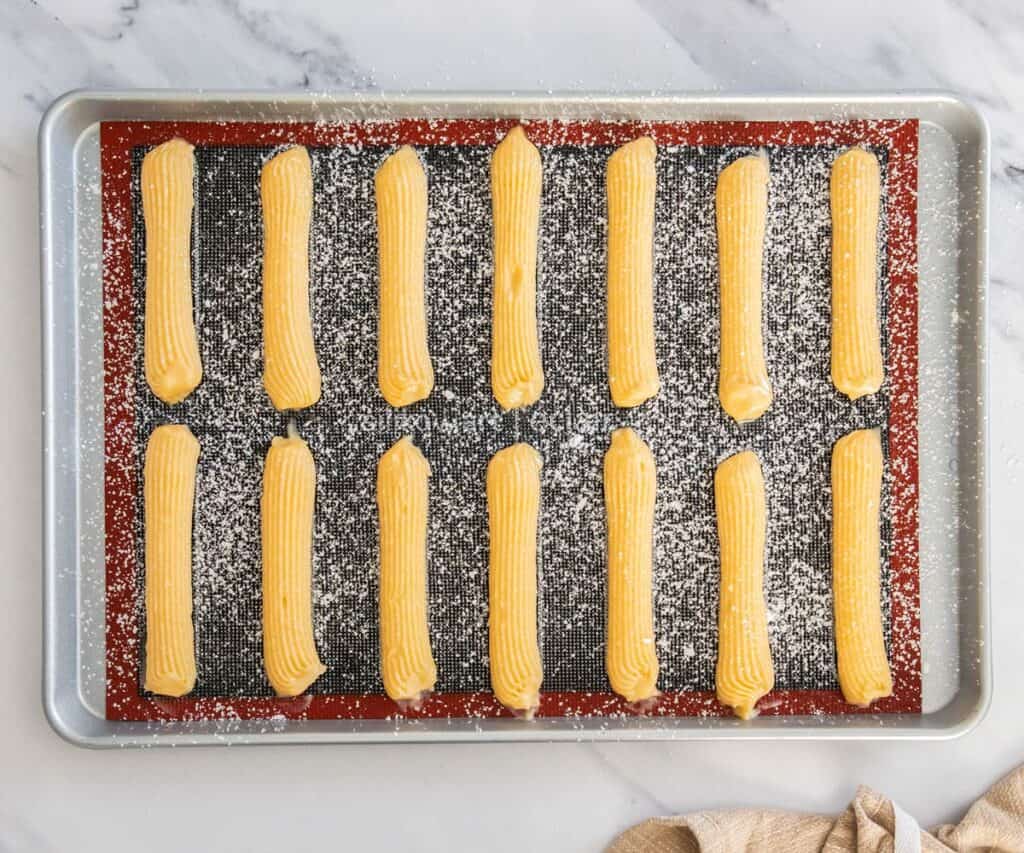
(5 minutes) Transfer your choux dough to a piping bag fitted with a large French star piping tip (1.25cm/½ inch opening). Be careful to avoid air bubbles by filling on one side of the bag and use a bench scraper on the outside of the piping bag while it's lying flat, to drag the dough down. Line a baking sheet with an eclair baking mat or regular perforated baking mat (these are the best options), a regular baking mat or baking paper (can work but not ideal).
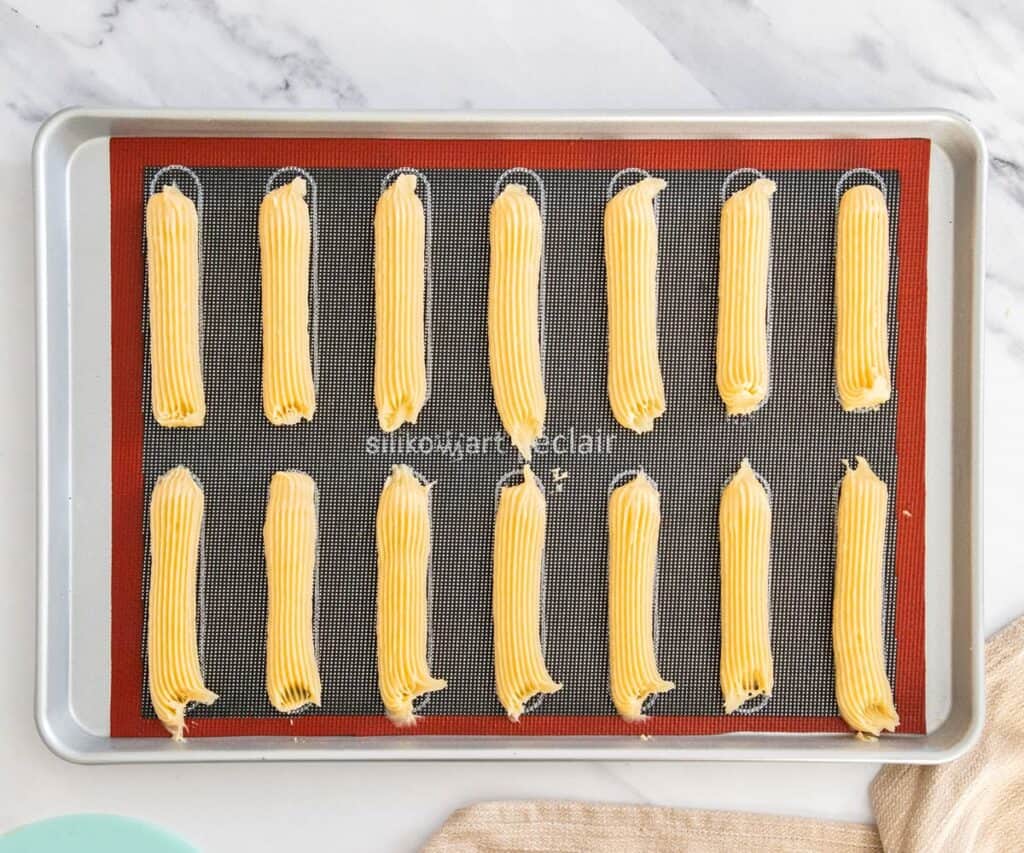
Pipe the eclairs
(5 minutes) Possibly the trickiest part, but practice makes perfect. With the piping bag at a 45° angle, pipe logs of dough onto your baking sheet about 12cm / ~5in long. If your mat doesn't have guides, you can use a piece of cardboard the right length (or the plastic bench scrapers I use are pretty perfect length) to guide you as you pipe. Try to pipe smoothly and move your arms towards you as you do. When you get to the end, press the tip down onto the baking mat, then lift up over the eclair and it should just break off with a small tail.
Save this post!
No spam, I promise 😊
What if I see air bubbles
If you see air bubbles in the eclairs as you pipe them, you can either leave them and know that you might get a crack or blowout at the point during baking, or use the flat sides of 2 dough scrapers, one on either side of the eclair to slide under and lift it off the tray. You can then just pipe a new one in its place.

Neaten the ends
(1 minute) If you have points or rough ends at the ends of your eclairs, just dip your finger in water and gently shape them smooth.
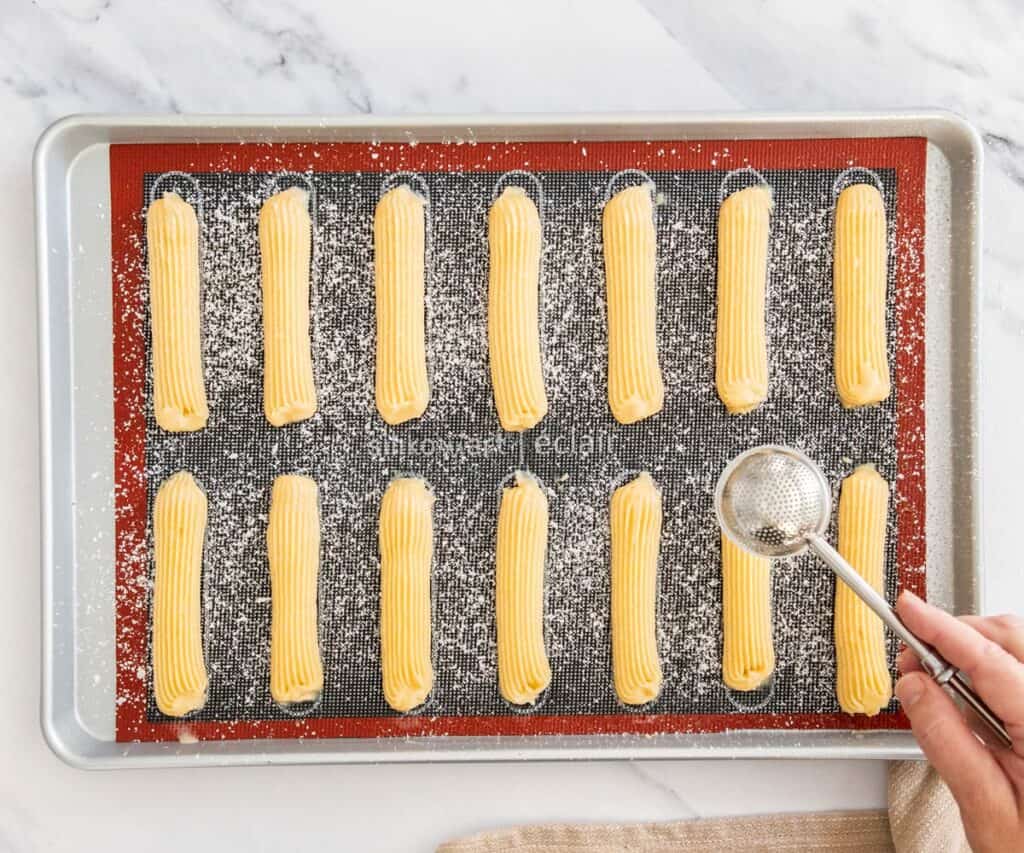
Spray and dust
(1 minute) A great tip to help you get nice smooth eclairs is to spray them with a light spray of oil, then dust them lightly, twice over, with some icing sugar. Don't dust too heavily.
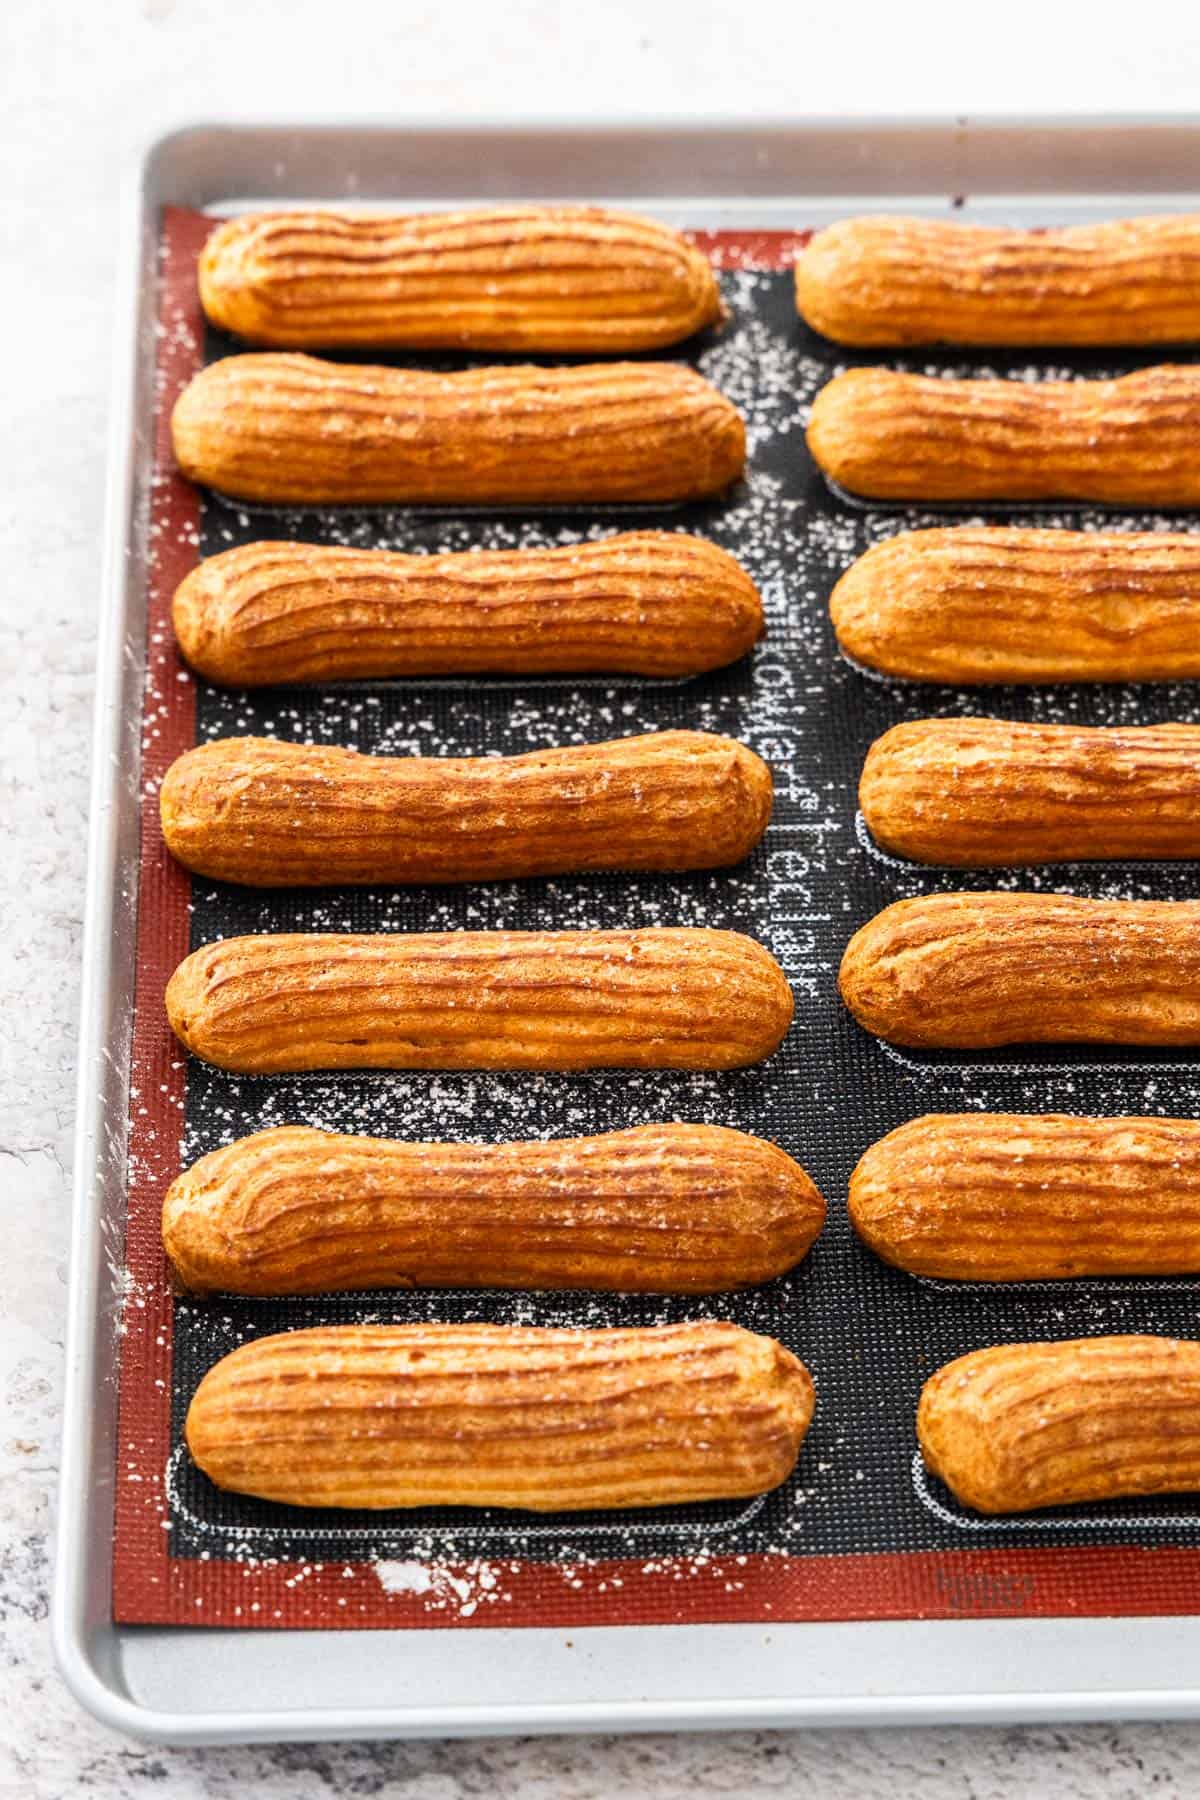
Bake
(35-40 minutes) Place your eclairs into a preheated oven and bake for 35 minutes. Check them, then you may need to bake for another 5 minutes to get them nice and crisp.
Should I use silpat or baking paper?
- I tested many different ways of piping the eclairs onto the baking sheets. By far, the best results came from using a perforated eclair mat or regular perforated baking mat. The eclair mat just gives you guides to pipe in, if you flip it over, it has circles to use for choux buns and chouqeuttes. It allows a buffer and air between the baking sheet and your pastries.
- The second best option is a regular silpat or silicone baking mat. It doesn't allow air but it does give a buffer between the eclairs and the baking sheet.
- When using baking paper or directly onto the baking sheet, it can work but it often results in the a concave base on your eclairs or a wider spread. I can only assume it's because the base is heating too quickly and causes the dough to collapse around it a bit.
Release the steam
(2 minutes) As soon as you can bear to handle them (immediately if possible), or using a tea towel to help, Use a skewer to poke two holes in the base of each eclair (one at either end) and leave them to cool on a wire rack.
Tips and tricks
- Cut the butter into cubes before adding to the milk or it will take too long to melt.
- Don't boil the milk mixture: As soon as you see bubbles, turn off the heat or you'll lose too much liquid through evaporation
- Don't fill your eclairs too early: The filling will cause the choux pastry to soften so don't fill them until a couple of hours before you serve.
- Don't open the oven before 25 minutes or your eclairs may collapse.
- All ovens vary: You can bake a tester if you like first to see how long they take in your oven. Choux dough will quite happily sit and wait until you're ready.
- Using a large French star piping tip will help to reduce cracks.
😥 Troubleshooting
If your choux pastry has air bubbles, they will cause cracks and splits as the eclairs bake. When you fill the piping bag, make sure to fill down one side of the bag, pressing each spoonful of dough directly onto the last. Lay the piping bag down flat, then use your hand push out obvious air bubbles. Use a plastic bench scraper to drag down on the piping bag, pushing the dough together.
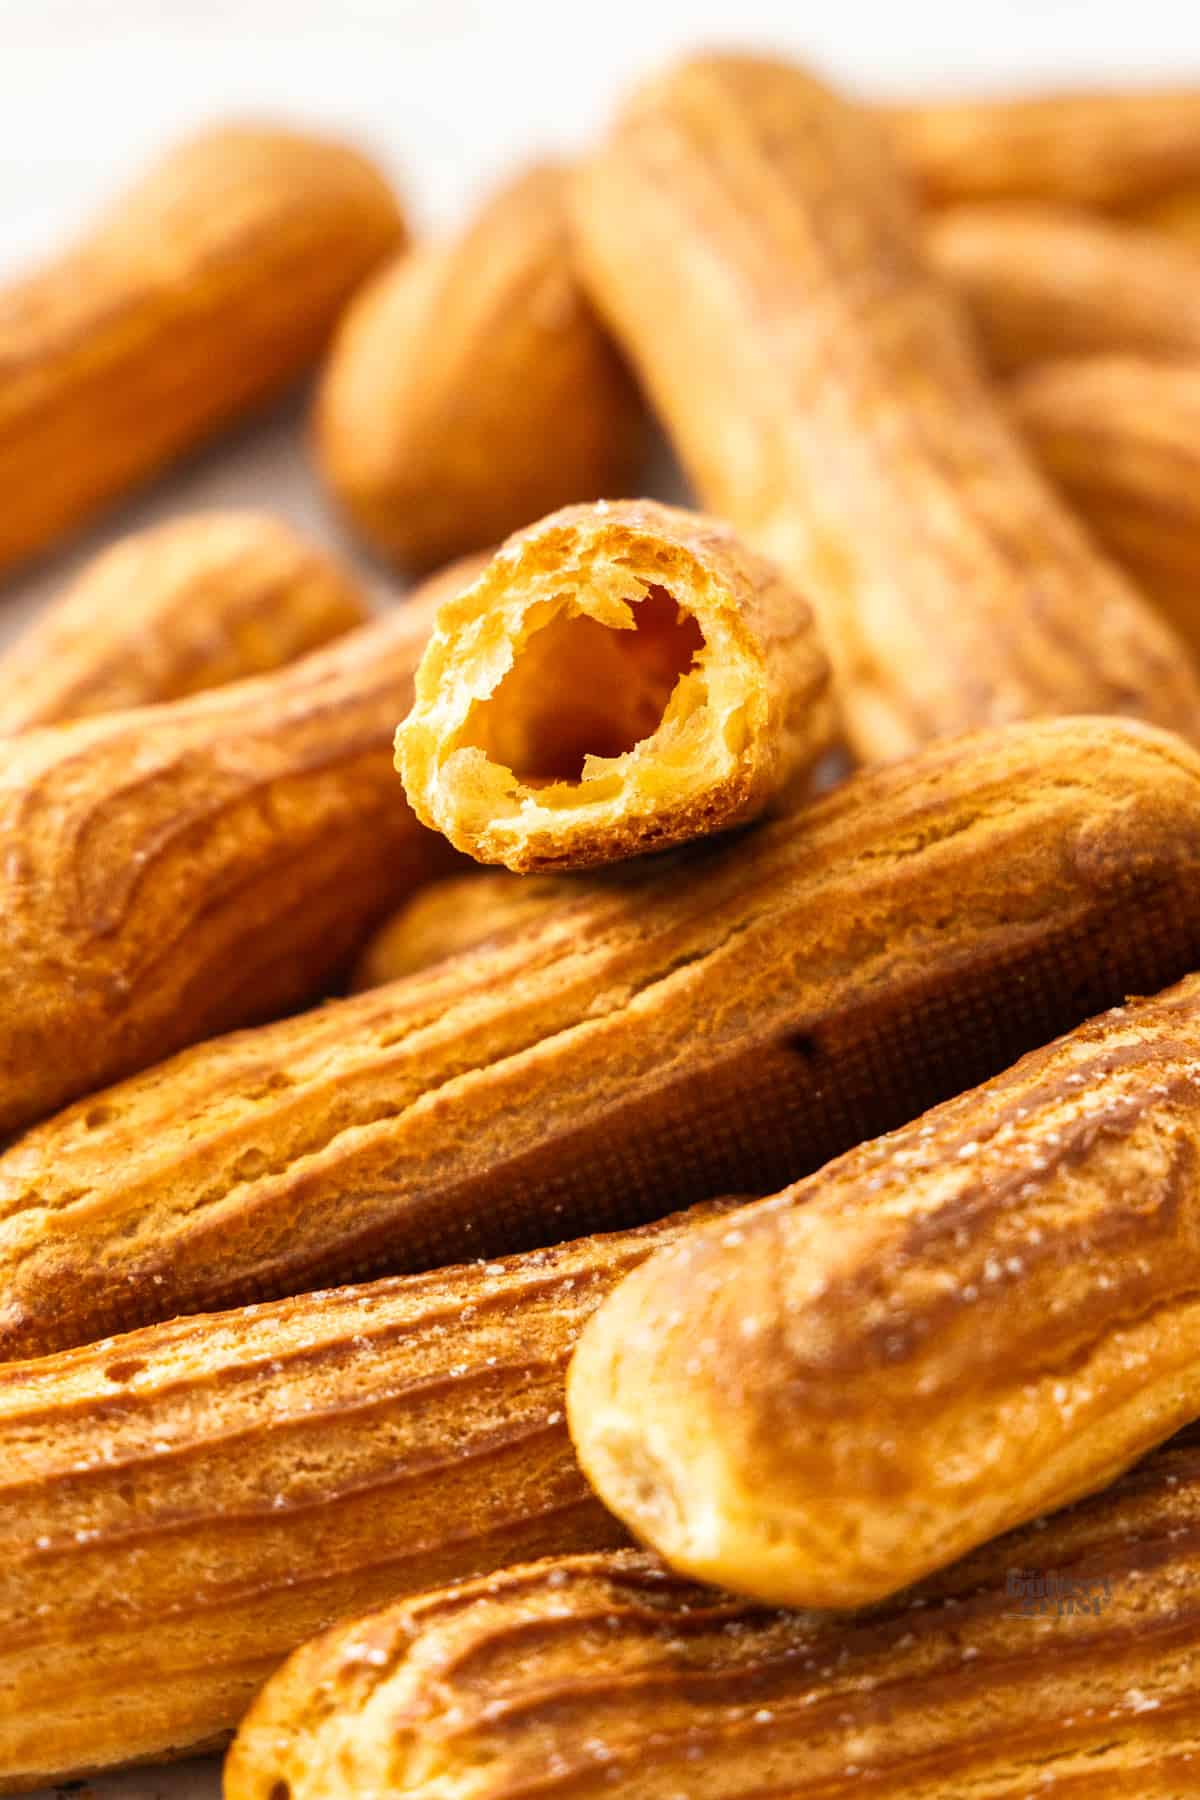
If the shells aren't hollow, the choux dough may have been too wet or the eclairs weren't baked long enough. Too much egg in the dough can prevent the structure from setting properly, while underbaking can leave the interior dense instead of airy.
Collapsed shells are usually a result of removing them from the oven too early (when the structure is not yet set) or not allowing steam to escape after baking. Make sure to pierce the bases of the eclairs with a skewer and leave them to cool on a wire rack so the trapped steam can escape.
Flat eclairs usually means the dough was too loose. This can happen if there is too much egg in the dough or the panade wasn't cooked long enough before adding the eggs. The dough should be thick and pipeable, holding it's shape when piped.
While some cracks are unavoidable, large obvious cracks in the top or sides of your eclairs can happen when there are air bubbles in the dough (that blow out as they bake) or if the surface of the dough dries too quickly in the oven before the éclair expands. Make sure to remove air bubbles before piping and spray the eclairs with oil spray before baking. Dusting with icing sugar adds extra protection from cracking.
Soft shells are caused by underbaking or too much moisture. Eclairs should bake until they are deep golden brown and crisp. They will soften after baking the longer they sit but can be easily re-crisped in the oven.
Poor rise can be caused by several factor including dough that is too stiff, an oven that isn't hot enough, or opening the door of the oven too early. Choux pastry relies on steam to puff, so the oven door needs to stay closed up to at least 25 minutes.
Eclair flavour ideas
- Classic chocolate eclairs: Fill your eclairs with vanilla pastry cream then top with chocolate glaze.
- Chocolate chocolate eclairs: Fill your eclairs with chocolate pastry cream then top with chocolate glaze.
- Rasberry chocolate: Use this raspberry pastry cream and a chocolate glaze.
- Coffee: Add 2 teaspoons of instant espresso powder to the hot milk when making your pastry cream to turn it into a coffee pastry cream then add coffee to a simple icing sugar (powdered sugar) and milk glaze.
- Pistachio: Mix ⅓ cup of pistachio spread into a batch of vanilla pastry cream then add ¼ cup of pistachio spread to ½ cup of icing sugar and milk for a pistachio glaze.


get creative
Try the Custom Choux Recipe Builder
Design your own flavour combinations in your pastry playground
Storage
Eclairs are a great make-ahead dessert.
Unbaked eclairs
Unbaked choux pastry can be stored piped or unpiped;
- In the fridge in an airtight container for up to 3 days,
- or the freezer in an airtight container for 1 month.
Baked, unfilled eclair shells
- At room temperature in an airtight container for 2 days, in a single layer,
- in the fridge in an airtight container for 3-4 days, in a single layer,
- or the freezer in an airtight container for up to 3 months.
Baked eclair shells do lose their crispness very quickly. They can be refreshed / recrisped in the oven preheated to 180C/350F, for 5-7 minutes.
Filled eclairs
Filled eclairs are best served the day they are made or within a couple of hours. Serving them as soon as they are filled is the best way to get perfect choux desserts. If you do have leftovers, their storage time will depend on the filling but most will be fine for 2-3 days in the fridge in an airtight container.
Can I make eclairs ahead of time?
You can make most or all of your components ahead of time, but eclairs are best filled only no more than a couple of hours beofore serving. The filling will cause the pastry to soften. Additionally, the choux pastry will naturally soften over time anyway and if they're filled, you can't then re-crisp the eclair shells in the oven.
- Choux pastry: See the section above for making and storing unfilled choux pastry but they can be frozen for up to 3 months, so plenty of time before you need them. Make sure to re-crisp your eclairs in the oven for 7-10 minutes, then let them cool before filling.
- Custard-based fillings: Most will last 2-3 days in the fridge before use. These will often need a whisk before use.
- Simple glazes, without fruit in them (so just icing, extract, water or milk) will last at room temperature for a week with plastic wrap pressed to the surface. If it has fruit, it will keep in the fridge for 4-5 days. Give it a mix before using.
- Ganache can keep in the fridge 3-4 days. Let it come to room temperature and give it a stir before use.
- Jams, caramel and praline paste last for weeks or months in the fridge.
Tools I use

- Medium heavy-based saucepan: The heavy base makes for even heating.
- Stand mixer: I use a Kitchen Aid stand mixer for beating in the eggs. You could also beat the choux by hand.
- Silicone spatula: So useful for all baking.
- Measuring jug: I whisk my eggs up in this.
- Mini whisk
- Plastic bench scraper: These are so useful for everything from scraping down the bench to pushing dough down in your piping bag to pressing air bubbles out of the dough before loading it into your piping bag.
- Piping bags: For piping the eclairs.
- Large French star piping tip
- Silicone mats: I get the best results using a perforated eclair mat (which has the eclair outlines) or a plain perforated baking mat.
- Half sheet pans: These are the size I always use for my baking.

If you made this eclairs recipe,
be sure to leave a ⭐⭐⭐⭐⭐ rating below. Thank you!
How to make Eclairs (Choux Pastry for Eclair Shells)
Equipment
- Wooden spoon / rubber spatula
- Piping bag
- Perforated baking mat helpful but not essential
- baking sheet
- Large French piping tip
Ingredients
- 160 ml water (⅔ cup)
- 80 ml whole milk (⅓ cup)
- 115 g unsalted butter (4oz / 1 stick)
- 2 teaspoons white granulated sugar
- ¼ teaspoon salt
- 130 g plain flour (all purpose flour) (1 cup, spooned and levelled/~4 ½oz)
- 200-230 g eggs (7-8oz / 4-5 large eggs, see notes)
Instructions
- Preheat oven to 180C / 350F. Line 2 large baking sheets with perforated baking mats (recommended) or, silpats, baking paper/parchment paper.
- MAKE THE PANADE:Combine the water, milk, butter, sugar and salt in saucepan and heat over medium stirring to melt the butter, then allow it to start to bubble.
- Once you see the first bubbles, turn the heat off. Sift in the flour and stir in with the spatula until fully combined.
- Place the pan over low heat and cook for 2 minutes, moving constantly. Fold it over itself then press it out across the pan and repeat for 2 minutes.
- COOL THE PANADE:If using a stand mixer: Transfer the dough to a stand mixer with a paddle attachment and beat on low for 2 minutes.If making by hand: Press the dough out flat over the base of the pan and leave it to cool for 5-10 minutes until it's no longer hot (warm is fine).
- ADD EGGS:Lightly beat 4 eggs together in a jug.
- Add a quarter of the eggs to the panade with one of these 3 methods;- In the stand mixer with paddle attachment and mix on low.- Beat by hand, directly in the saucepan with a silicone spatula or wooden spoon.- Use a handheld mixer on low.
- Continue by adding another quarter of the eggs, beating until fully incorporated. Repeat with the third quarter of eggs.
- With the last quarter of the eggs, add them just a little at a time until you have a dough that is smooth and shiny. It should reluctantly fall from the spoon leaving a "V" shape hanging from it.
- PIPE THE ECLAIRS:Once the dough is the right consistency, transfer it to a piping bag fitted with a large French star piping tip.
- Pipe 14 logs of dough, roughly 12cm/5 in in length, onto your prepared baking sheet at least 1 inch apart. When you get to the end of each one, press the tip down towards the baking sheet, then lift up over the end of the eclair. You will be left with either a little pointed end or maybe a rough end (either is fine).
- Wet your finger, then gently tap the ends of the eclairs where required to neaten them up.
- Give the eclairs a light spray with spray oil, and a light dusting of icing sugar, then a second light dusting of icing sugar.
- Bake for 35 minutes. Check to see if they're crispy or still soft. You may need to bake for a further 5-7 minutes.Do not open the oven before 25 minutes.
- As soon as you remove your eclairs from the oven, poke two holes in the base of each one with a skewer (one hole at either end) then sit them on a wire rack to cool.
- Once cool, your eclairs are ready to be filled but are best filled with an hour two of serving.
- Please take a moment to rate this recipe. I really appreciate it and it helps me create more recipes.
Notes
- How many eggs? With eclairs, the texture is best judged by eye, not by quantity of eggs. Add the eggs until the dough is at the right texture. For me it's between 3 ½ and 4 large eggs but the amount you require will be determined by many variables - egg size, amount of moisture cooked out of panade, protein content of flour and even humidity in the air.
- Store baked eclairs in an airtight container in a cool place, like the pantry for 2 days or fridge for 3-4 days. They can also be frozen for up to 3 months in an airtight container.
- They are only crispy straight from the oven and will begin to gradually soften. You can re-crisp them before filling by placing them in an oven preheated to 180C/350F for 7-10 minutes.
- Don't fill until they're cool.
- Fillings will soften the eclair pastry so they're best filled as close to serving as possible.


Comments
No Comments